The web-based Rally Bonus Planner is / will be a replacement for my Rally Planning spreadsheet that I first started working on back in 2013. Hundreds of rally riders over the years have used my spreadsheet for many different rallies including the Iron Butt Rally. Many top ten riders of past Iron Butt Rallies have also used my spreadsheet. All of the functionality from the spreadsheet will be implemented in the new web-based Rally Planning app. With the new web-based app you will be able to build out and format the the bonus names and then export the bonus list to a GPX file or and Excel spreadsheet. You will start by entering a bonus name for a long-distance motorcycle rally: enter or import bonus locations for each leg, look up their address, timezone, sunrise/sunset and 10-day weather automatically, see them plotted on a map colored by point value, and availability by shape. Export the finished list as GPX file (for a GPS or mapping program) or XLSX (for a spreadsheet).
Benefits of my rally planning web app
I developed the spreadsheet to help me get to routing faster in my mapping programs (now Basecamp), and it has evolved over the past 12 years.
- Easy to import bonus data, including points files from a rally master, and automatically create a GPX file ready for Basecamp or a GPS.
- Easy bonus name creation with bonus code, points, and availability.
- Automatic calculation of time zone, sunrise, and sunset based on latitude and longitude — good information for daylight-only bonuses.
- Easy to tag a bonus's availability: anytime, daylight only, group photo, etc.
- Easy to tag a bonus as part of a combo bonus.
- Automatic bonus symbol selection based on points value and bonus availability.
- Easy to add comments to a bonus that carry through into Basecamp and then your GPS, so you can see them riding up to a bonus.
- A Google Maps link is created for each bonus location — Street View in many cases.
- Generates a formatted GPX file for Basecamp and/or a GPS that includes comments, sunrise, and sunset times.
- Fast entry into Basecamp with the generated GPX file, bonus symbols already set by point value and availability. You can also load the GPX file directly onto a GPS.
The page is organized by rally → leg → bonus. A rally is the overall event (e.g. "2027 Iron Butt Rally"). Each rally has one or more legs (the segments between checkpoints). Each leg has a list of bonuses — the individual bonus locations worth points that you build a route out of for the rally.
Recent updates
A running log of what's changed in the app recently, newest first, in plain language rather than developer notes. Nothing here requires you to do anything — these are all things that just work differently (or are newly available) the next time you sign in.
September 2, 2026
New: route stats now show your total points, plus a Route Info popup with points-per-mile efficiency
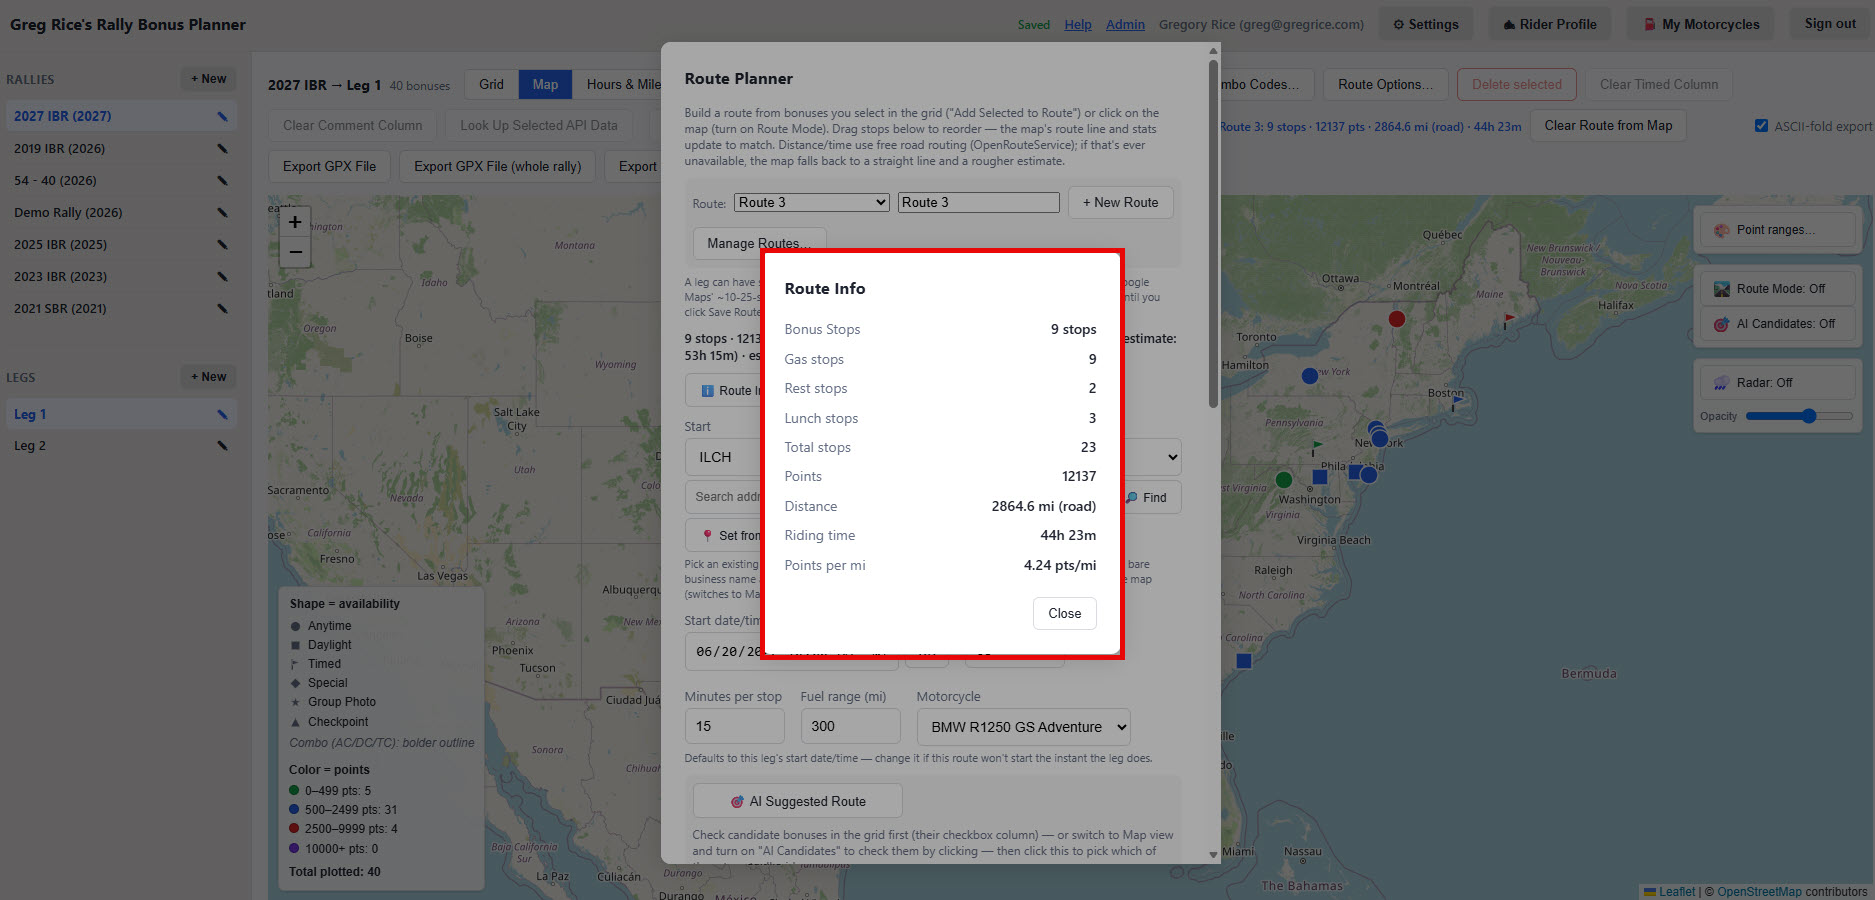
The Route Planner already showed stop count, distance, and estimated ride time — now it also shows a live points total in the stats line, the route summary chip, and next to each stop, updating as you add, remove, or reorder stops. A new ℹ️ Route Info button pops up a clean, screenshot-friendly summary — Stops, Points, Distance, Riding time, and Points per mile — the efficiency number riders and spectators like to compare after a rally. It's also on the printed route schedule now, so it travels with whatever you already save or share.
New: mark a bonus mandatory — AI Suggested Route now guarantees it's included
A new ⭐ column in the bonus grid lets you mark a bonus mandatory — a plain manual toggle, never set automatically, for the bonuses your rally book or the start rider meeting says you must ride. 🎯 AI Suggested Route now treats every starred bonus as a hard requirement, seeding it into the route first so a 5-point mandatory bonus can no longer get edged out by a 500-point optional one. If a mandatory bonus genuinely can't fit, or has no coordinates on file, you're told clearly instead of finding out from a route that's quietly missing it.
New: AI Suggested Route warns you if a Daylight-only bonus is missing its sunrise/sunset lookup
If any candidate bonus is Daylight-only and its sunrise/sunset was never looked up, AI Suggested Route now warns you before the search even runs — naming the bonuses, so you can cancel and run Look up selected/missing first, or continue knowing the search will treat them as unrestricted. The completion popup also flags the total number of schedule warnings, so a missed daylight window is never something you'd only notice by scrolling down.
Switched the road-routing engine to OpenRouteService — the stop cap is now 50 (was 25)
Road routing for the Route Planner moved from the free OSRM demo server to OpenRouteService, which comes with a documented, reliable free tier instead of an informal best-effort one — and supports far more stops per route. The app's own stop cap went up accordingly, from 25 to 50, so a longer multi-day leg no longer needs to be split into several routes just to fit. You'll also see a live warning as you approach the new 50-stop limit, the same way the old 25-stop warning worked.
New: bulk-delete several saved routes for a leg at once
A Manage Routes… button next to + New Route in the Route Planner opens a checklist of every saved route on the current leg, with Select all and Delete Selected — handy after importing several route options from a rally book leaves a leg with more saved routes than you actually want to keep.
Fixed: Recalculate/Optimize Route could hang forever
Right after leg locations shipped, Recalculate Route or Optimize Route could sit on "Calculating…" forever and never finish. The underlying cause was a server-side session-locking issue that could let one slow request block every other request in the same browser tab — fixed across every part of the app that could trigger it, not just the route planner.
Fixed: road-route calculation was failing for everyone
A leftover duplicate function definition on the server was causing Recalculate Route and Optimize Route to fail outright with a server error, for every rider, every time. Fixed.
Documented: exactly what AI Suggested Route does (and doesn't) take into account
The AI Suggested Route help section now spells out precisely what feeds into a suggested route — rider profile settings, fuel range, rest/lunch rules, Timed/Daylight windows, riding intensity — and what doesn't (gas stations, traffic, elevation, combo codes), plus how it differs from the separate Optimize Route button.
New: PDF import now falls back to OCR for scanned bonus books, plus one-click host-hotel autofill
Some rally books print their Bonus Listing pages as flattened images with no real selectable text — importing one used to come back empty. PDF import now recognizes that and reads those pages with OCR automatically. Separately, the leg edit popup's Start/End location fields each got a From PDF… button that reads the host hotel's address straight off a chosen rally book PDF and looks it up for you — no retyping needed.
New: a Route Options reference list, imported straight from the rally book, with one-click "Import as Route"
Many rally books define predefined route options — ride every bonus on the list, claim a lump-sum bonus. A new Route Options… button imports these straight from the PDF and shows each one's code, mileage, points, and full bonus checklist, right next to your own grid. Every option also gets an Import as Route button (and there's an Import All as Routes for the whole list) that turns it straight into a real, saved Route Planner route — no manual re-selecting bonuses required.
New: import now catches duplicate bonus codes before adding them
Appending an imported file to a leg that already has some of those same bonuses now warns you first, with a choice: skip the duplicates, replace the existing rows with the new import, or append everything anyway.
Big accuracy jump: OCR switched from Tesseract to Google Cloud Vision
The free in-browser OCR engine (Tesseract) that reads scanned bonus book pages was flagging over 70% of imported bonuses as low-confidence — too many to be a useful "check these few" signal. Switched to Google Cloud Vision, which reads noticeably more accurately — and, as a bonus, pages now get OCR'd several at a time instead of strictly one after another, so a big rally book imports faster too.
Six different rally-book layouts now supported
The importer started out recognizing two bonus-book page layouts. Real rally books kept turning up new ones, and each is now supported: a two-column flag-icon layout, a no-points layout (points come from a separate file), a fixed-position layout with no text labels to match on, and a labeled-row layout with everything spelled out in text. Whatever layout a book uses, import now tries all of them (fastest first) before ever falling back to OCR.
Several smaller import/OCR reliability fixes
- A coordinate reading that comes back numerically valid but implausible (near the North Pole, say) now gets flagged for review, the same as a missing field.
- Fixed a rare case where a coordinate's OCR misread could silently drop the entire bonus from the import instead of just misreading it.
- A PDF that had already been run through a different OCR tool before importing (leaving garbled but present text behind) now correctly falls back to this app's own OCR instead of trying to read the garbled text as-is.
- An import that's clearly never going to succeed now fails fast, after sampling a handful of pages, instead of running (and billing) a full OCR pass on every page of a doomed import.
- Availability text the importer doesn't recognize as a structured value (a specific calendar date, a business-hours notice) is now kept in the bonus description instead of silently discarded.
- OCR misreading a bonus code's digit "0" as the letter "O" is now caught and corrected automatically — flagged in the Import Flag column so it's still easy to double-check — without touching codes that are genuinely all letters (MANGO, CHACO, and the like).
New: a clear ⚠ Flag column and "trust but verify" reminders for imported/OCR'd data
Anything OCR flags for a closer look (a missing field, a low-confidence coordinate, an implausible location) now shows up in its own ⚠ Flag column with a specific reason and PDF page number — instead of a generic note stuffed into the Comment field, which used to leak into GPX/KML exports and your GPS unit. The welcome popup and a post-import notice both remind you that imported and OCR'd data is a starting point, not a guarantee — always double-check against the real rally book before riding on it.
Fixed: correcting a bonus's coordinates now refreshes its cached timezone/sunrise/sunset
Hand-correcting a bonus's Lat or Lon in the grid used to leave its cached timezone, address, and sunrise/sunset stale — computed from the old coordinate, with no visual sign anything was wrong. Editing a coordinate now clears those cached fields so they get picked up automatically on the next Look Up API Data pass.
Fixed: a leg's saved location now reaches Hours & Miles and the Map page too
A leg's saved Start/End location (from the leg edit popup), the Hours & Miles Checkpoints table, and the Map page's own start/end markers used to be three separate, disconnected places to enter the same real-world hotel or gas stop. Entering a location in any one of them now fills in the other two automatically — only when they're still blank, so anything you've already entered yourself is never overwritten.
Clearer divider between Rallies and Legs in the sidebar
As a rally grows a few legs, the Legs list used to run right up against the Rallies list above it with no visual break. There's now a clear divider between the two sections.
New: full database backup on the admin page
A ⬇ Download Database Backup link on the admin page streams a complete SQL dump of every table — schema and data — ready to restore through phpMyAdmin.
New: a much fuller rider overview table on the admin page
The admin rider table grew from a handful of columns to nearly two dozen: Logins, Rallies, Legs, Bonuses, Flagged (bonuses still carrying an unreviewed import flag), Routes, whether a rider has ever set up a Rider Profile, and how many motorcycle profiles they've created — a much fuller picture of how each rider is actually using the app.
Rider/Email/status columns now stay pinned while scrolling on the admin page
With so many more columns, scrolling right on the admin page to see usage numbers used to lose track of whose row you were even looking at. Rider, Email, and the online-status dot now stay pinned to the left edge no matter how far right you scroll.
A handful of admin-page readability fixes
- The "Reading the columns" explanatory text on the admin page is bigger, and now stretches the full width of the table instead of hugging the left edge in a narrow column.
- A rider's login history date is fully visible again — it used to get squeezed down to an unreadable stub by the frozen-column styling.
New: the ℹ️ Route Info popup now shows projected gas/rest/lunch stops
The ℹ️ Route Info popup adds four more rows once you've clicked 📅 Build Route Schedule for the current route: Gas stops, Rest stops, Lunch stops, and a Total stops row adding those to your Bonus Stops count — the same rest/lunch/fuel projection Build Route Schedule already builds from your motorcycle's fuel range and the rally/leg's rest & lunch rules, just summarized here too. Haven't built a schedule yet? The popup shows a Build Schedule Now button in its place — click it and the popup refreshes with the real counts.
August 28, 2026
Help file: documented what happens when you delete and re-import bonuses
Added an explanation, in Selecting & deleting rows, of what deleting a bonus actually does and what re-importing the same rally book afterward does (and doesn't) restore — including how it can affect a saved route's stops or Start/End location if any of the deleted bonuses were used in one.
August 25–26, 2026
New: each leg can save its own start/end hotel location
The leg edit popup now has Start location and End location fields — usually the hotel a leg begins or ends its overnight stop at. Type an address, click Look up, and it geocodes and saves the coordinates along with it.
- Once a leg has a saved location, opening that leg — or clicking New route for it in the Route Planner — automatically fills in the route's Start/End points from those saved locations, so you're not re-typing or re-searching the same hotel address every time you plan a route for that leg. You can still change or clear either one for a specific route same as before.
- Since the hotel a leg ends at is usually the very same hotel the next leg starts from, saving a leg's end location now automatically fills in the next leg's start location too — but only if that next leg doesn't already have its own start location saved, so nothing you've entered yourself ever gets overwritten. If you have an existing rally and want this to catch up on legs you set up before this update, just open an earlier leg and click Save (no changes needed) to push its end location forward.
Hours & Miles: new per-leg columns, and a totals fix
The Hours & Miles Legs table has five new columns showing each leg's real totals, not just the daily rate you type in: Rest hrs, # Gas stops, Gas stop hrs, # Bonus stops, and Bonus stop hrs — each one correctly accounts for legs that span more than one day.
- The Rally totals row now correctly sums Rest hrs/day, Gas stops/day, Gas stop min, Bonus stops/day, and Bonus stop min across all your legs — 4 rest hours on Leg 1 + 4 on Leg 2 + 4 on Leg 3 now shows 12, not 4. Avg MPH, Avg MPG, and Fuel $/gal still show an average across legs, since adding those together wouldn't mean anything.
- Every column on the Hours & Miles Legs table is now centered, to match the layout of the original spreadsheet. The separate Checkpoints table (addresses and coordinates) is unchanged.
Fixed: Hours & Miles now stays in sync with your legs
- Editing a leg's start or end date now automatically updates its matching Hours & Miles block to match, instead of leaving you to copy the dates over by hand.
- Fixed a rare bug where editing an already-saved leg could silently shuffle the internal order of your legs, which could in turn make a leg's Hours & Miles numbers — or its Out of range flag — show up matched to the wrong leg.
- Fixed a bug where clicking the Hours & Miles tab could show a completely blank screen instead of the worksheet.
Help file: documented the Out of range flag
Added an explanation, with screenshots, of the Range column in the grid and the dimmed map markers it's paired with — see The bonus grid and Map view.
Creating an account
From the sign-in screen, click Need an account? Sign up. Enter your email, a password, and your name, then click Sign up. You'll be signed in immediately and dropped into the main app with an empty rally list.
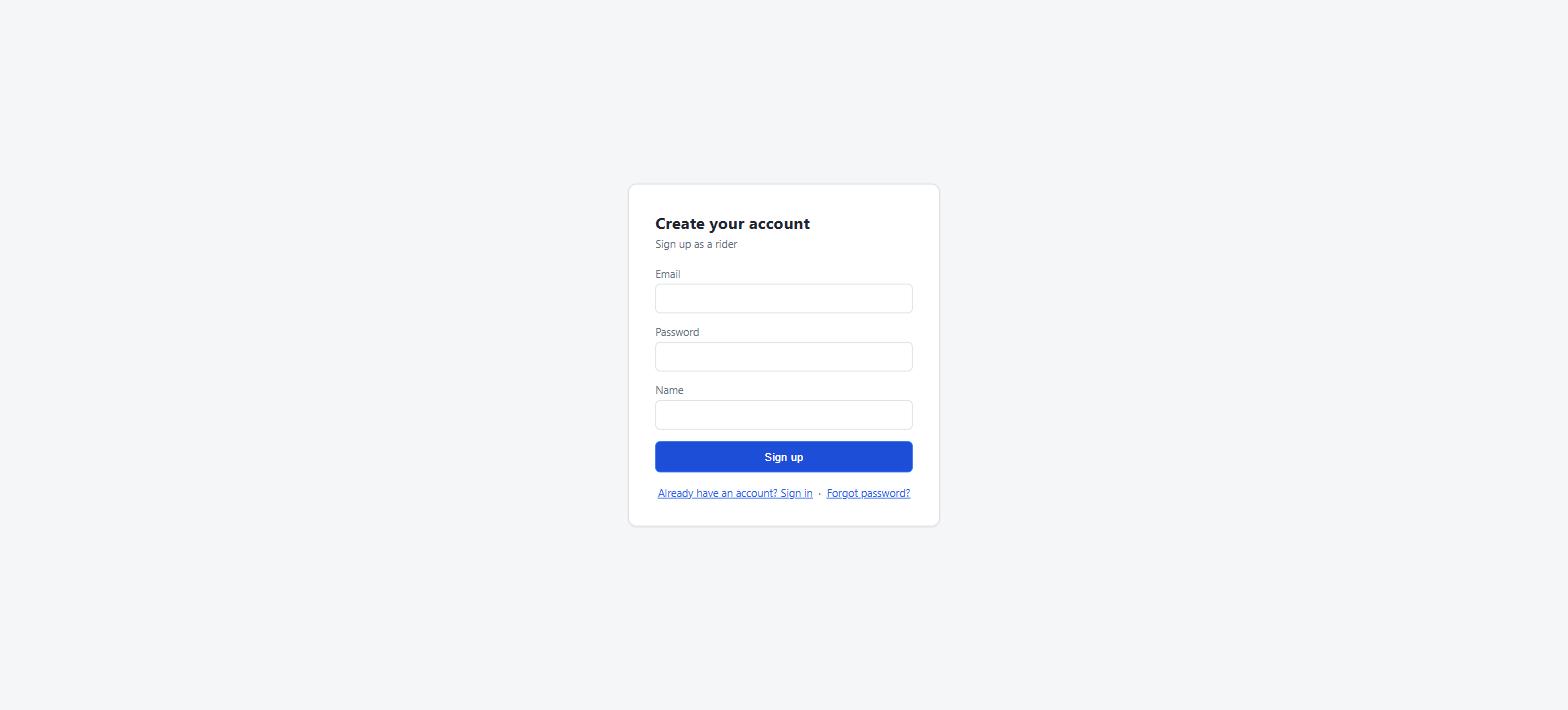
New accounts sign up as a regular rider. If you need admin access (to manage other users, see below), ask an existing admin to promote your account from the admin portal.
Signing in
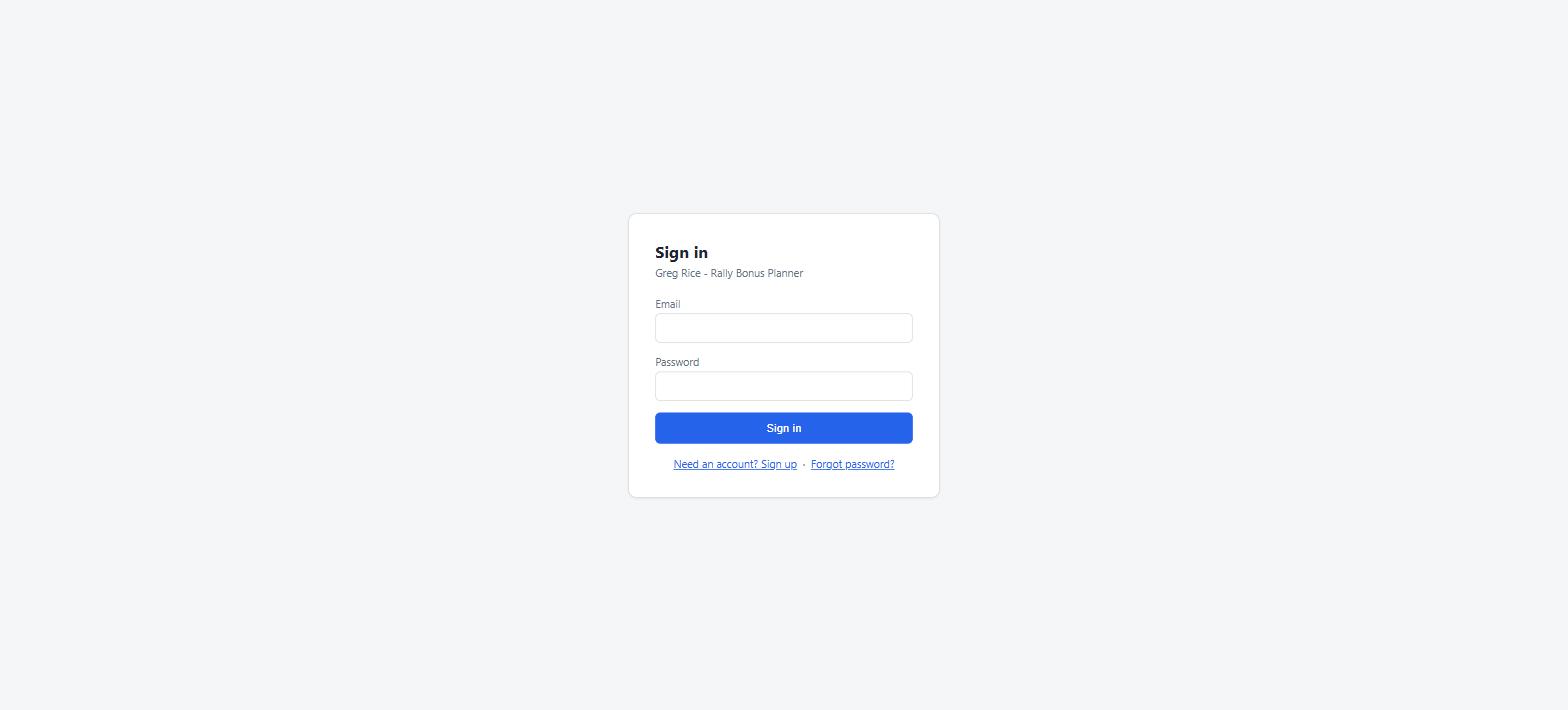
Enter your email and password on the sign-in screen and click Sign in. Forgot your password? Use the Forgot password? link to request a reset email.
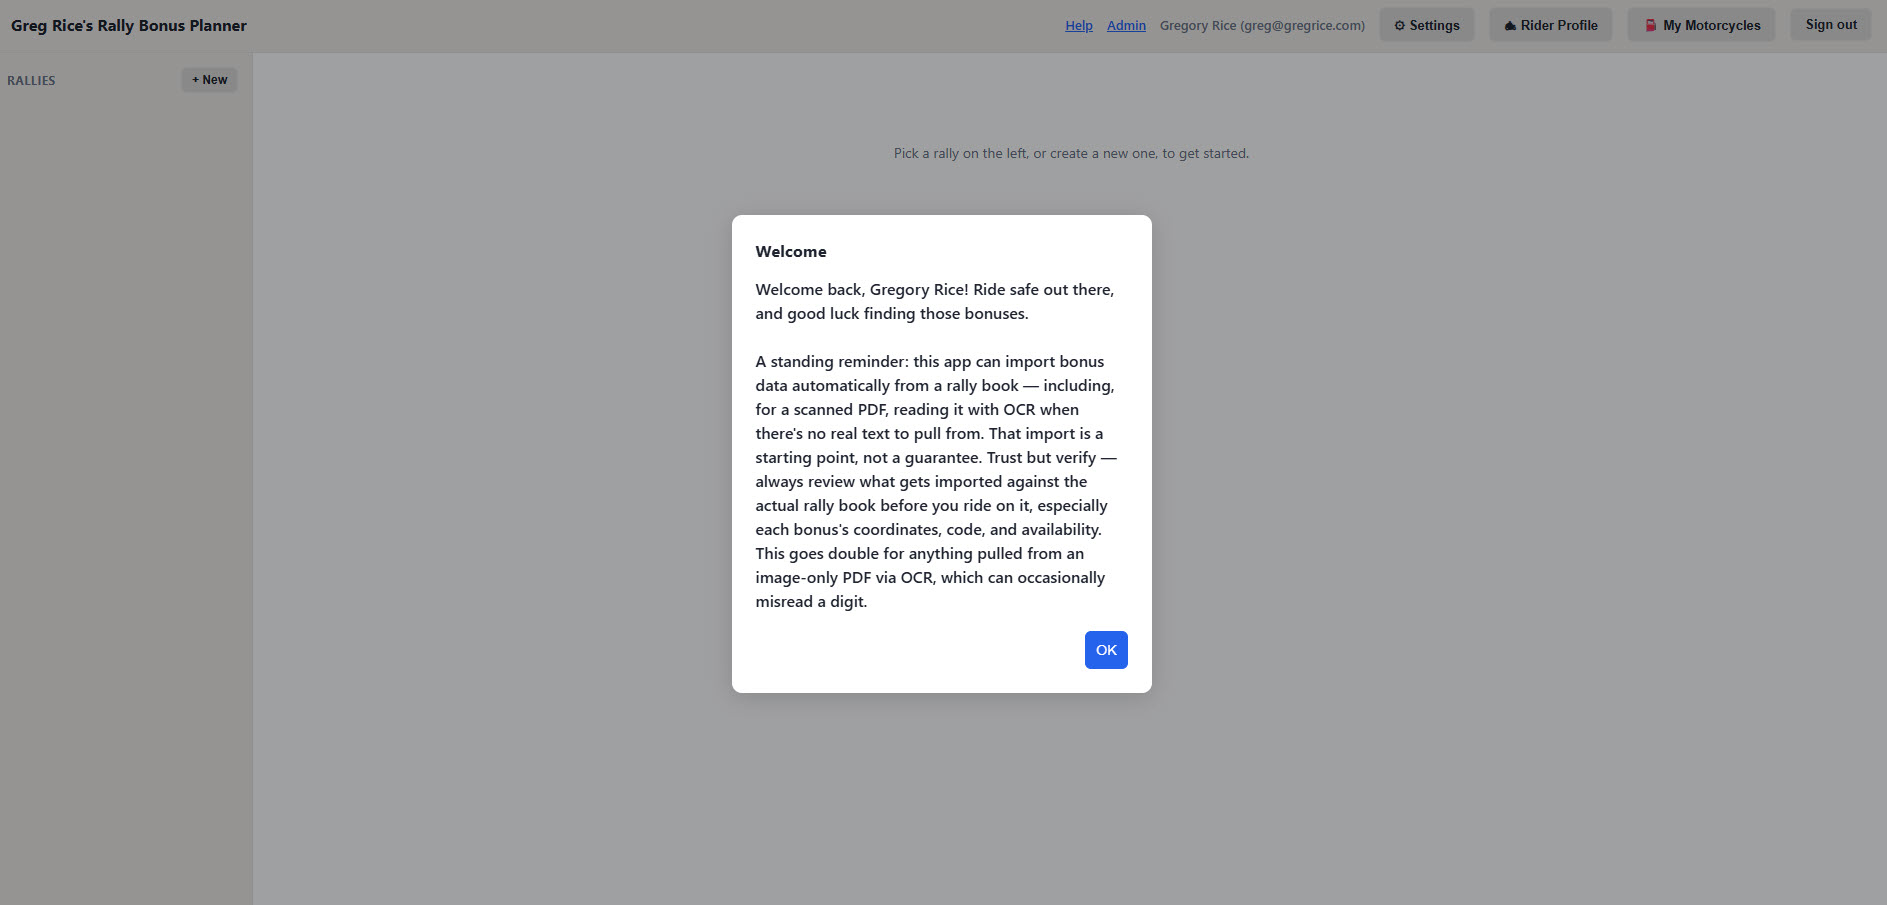
Every time you sign in, a Welcome popup greets you by name and repeats a standing reminder: anything the app imports automatically — especially OCR'd data from a scanned rally book PDF — is a starting point, not a guarantee. Click OK to dismiss it and get to your rally list.
How the app is organized
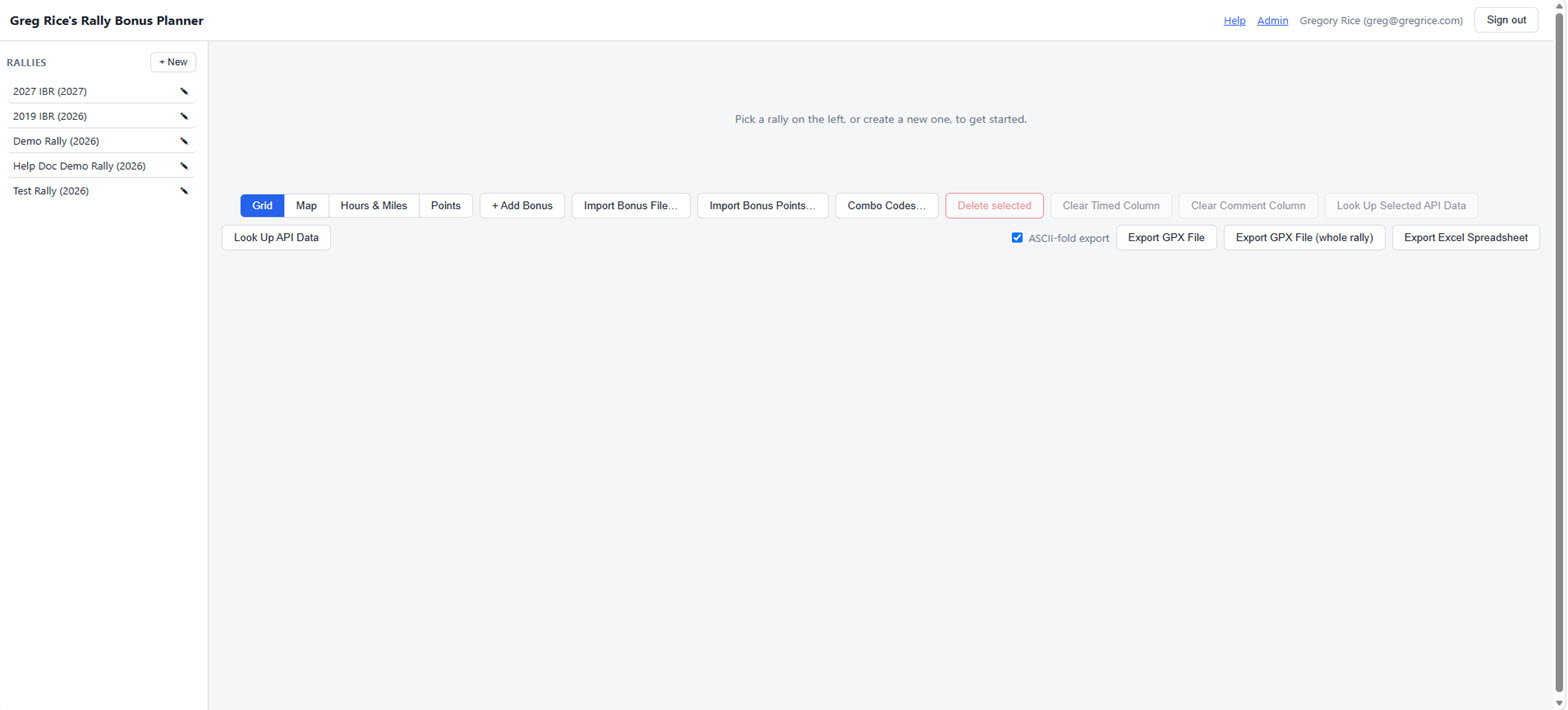
Everything lives under three levels, shown in the left-hand sidebar once you're signed in:
- Rallies — the top-level events you're planning for(eg.. 2027 Iron Butt Rally ). Click + New under "Rallies" to add one.
- Legs — appear once you select a rally. Each leg is a part of a rally which you would create a route with its own start/end time, used to calculate sunrise/sunset for bonuses on that leg.
- Bonuses — appear once you select a leg, in the grid on the right. This is where you'll spend most of your time: entering codes, coordinates, points, and availability.
Units & time format
Click ⚙ Settings in the header to choose Imperial (°F, mph, miles, gallons) or Metric (°C, km/h, kilometers, liters), and 12-hour or 24-hour time. This covers riders outside the US planning a rally in kilometers and Celsius.
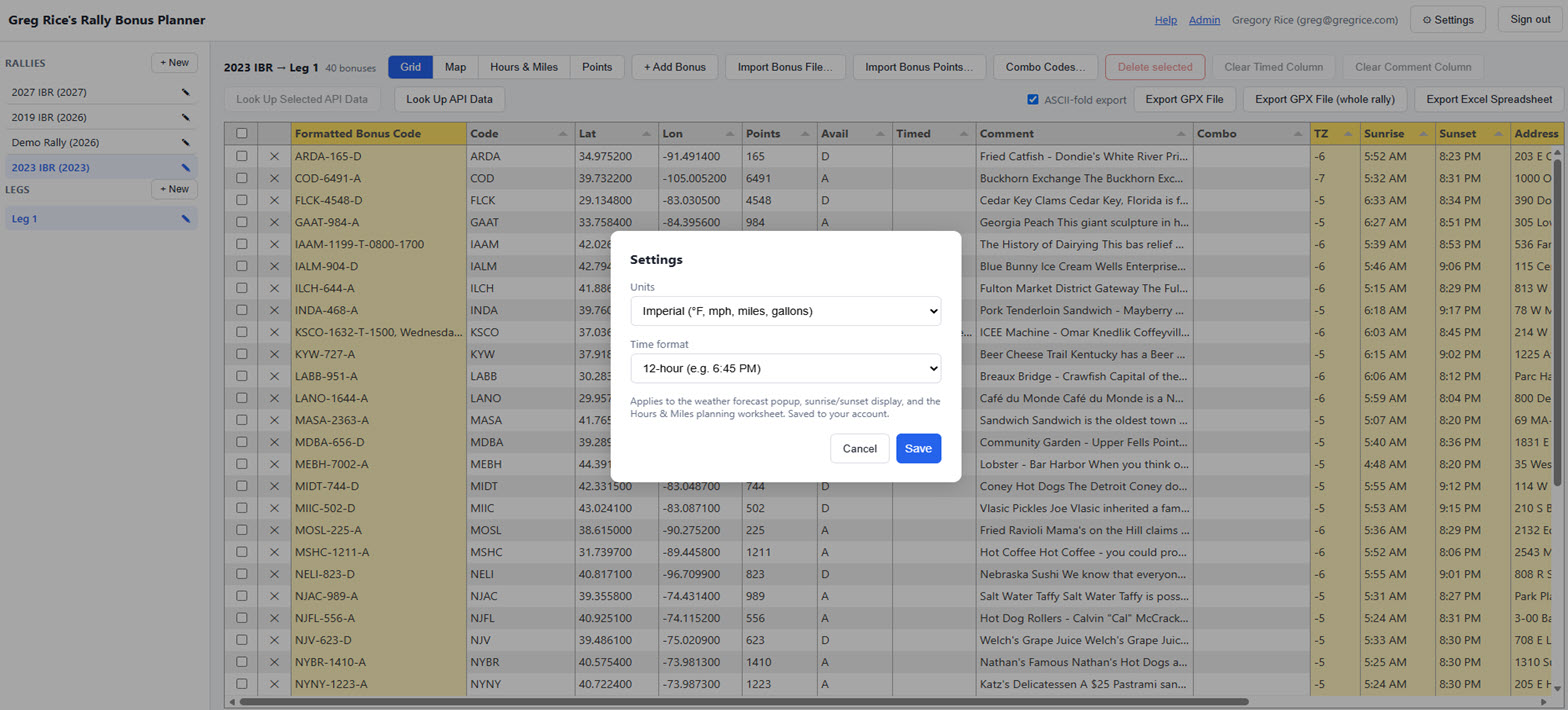
Units affects the weather forecast popup's temperatures and the Hours & Miles worksheet's speed, distance, and fuel columns (Avg moving MPH/MPG, Miles, Gallons become Avg moving km/h, Avg km/L, Km, Liters). Time format affects every place sunrise/sunset is shown — the grid columns, a bonus's popup, and GPX/XLSX export previews.
Both are saved to your account, so they follow you to any device you sign in from. Changes apply immediately — no need to reload the page.
Using this app in another language
This app is only written in English, but riders outside the US can use their browser's built-in page translation to view it in Spanish, French, German, or any other language — the whole page, including the bonus grid, buttons, and popup messages, gets translated automatically.
In Microsoft Edge or Google Chrome, right-click anywhere on the page and choose Translate to [your language] from the menu. You can also click the translate icon that appears in the address bar on some pages, or open the browser's Settings and set a preferred language so pages translate automatically going forward.
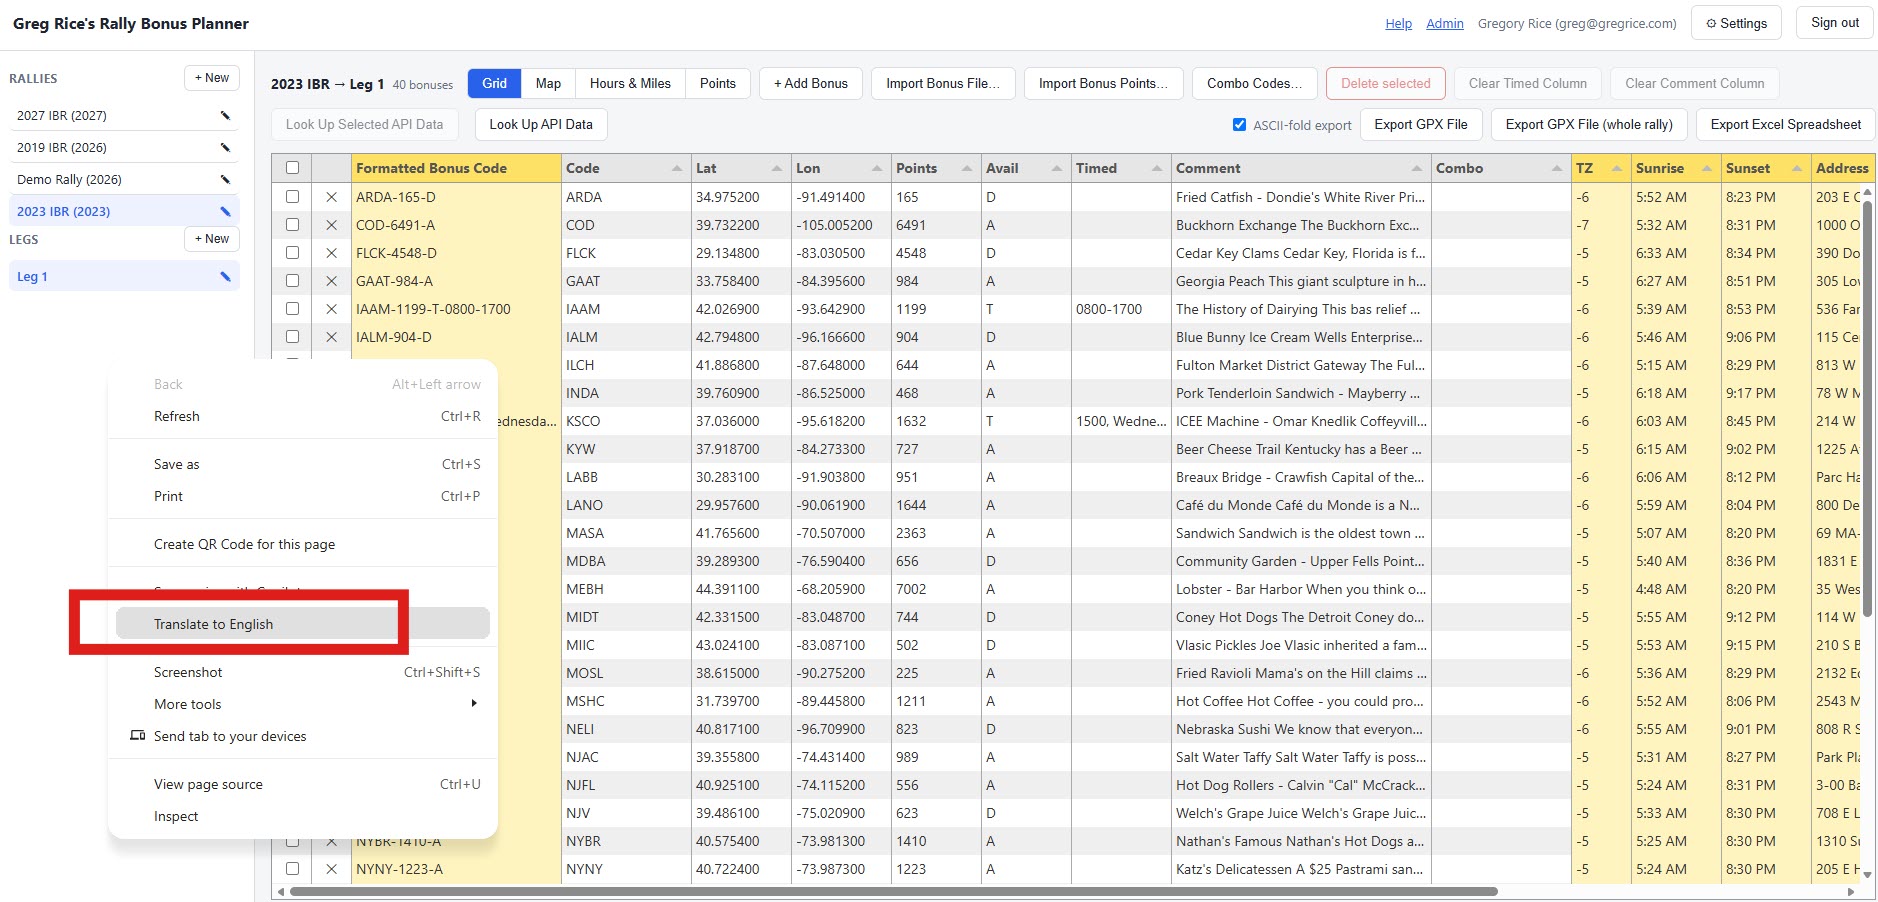
Translation works well for the page itself, but a couple of things may not translate: text inside tooltips (like the column header tooltips), and any emails the app sends (like a password reset link) — those stay in English unless your email program offers its own translation.
Rider profile
Click 🏍 Rider Profile in the header to record how you like to ride: your night-riding and bad-weather/rain tolerance, average moving speed, how often and how long you like to stop and rest, how hard you push daily mileage (relaxed/moderate/aggressive), and how much sleep/off-bike rest you need each day. This is saved once to your account — not per rally — and feeds the route planner's Build Route Schedule feature (see Building a route below).
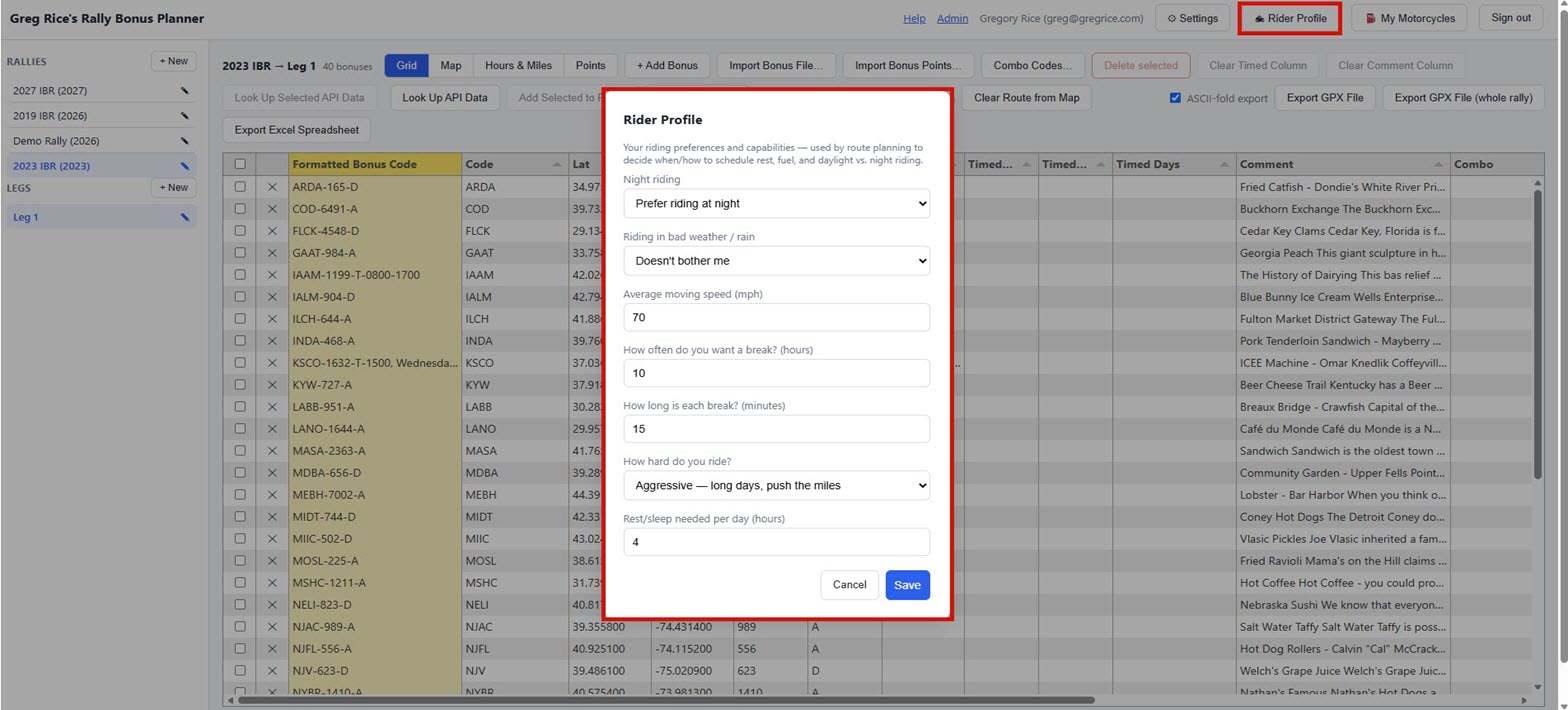
Average moving speed is worth a closer look, since the app asks for it three different places and a few riders have written in wondering if they mean three different things. They don't — all three are your speed only while the bike is actually moving. Rest, fuel, meal, and bonus-stop time are never blended into any of them; the app already tracks those separately and adds them on top wherever it estimates a schedule. The Route Planner's own Avg moving speed field is this exact number, pre-filled here but editable per route, and the Hours & Miles worksheet's Avg moving MPH column is the same idea again — just a separate number you type in per leg rather than one pulled from this profile, since a leg's real moving speed can vary rally to rally (traffic, terrain, weather) more than your personal baseline does.
None of this is required — leave the defaults if you'd rather not fill it in, and creating and saving routes works exactly the same either way. It only changes anything once you click Build Route Schedule.
My motorcycles
Click ⛽ My Motorcycles in the header to keep one or more fuel-range profiles — main tank and auxiliary tank capacity, average fuel consumption, a fuel reserve you never want to plan below, and a safety buffer percentage on top of that. Mark one Default motorcycle and it pre-fills automatically — motorcycle, fuel range, average speed, and minutes per stop — when you start planning a new route. Every field here (tank sizes, fuel consumption) follows your Units setting: imperial shows gallons/MPG, metric shows liters/L per 100km.
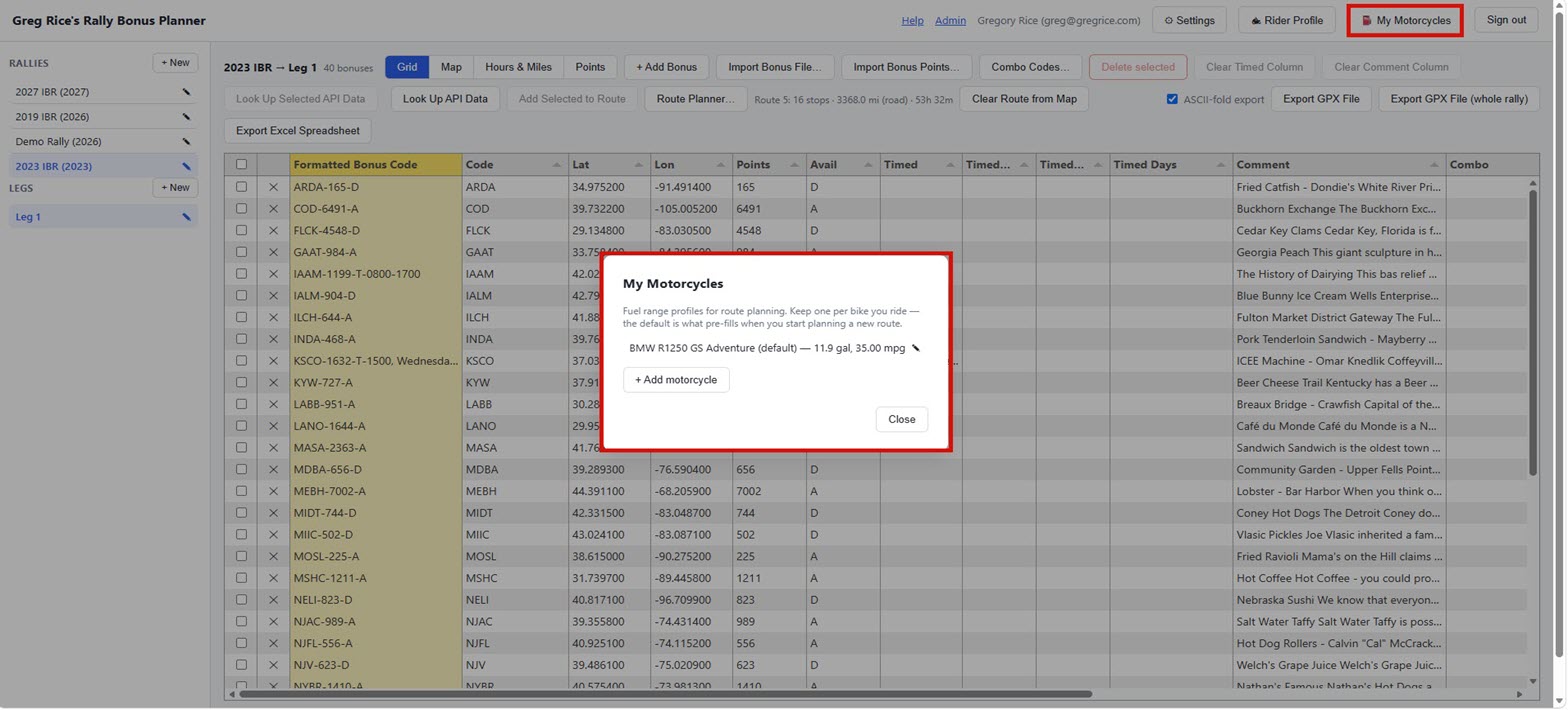
Click a motorcycle to edit it, or + Add motorcycle for another.
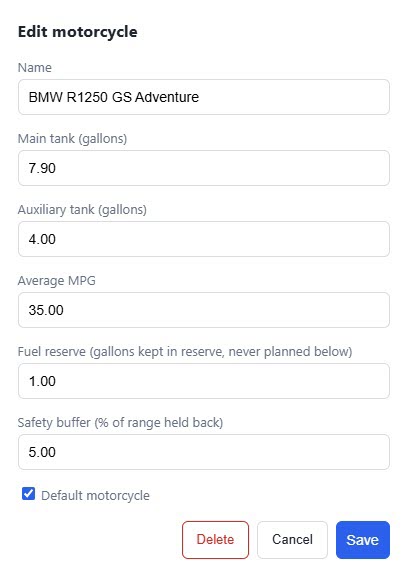
Like the rider profile, this is optional — the route planner's own Fuel range (mi) field works fine on its own without picking a motorcycle here. Picking one attaches it to the route (so you know which bike it was planned for) and fills in Fuel range for you — usable tank capacity (main + auxiliary, minus your fuel reserve) times average fuel consumption, minus your safety buffer — recalculated any time you switch bikes. You can still type over it with your own number afterward if you'd rather.
Creating a rally
Click + New above the rally list, give it a name and (optionally) a year and notes, then Save.
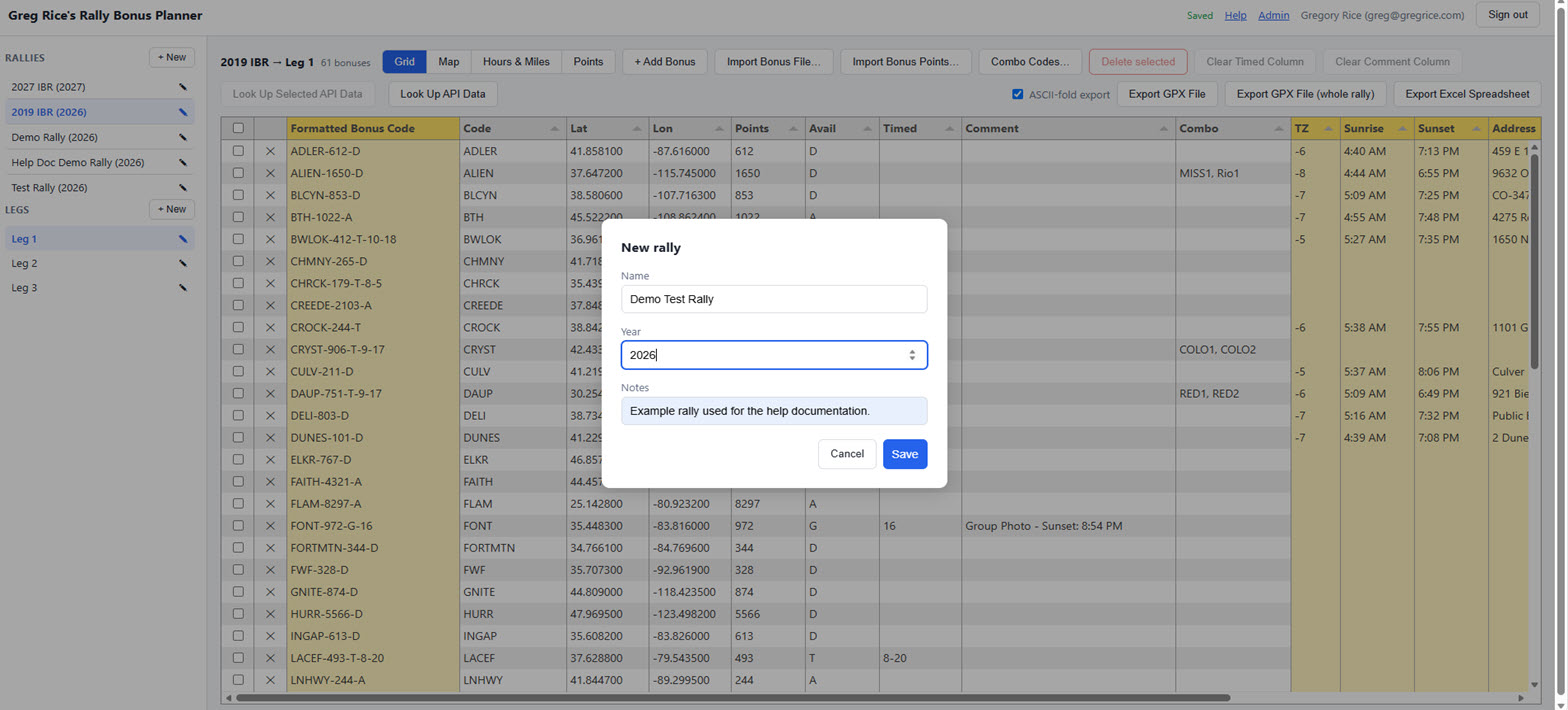
To edit or delete a rally later, click the ✎ that appears next to its name in the sidebar — this opens the same dialog with a Delete button. Deleting a rally also deletes all of its legs and bonuses, so it asks for confirmation first.
Creating a leg
With a rally selected, click + New above the leg list. Give the leg a name and, ideally, a start and end date/time — these are used to compute accurate sunrise and sunset times for every bonus on that leg. Check Daylight saving in effect if applicable.
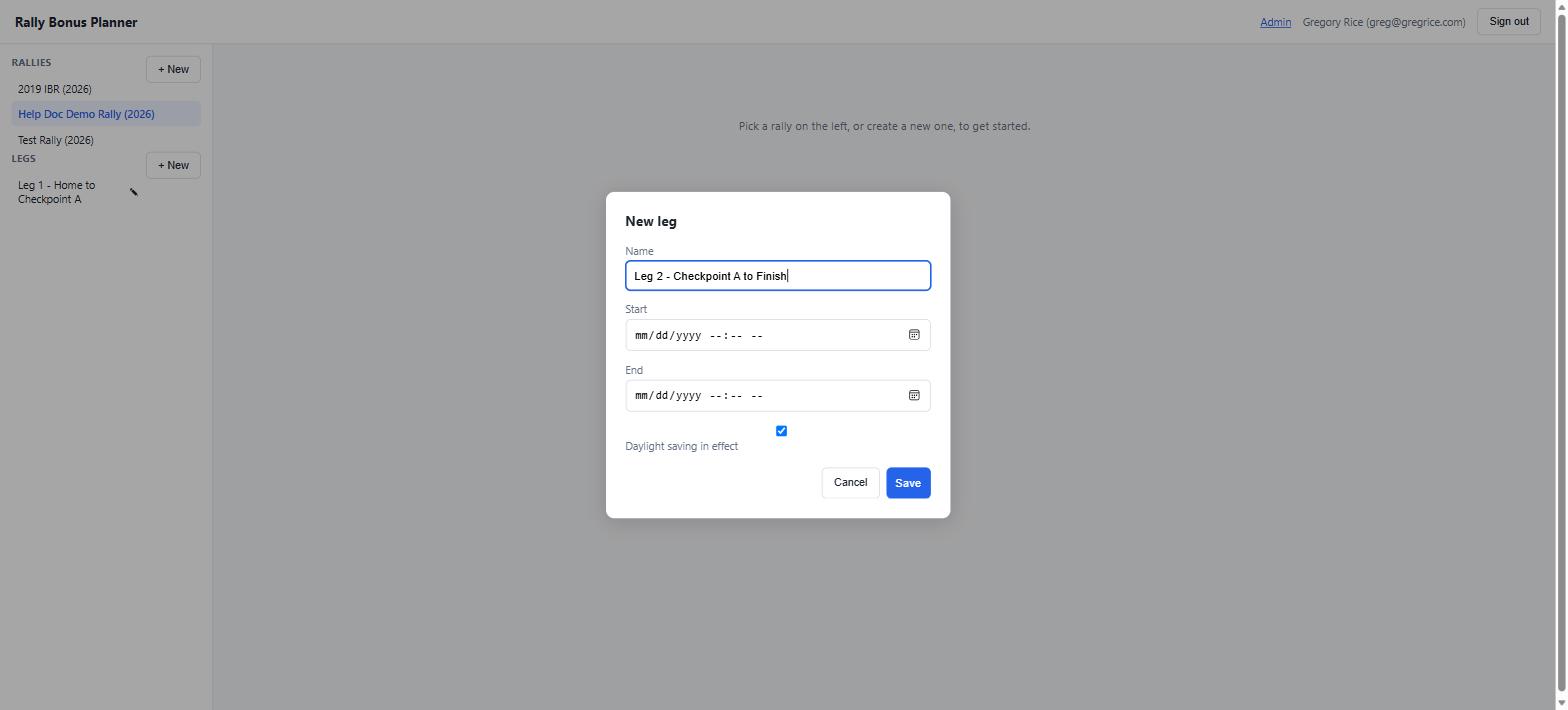
Click a leg's name (or the small pencil that appears next to it) to edit or delete it later. The same popup also has Start location and End location fields — usually the hotel a leg begins or ends its overnight stop at. Type an address and click Look up to geocode and save it, the same address-lookup pattern as the Hours & Miles checkpoints. Once a leg has a saved location, opening that leg — or starting a new route for it — automatically fills in the Route Planner's Start/End points from those saved locations, and shows them on the map right away; see Start, End, and your motorcycle below for what that looks like. And since the hotel a leg ends at is usually the very same hotel the next leg starts from, saving a leg's end location automatically fills in the next leg's start location too, as long as that next leg doesn't already have one of its own. Each field also has a From PDF… button (§51) that reads the host hotel's name and address straight off a rally book PDF's Schedule of Events page and fills it in for you, geocoding it immediately — handy for skipping the typing on a rally where every checkpoint is the same host hotel.
The bonus grid
Selecting a leg loads its bonuses into a spreadsheet-style grid. Click any cell to edit it in place — changes save automatically (watch the small save indicator next to your name in the header). Use + Add bonus to insert a blank row.
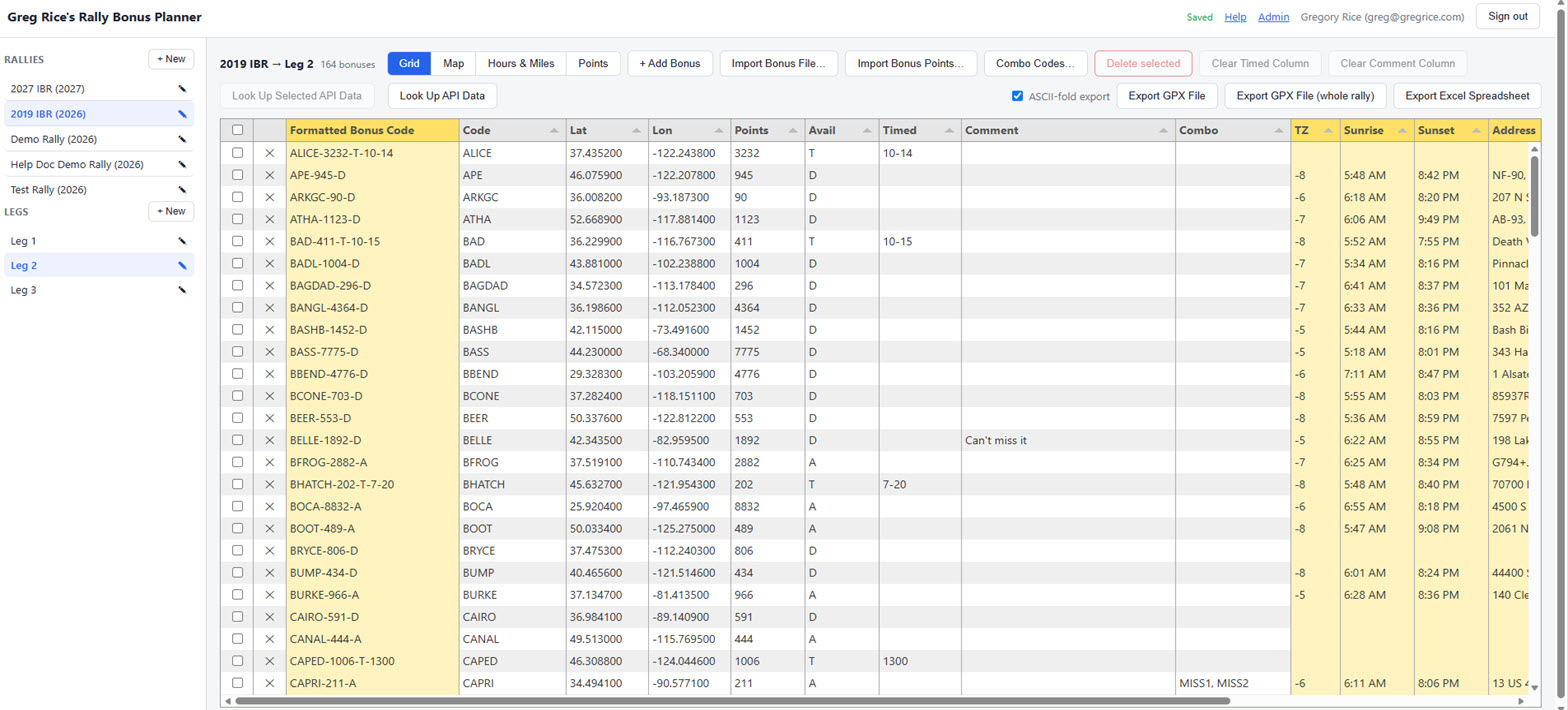
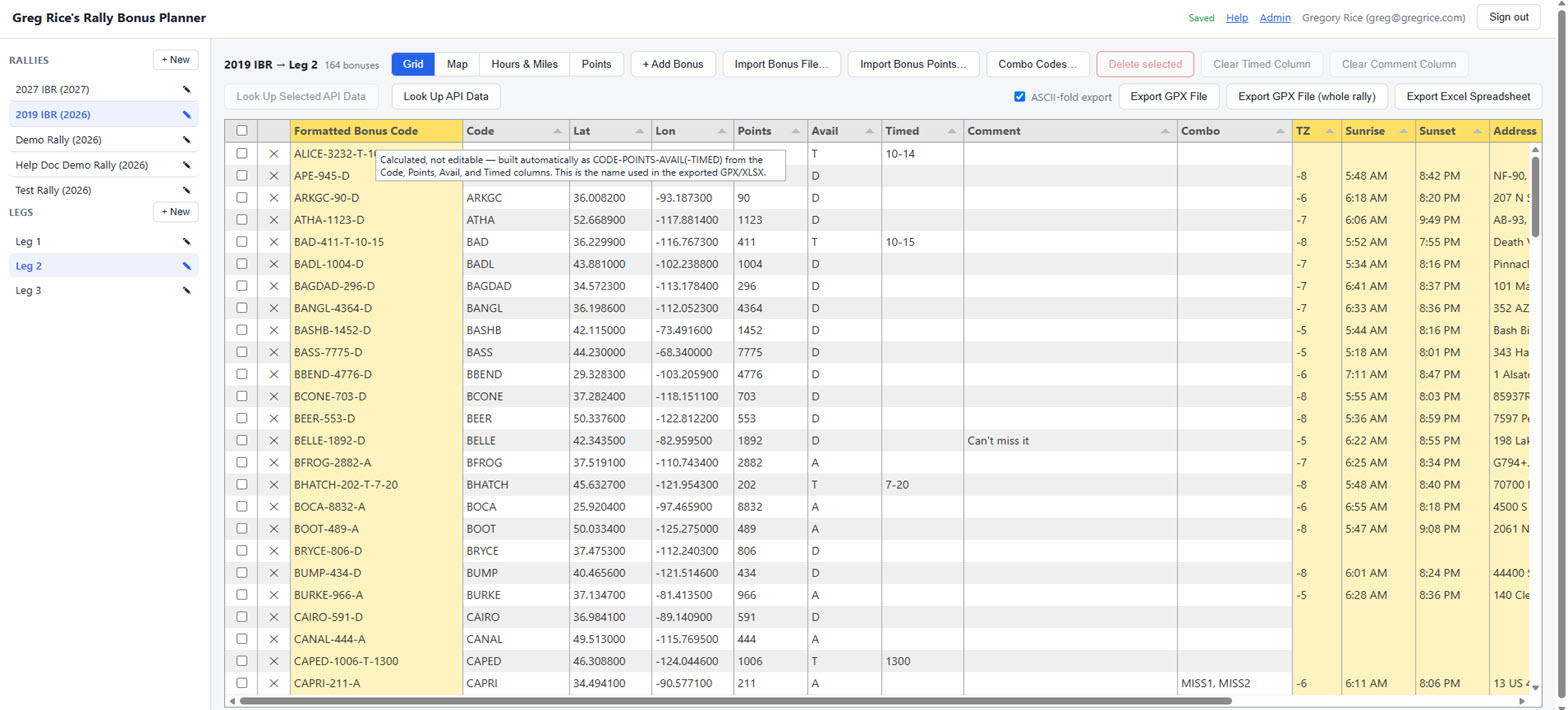
The Formatted Bonus Code column, just before Code, is read-only and updates
automatically as you edit a row — it's the bonus's CODE-POINTS-AVAIL-TIMED name, the same
format used for the <name> in an exported GPX waypoint.
All column headers have tooltips — hover over any one to see an explanation of what it means and how it's used, like the Formatted Bonus Code column below.
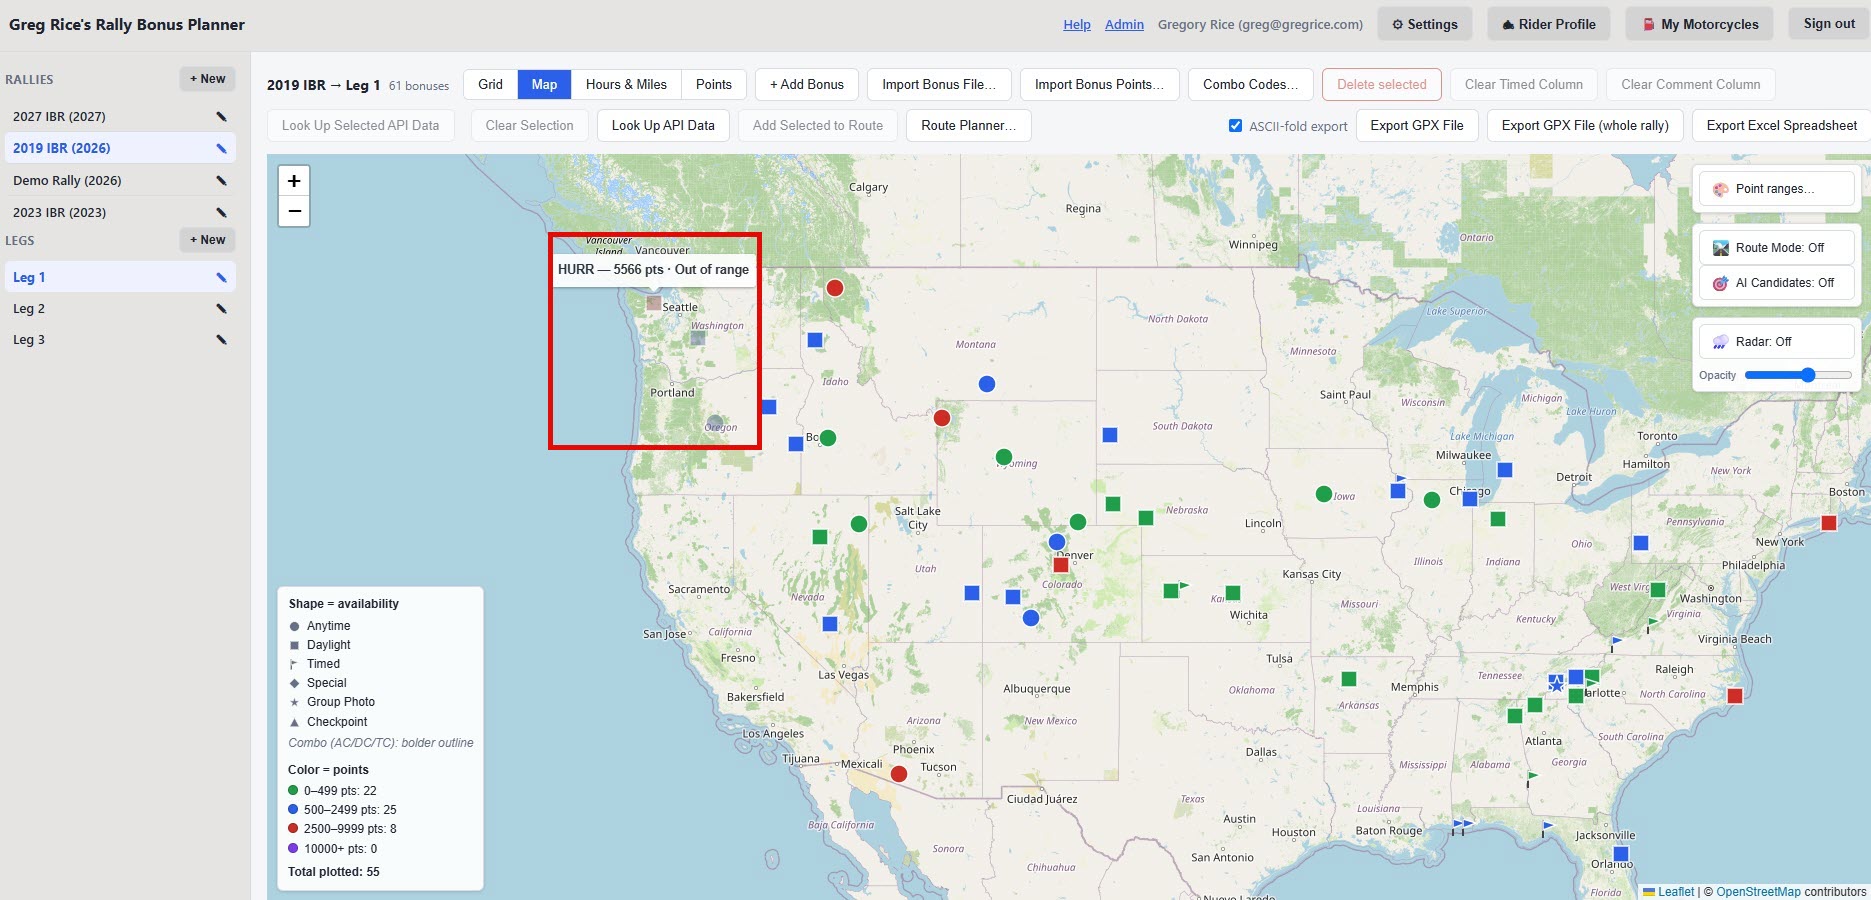
The Range column flags any bonus where a round trip from Start to it and back to End alone already exceeds this leg's Hours & Miles "Miles possible" budget — meaning it couldn't be reached even if it were the only stop you made all leg. It's a heads-up to help narrow down which bonuses are worth planning around, not a hard rule: it never removes a bonus from the grid or map, never stops you from adding it to a route, and the column is sortable — click its header to group flagged bonuses together.
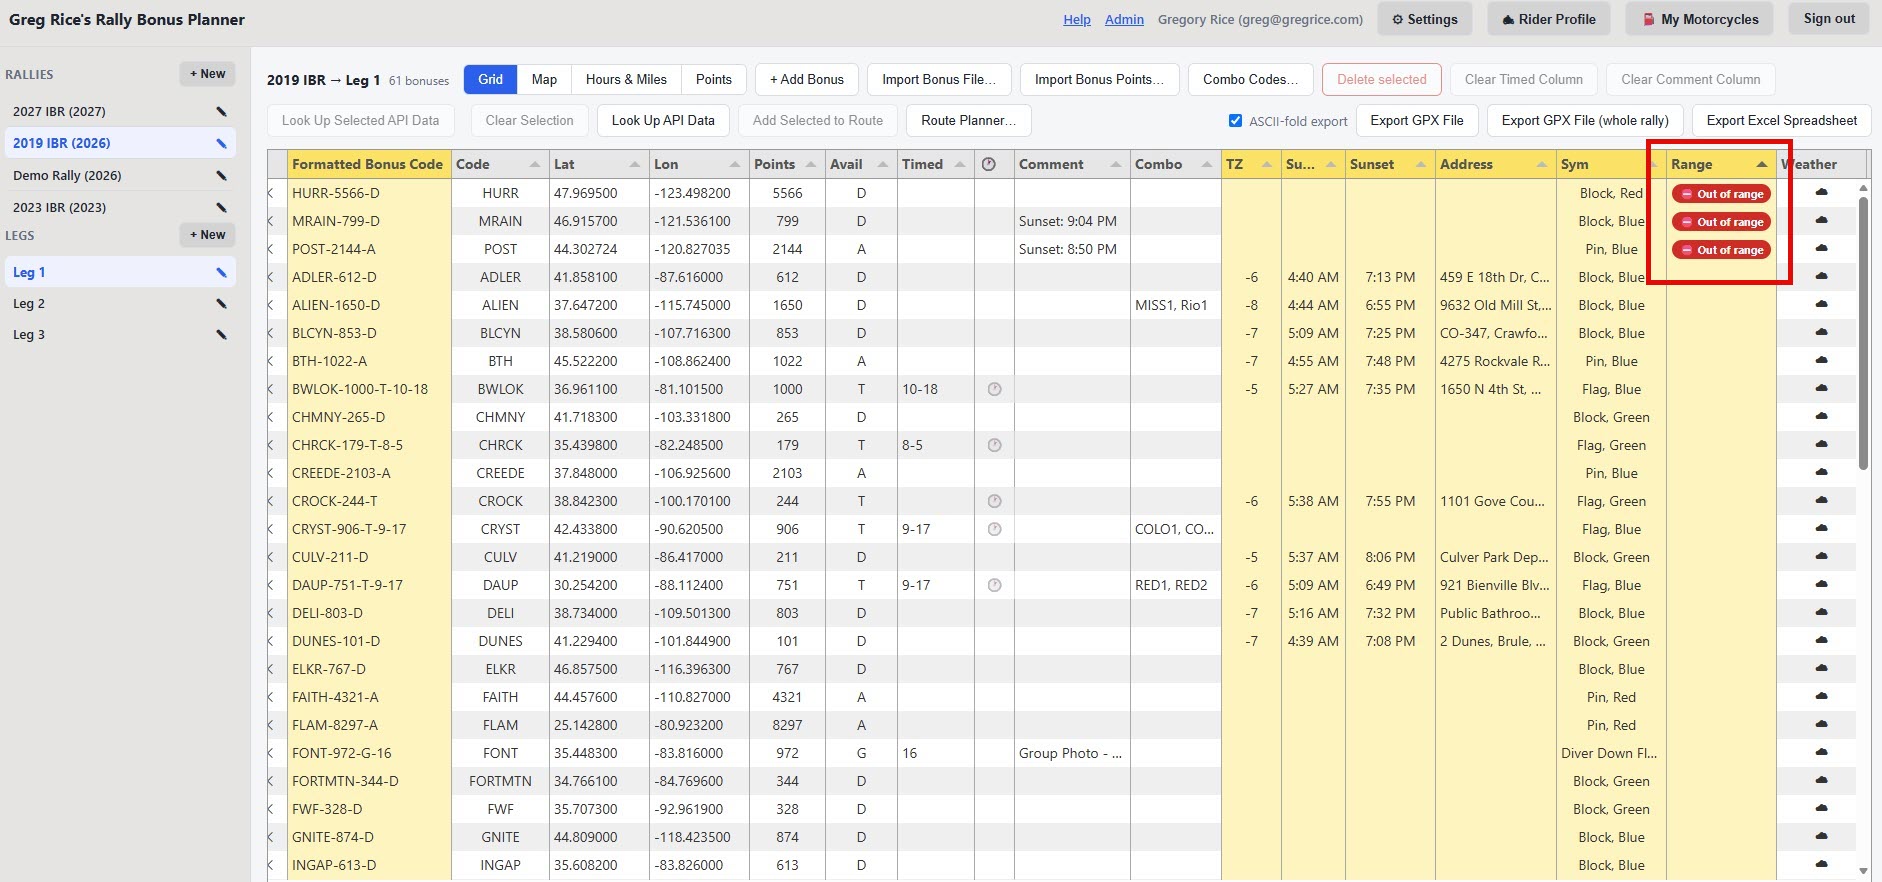
The match to the Hours & Miles worksheet is by position: this rally's 1st leg reads its budget from that worksheet's "Leg 1" block, 2nd leg from "Leg 2," and so on — the same way the worksheet already names them. A leg won't show any flags until that worksheet's matching block has dates filled in and both checkpoints looked up; that failure mode is silent rather than showing a false flag. One limitation worth knowing: the worksheet caps at 3 legs like the original spreadsheet, so a 4th+ leg in a longer rally won't get this flag.
⭐ Marking a bonus mandatory
The ⭐ column, right next to the ⚠ Flag column, marks a bonus you already know you have to ride — something the rally book itself calls mandatory, or a bonus (often a timed one, sometimes a group photo) the rally master specifically called out at the start rider meeting. Click the column to toggle it on (⭐) or off (☆) — like every other grid edit, it saves automatically. This is entirely your own call: the app has no way to read the rally book or listen in on the rider meeting, so nothing here is ever set for you automatically, including on import — a bonus a source file happens to label "mandatory" still comes in unstarred, and needs the same click as any other.
Starring a bonus doesn't change its points, availability, or anything else about the row by itself. Its whole effect is in 🎯 AI Suggested Route: a starred bonus is treated there as a hard requirement rather than an optional candidate bonus, seeded into the route ahead of the normal points-per-hour search, so it can no longer lose its spot to a higher-value bonus the way an ordinary candidate bonus can. See that section below for the full details, including what happens when a mandatory bonus genuinely can't be made to fit.
Two things worth being explicit about, since they change how you should think about a ⭐ bonus:
- You don't have to also check it. A ⭐ bonus joins 🎯 AI Suggested Route's search automatically whether or not it's also checked in the grid or on the map — and because it's a hard requirement, it gets first claim on the leg's available time. If the leg can't fit both it and everything you checked, one of your checked, non-mandatory bonuses is what gives way, not the starred one — see 🎯 AI Suggested Route below for exactly how that trade-off gets reported.
- ⭐ only does anything inside 🎯 AI Suggested Route. It has no effect anywhere else in the app. Building a route by hand — dragging bonus markers onto the map in Route Mode, or Add Selected to Route — completely ignores it, and so do Optimize Route, Build/Print Route Schedule, and the GPX/KML/XLSX exports. Nothing warns you if you build or save a route by hand that leaves a starred bonus out. Think of the star as a note to yourself that only becomes an enforced requirement the moment you actually click 🎯 AI Suggested Route.
Entering or changing bonus points
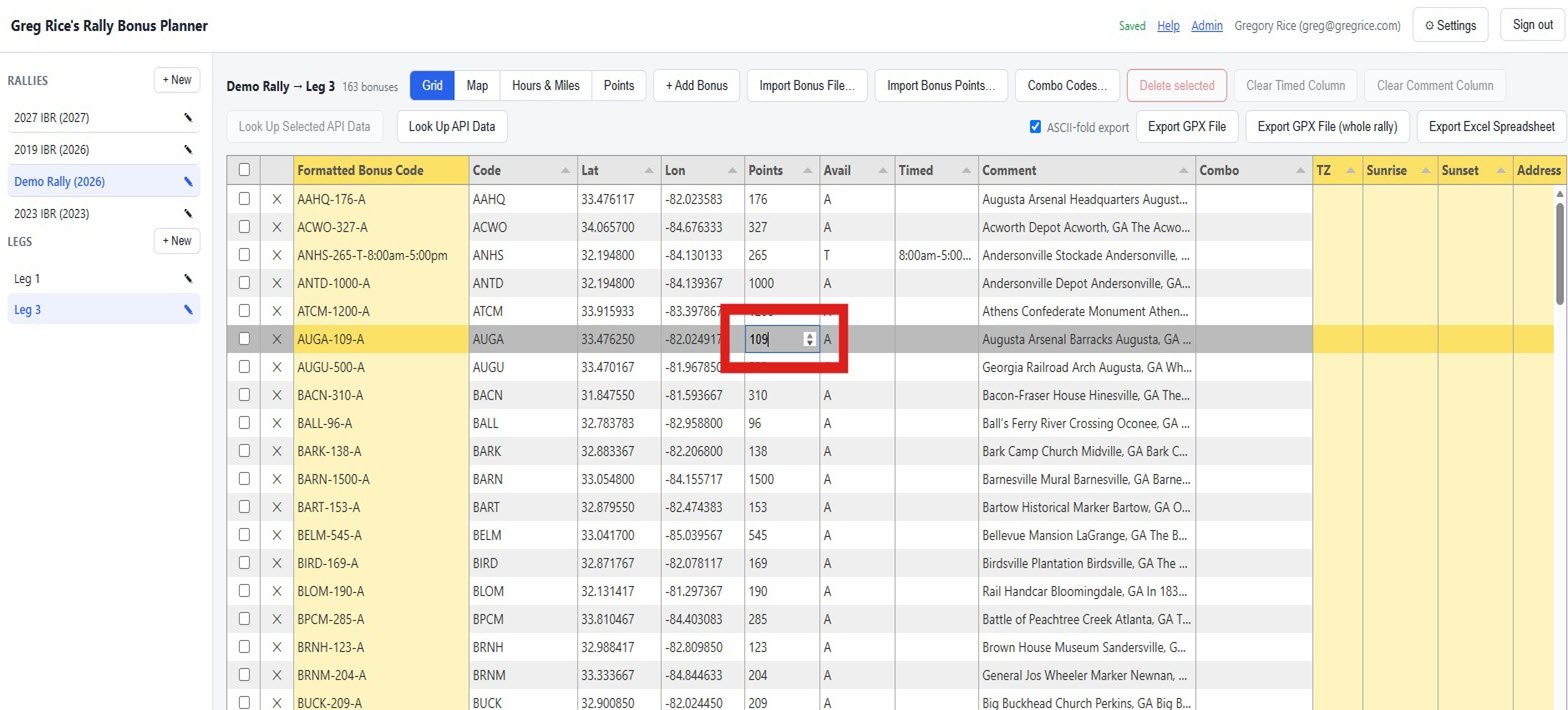
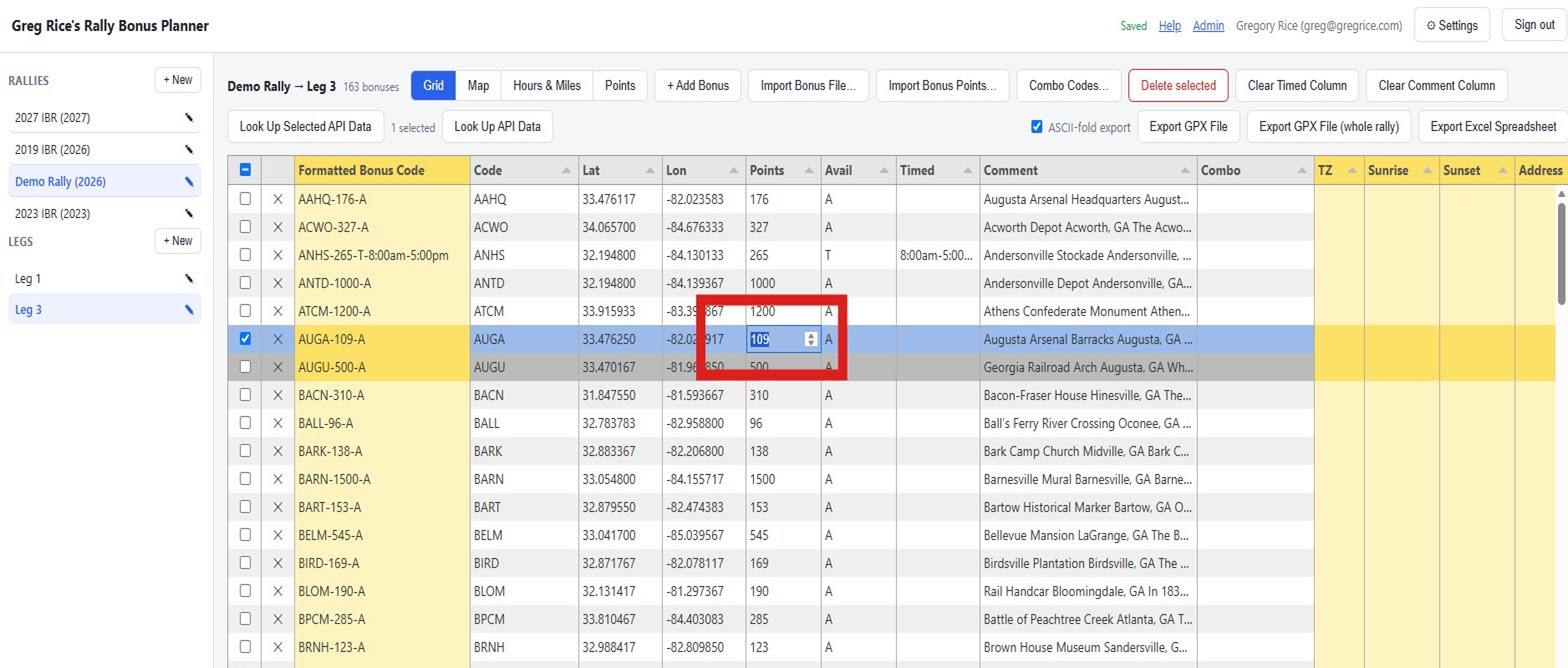
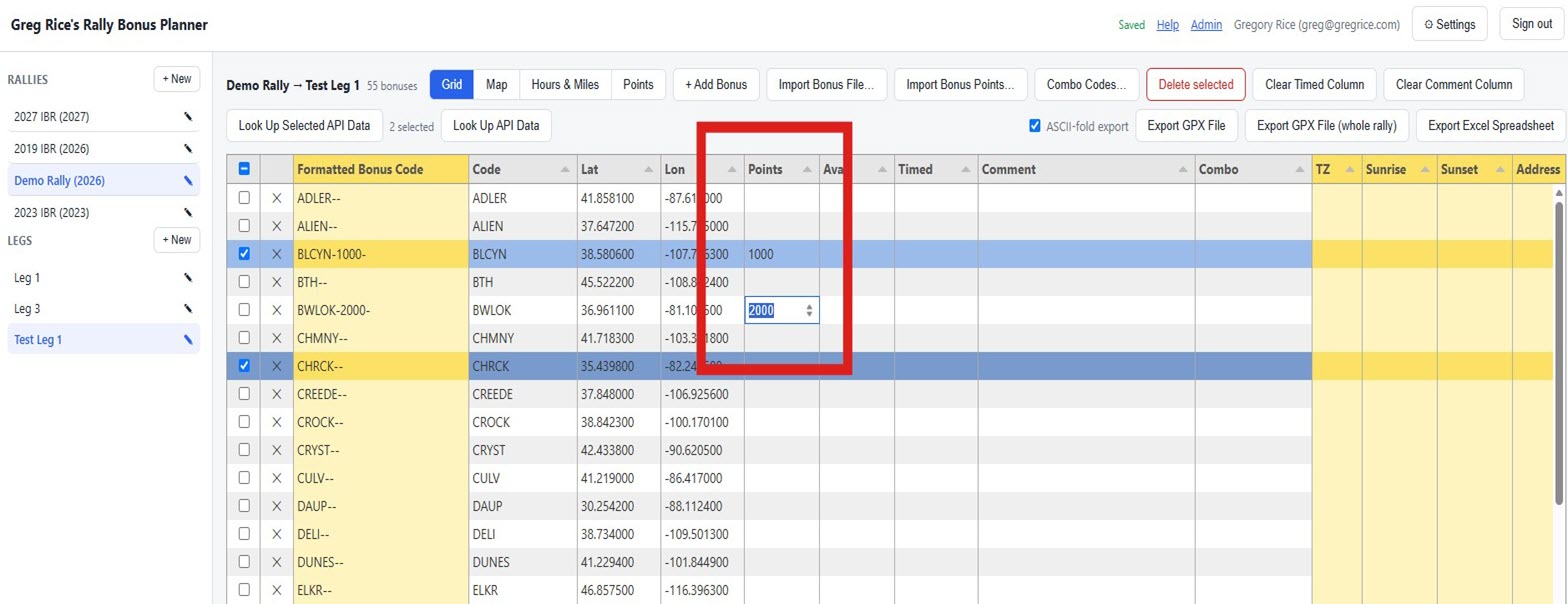
The Points column is a normal editable cell — click it, type the new value, and press Enter or click away to save. Use this to correct a bonus's points after import, or to fill in points for bonuses whose import didn't include them (some bonus listing files publish codes and coordinates first, with points released or corrected later).
Availability codes
The Avail column controls how a bonus is scored and how it's shaped on the map:
For timed bonuses, fill in the Timed column with the available window (e.g.
930a-6p). This is a plain text column — it's what shows up in the exported GPX/XLSX, and
what the map's legend and popups display.
For a Timed or Timed-Combo (T/TC) bonus, a small 🕐 column next to Timed shows an icon — click it to open a small dialog with two date/time pickers, Available from and Available until. This is optional, structured data separate from the plain text: it doesn't change what's exported, but it's what the route planner's Build Route Schedule feature (see Building a route) checks your estimated arrival time against, flagging anything that would miss the window. Leave it unset (the icon stays faded) and Build Route Schedule just can't verify that bonus — it says so rather than assuming you'll make it. Clear in that dialog removes the structured window entirely without touching the plain Timed text.
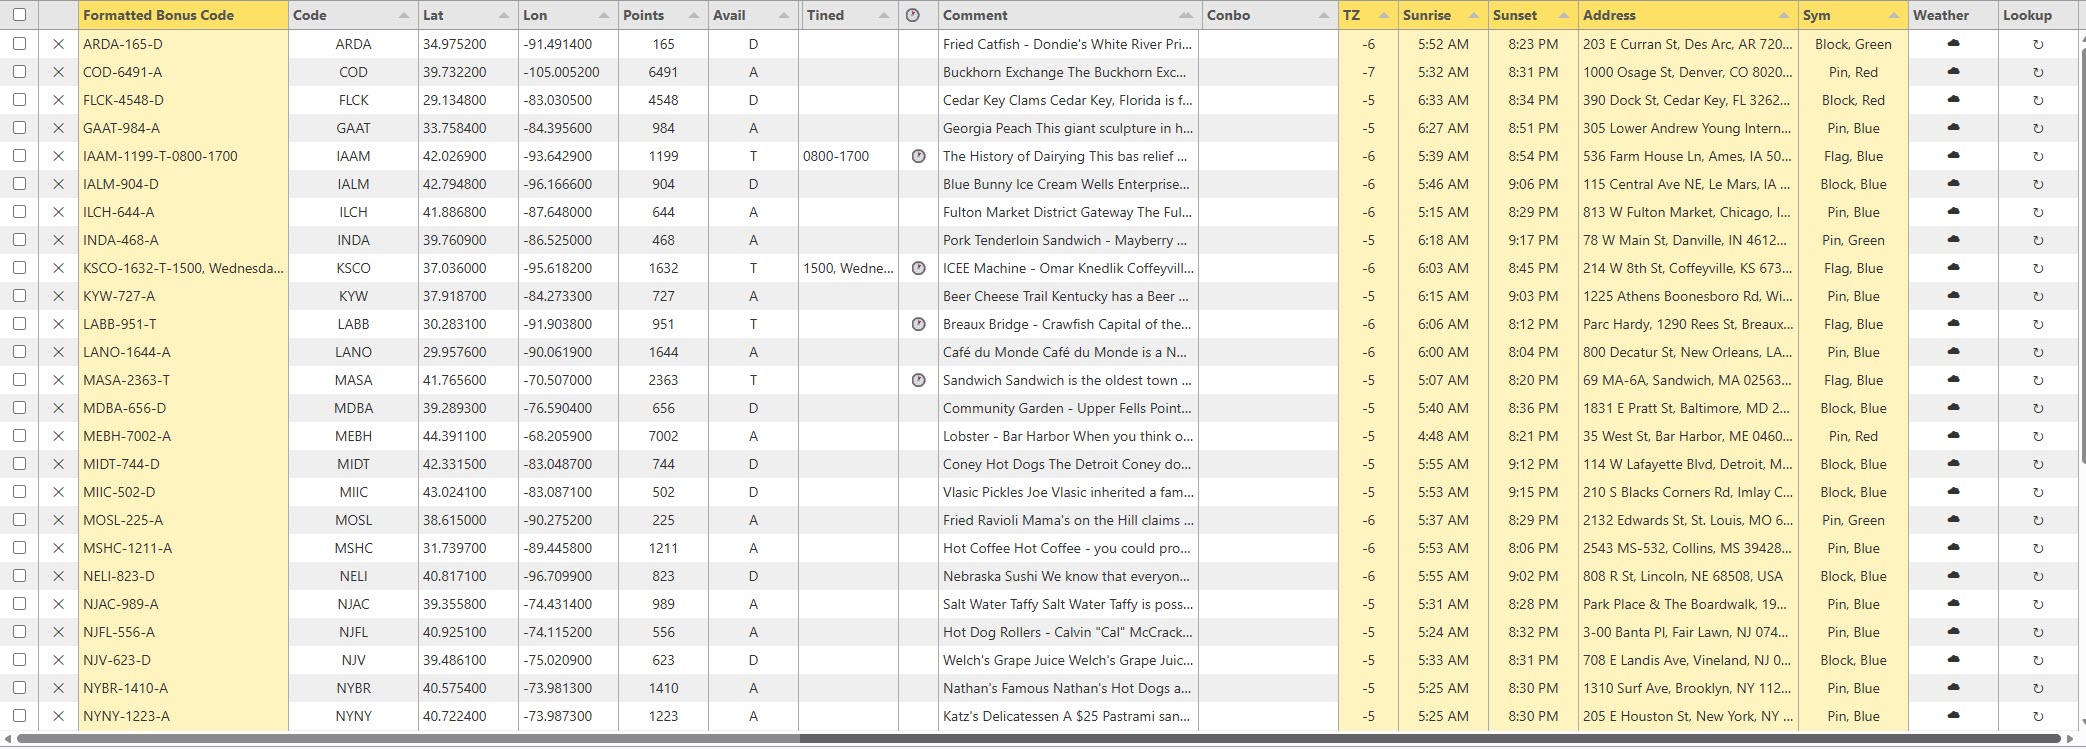
0800-1700 and
1500, Wedne... means a structured window is already set for that row).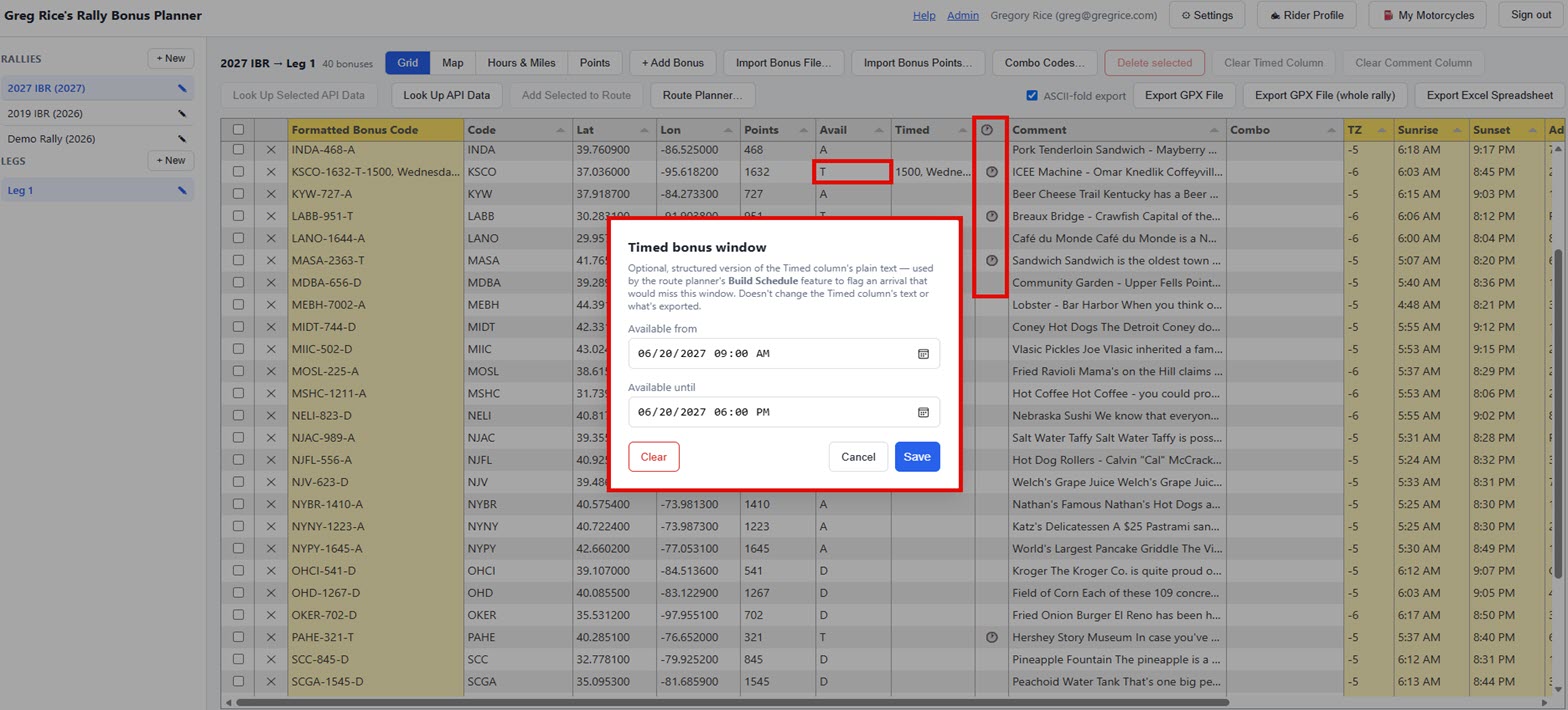
Tagging combo bonuses
Some rally packs group individual bonuses into a named combo — collect all of a river's
bonuses and the combo pays extra, for example. Click Combo codes… in the
toolbar to define your rally's list of combo codes and names (e.g. MISS1 =
"Mississippi River"). This list is shared across every leg in the rally, since a combo can
span more than one leg. Add codes one at a time with + Add combo code, or
click Paste list… to paste in several at once — copy two columns (code,
name) straight from a spreadsheet, or paste a comma-separated list; a code that already
matches one in your list gets its name updated instead of creating a duplicate.
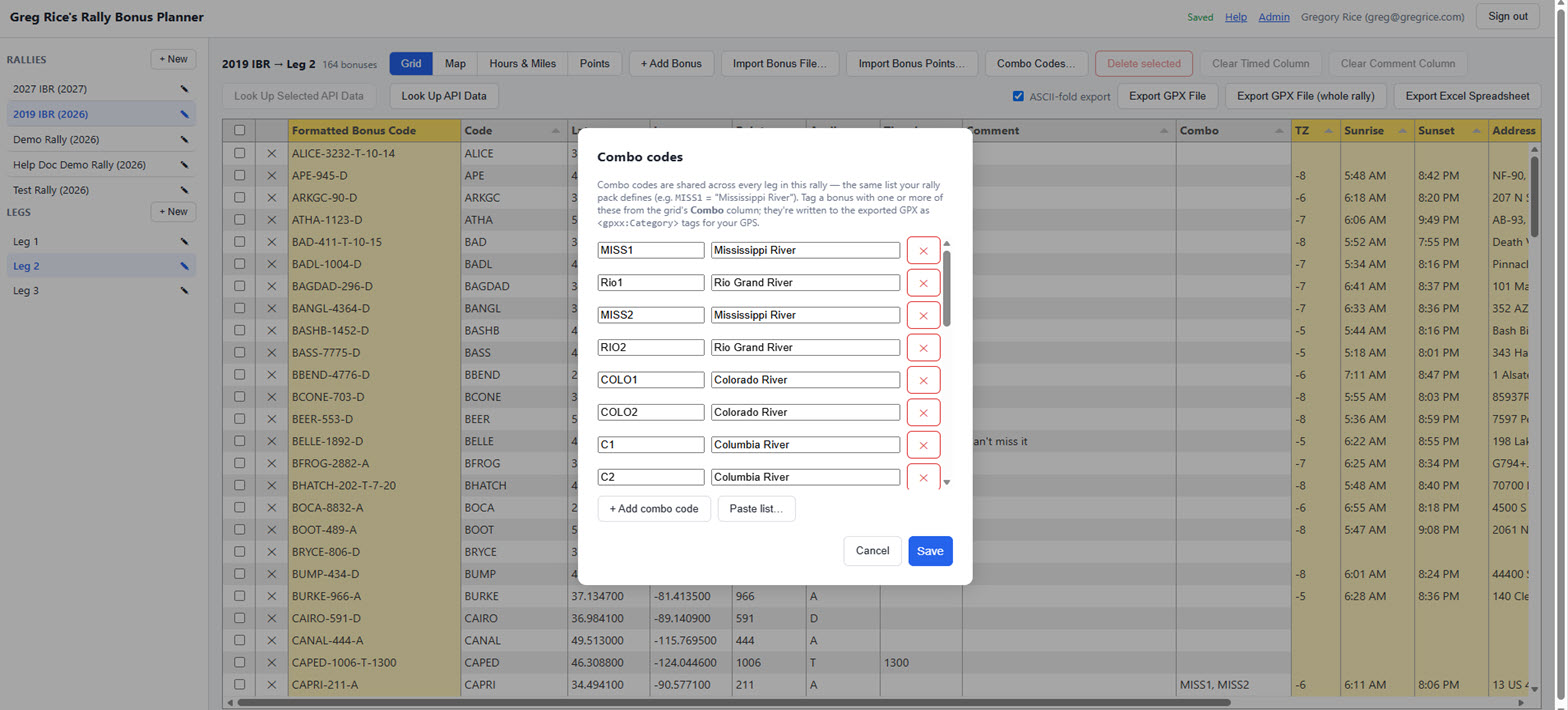
Once you've defined some codes, click a bonus's Combo cell in the grid to open a checklist of them — check every combo that bonus belongs to (a bonus can be part of more than one) and click Done. Hover the cell afterward to see the full combo names, not just the codes.
A bonus's combo tags are written to the exported
GPX file as <gpxx:Category> entries, so they show up as categories on your
GPS the same way they did from the spreadsheet's export.
Selecting & deleting rows
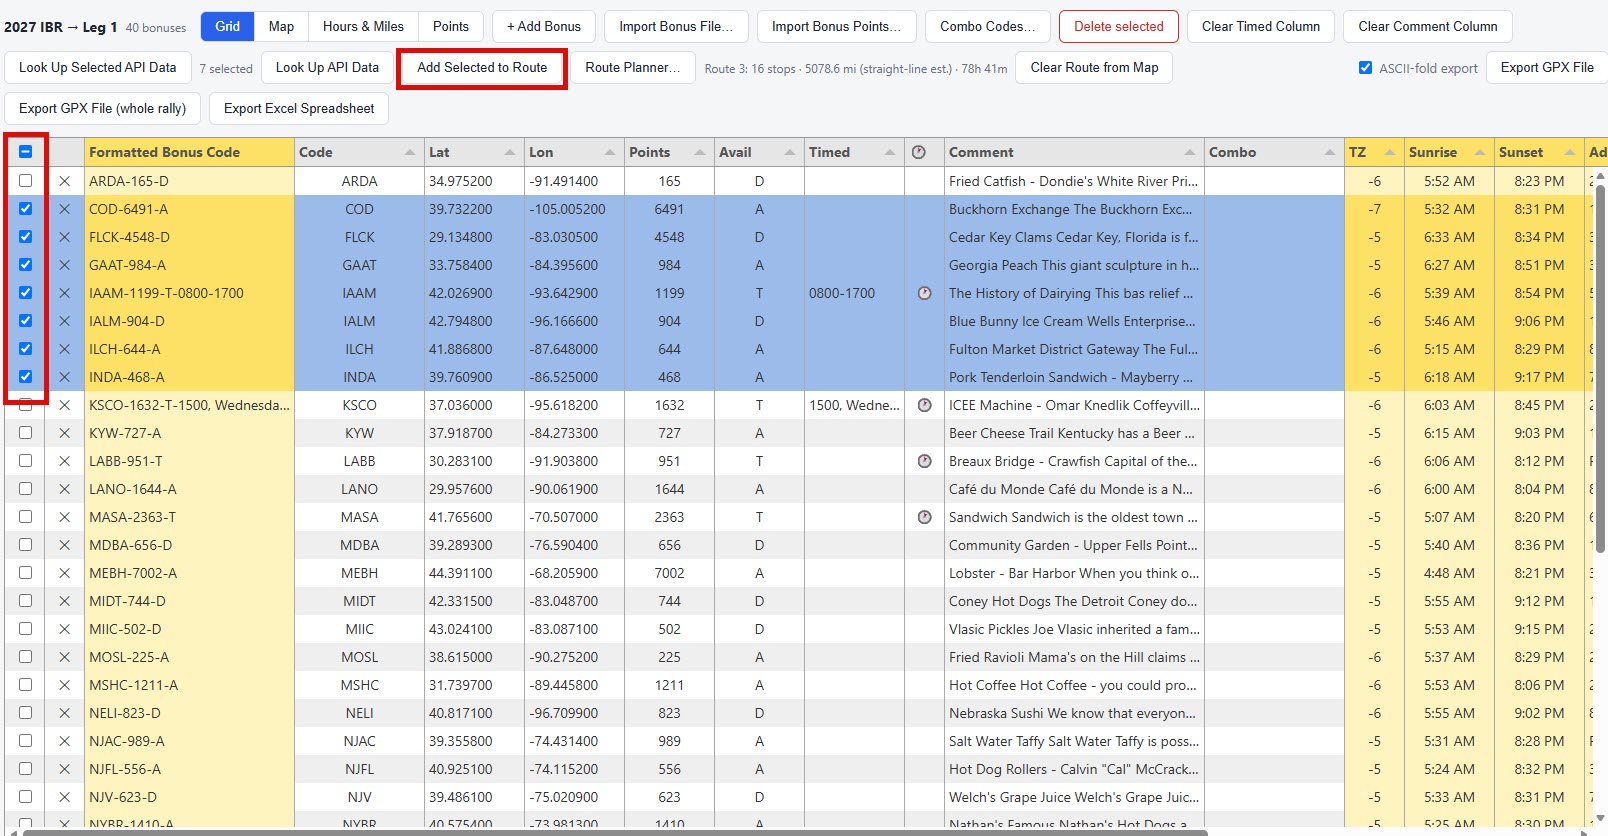
Check the boxes on the left of any rows you want to act on — the header checkbox selects all. With rows selected, Delete selected removes them, and Look up selected fetches address/timezone/weather for just those rows.
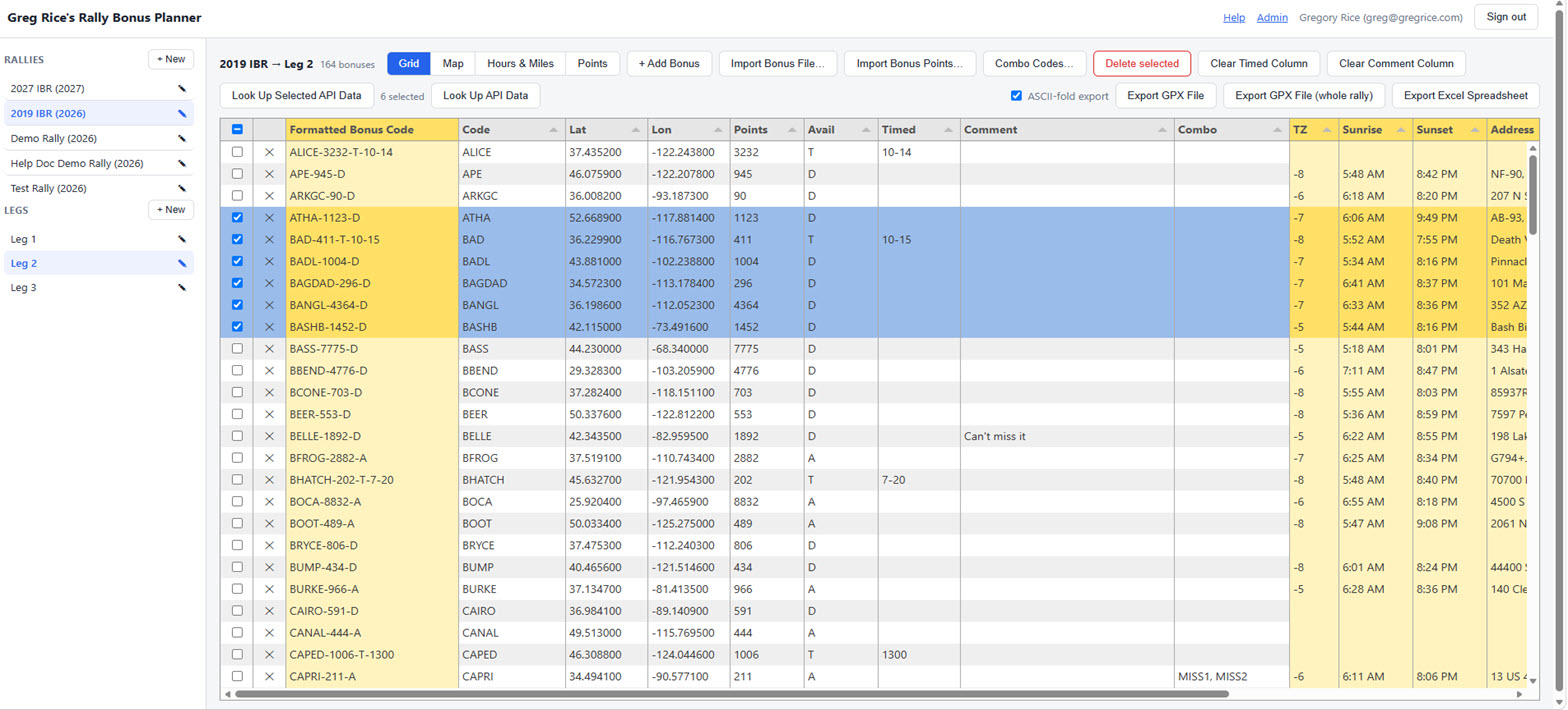
Deleting is permanent, and re-importing afterward does not undo it. If you delete a batch of bonuses and then re-import the same rally book PDF to bring them back, the app doesn't restore or reconnect to what you deleted — it reads the PDF fresh and adds each bonus back as a brand-new row, even though the code, coordinates, and points may look identical to what was there before. As far as the app is concerned, it's a different bonus than the one you deleted.
That distinction matters if any of the deleted bonuses were used in a saved route. A route remembers its stops, and its Start/End location if one is set to a bonus, by pointing at that specific bonus row — not by its code. So:
- A stop built from a bonus you delete is quietly dropped from the route the next time you open it — and once the route is saved again after that, the stop is gone from it for good. The freshly re-imported version of that bonus does not automatically rejoin the route; you'll need to re-add it from the grid or map yourself.
- If a deleted bonus was set as a route's Start or End location, that field is cleared back to blank as soon as the bonus is deleted.
If you're planning to delete and re-import a leg's bonuses, it's worth checking first whether any of your saved routes on that leg use bonuses from it — plan on rebuilding those stops (and Start/End, if needed) afterward rather than assuming the re-import will pick up where the route left off.
Looking up address & timezone
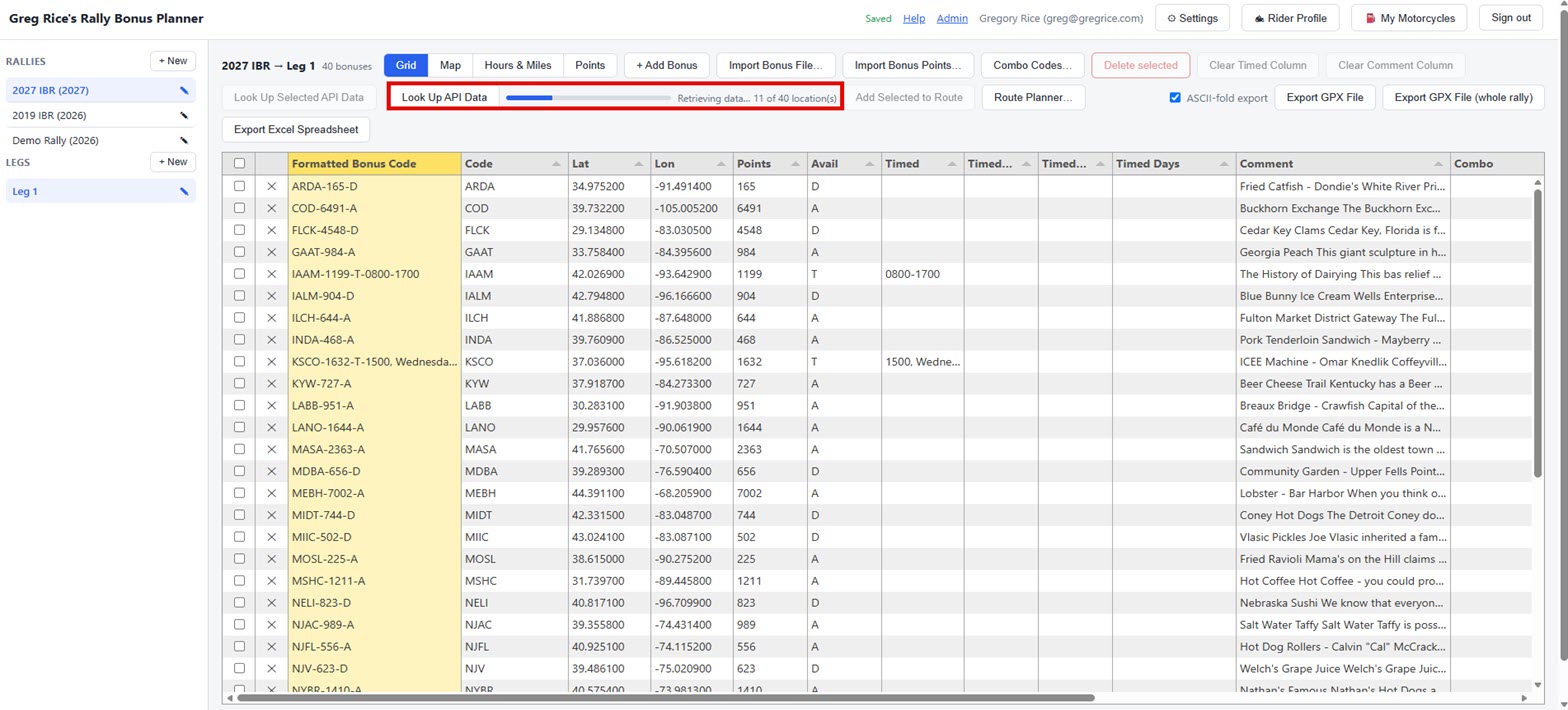
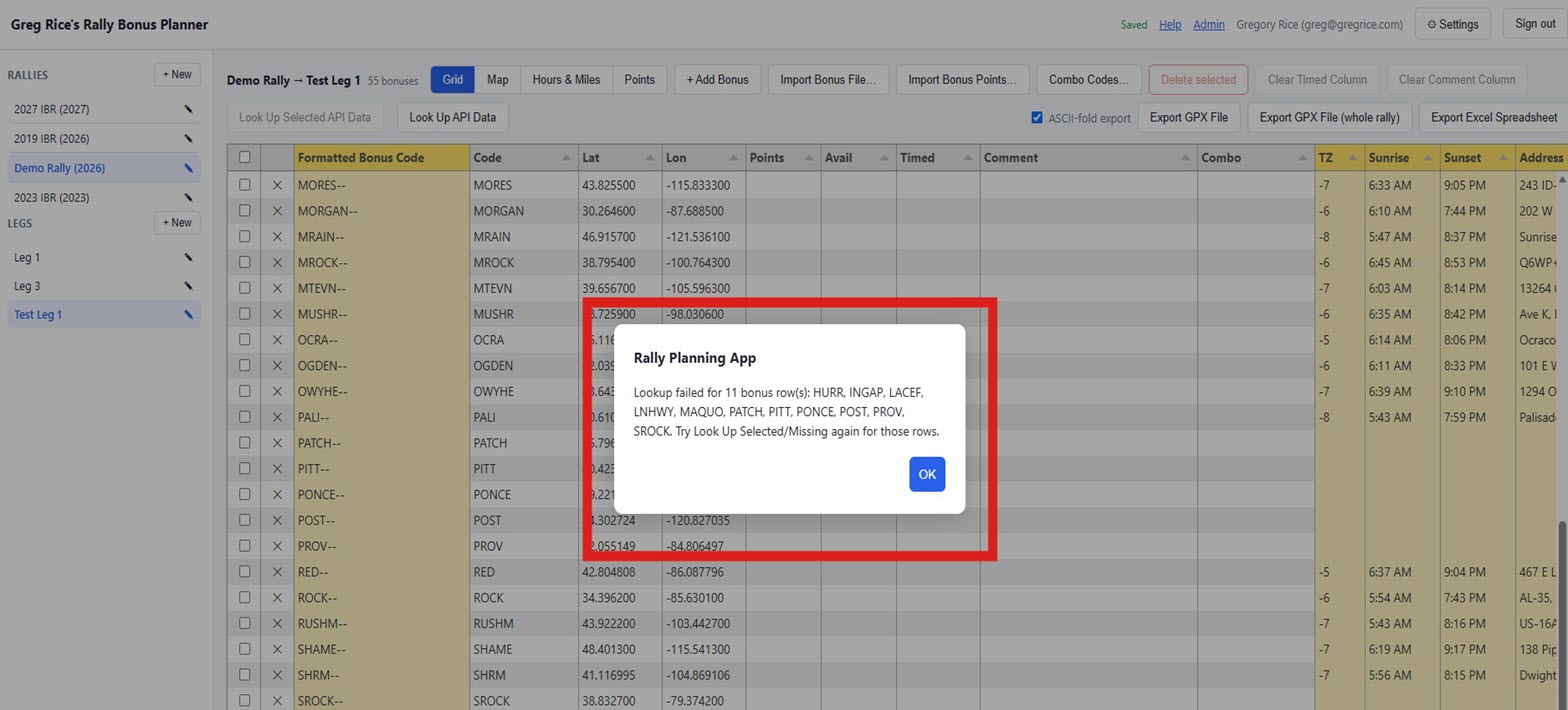
Once a bonus has coordinates, click Look up missing in the toolbar to fill in its timezone, reverse-geocoded address, and (if the leg has start/end times set) sunrise and sunset — automatically, for every bonus that's missing this data. This runs in the background with a small progress indicator, and results are cached, so re-running it doesn't re-charge lookups for bonuses already looked up.
Lookups are rate-limited per account to keep API costs down. If you hit the limit, wait a bit and try again.
Importing bonus files
Click Import file… and choose a .gpx, .kml,
.csv, .tsv, .txt, Excel (.xlsx/.xlsm/.xls),
or .pdf bonus listing file. The app parses it entirely in your browser and shows a preview
grid so you can review and fix anything before committing — nothing is written to your leg until you
click Append to leg or Replace leg's bonuses.
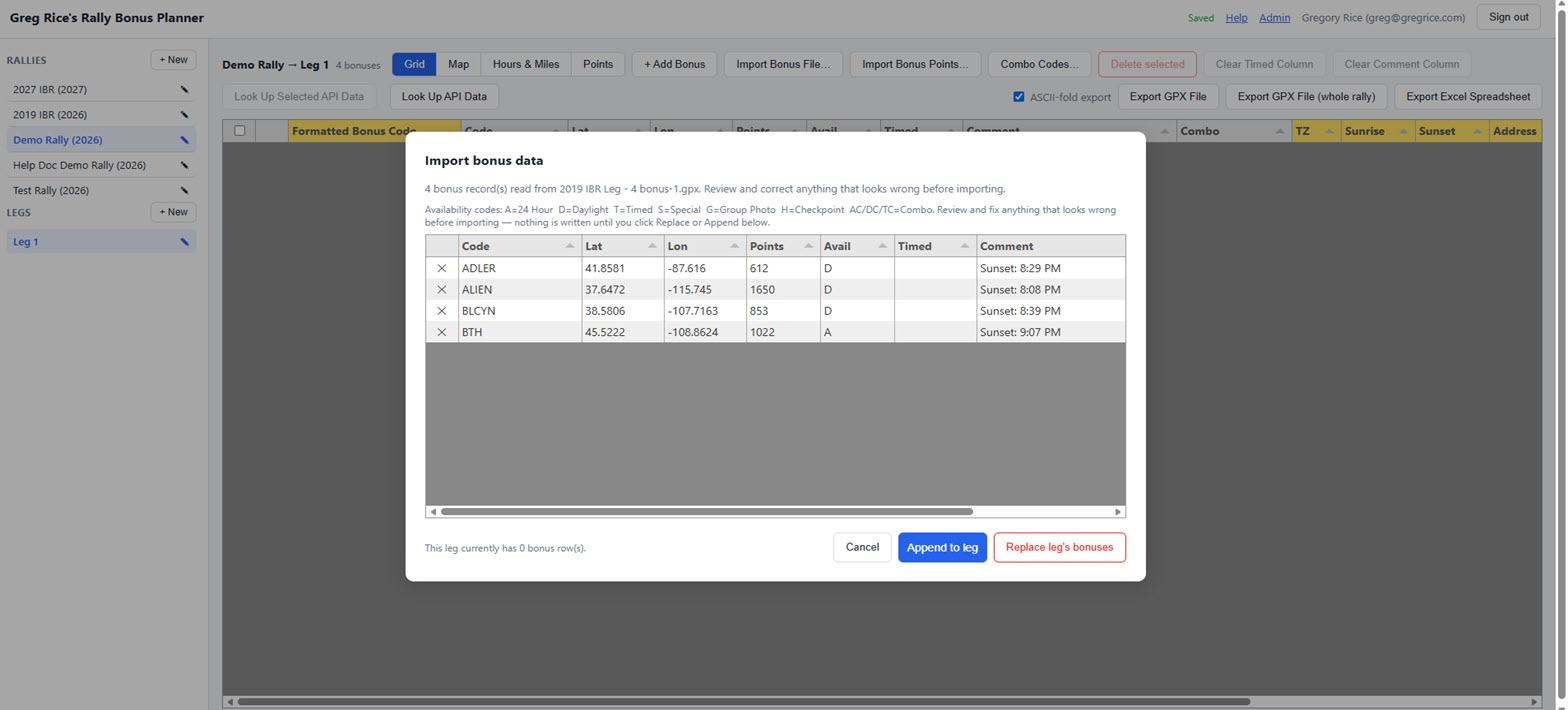
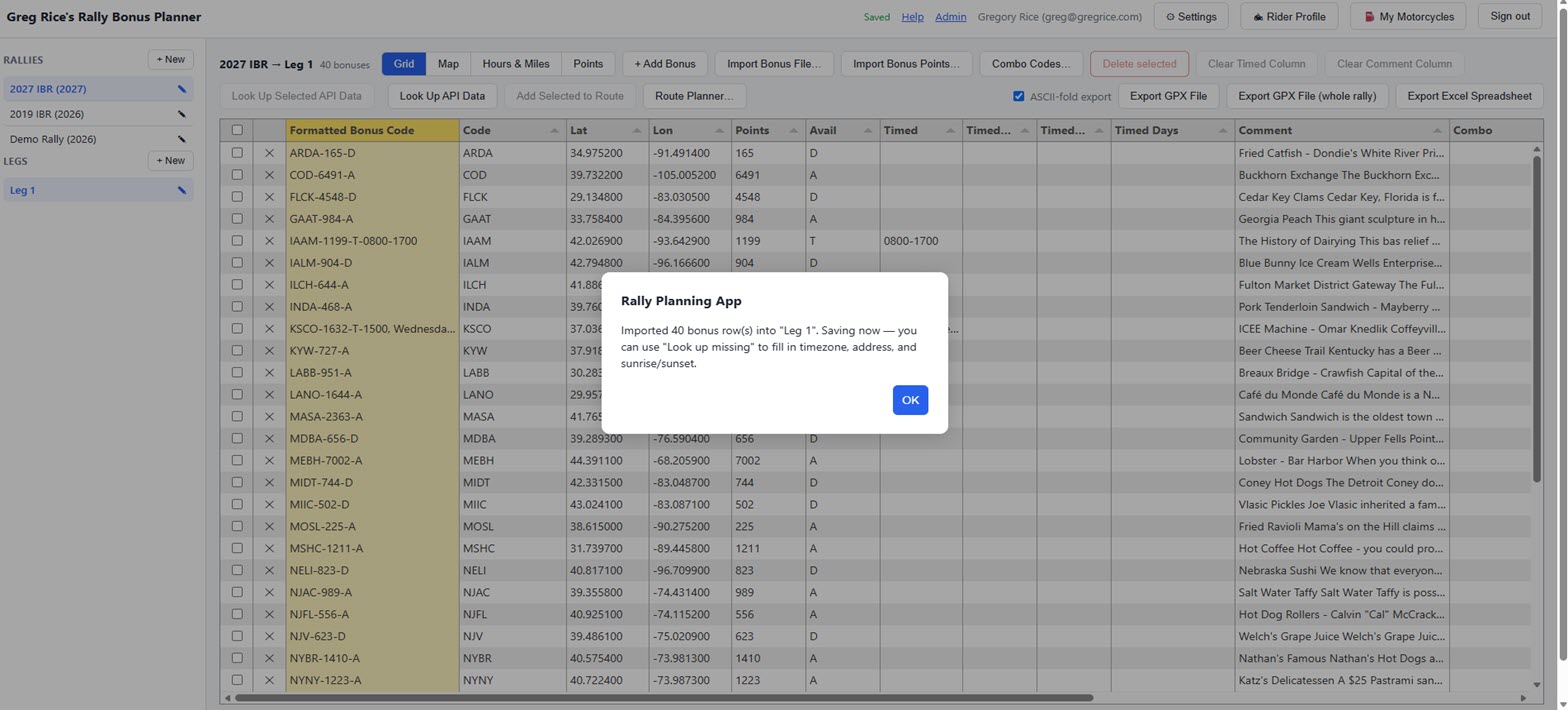
PDF import is built for Iron Butt Rally-style bonus listing packets — a code, point value, GPS coordinates, available hours, and description per destination bonus. Monitoring bonuses (call-in, rest, tracking) and checkpoint info don't have coordinates, so they're skipped automatically; only bonuses with a real lat/lon come through. A PDF laid out very differently may not parse cleanly — check the preview before committing, same as any other format.
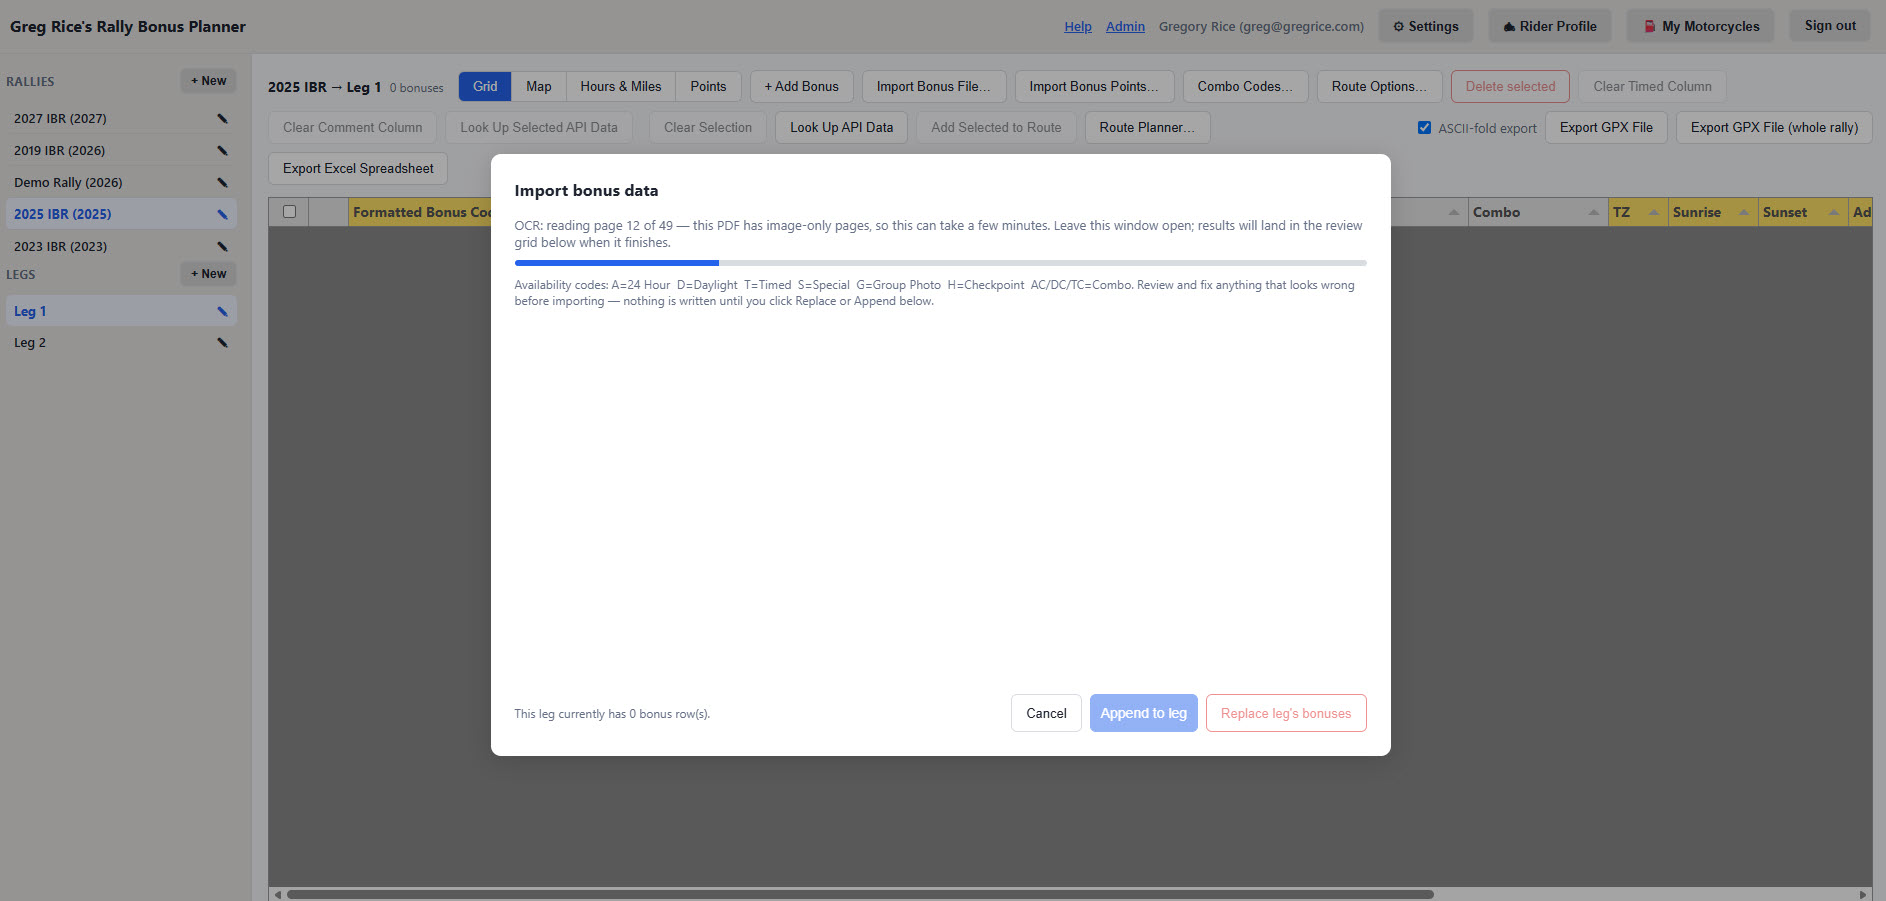
Some rally books' bonus-listing pages are flattened images rather than real selectable text (common in newer, more graphically designed packets). If a PDF like that comes up with "No bonus records were found," the app automatically retries with OCR before giving up — this can take several minutes on a large book, with a page counter in the import window so it doesn't look stalled; leave the window open and the results land in the preview grid below once it finishes.
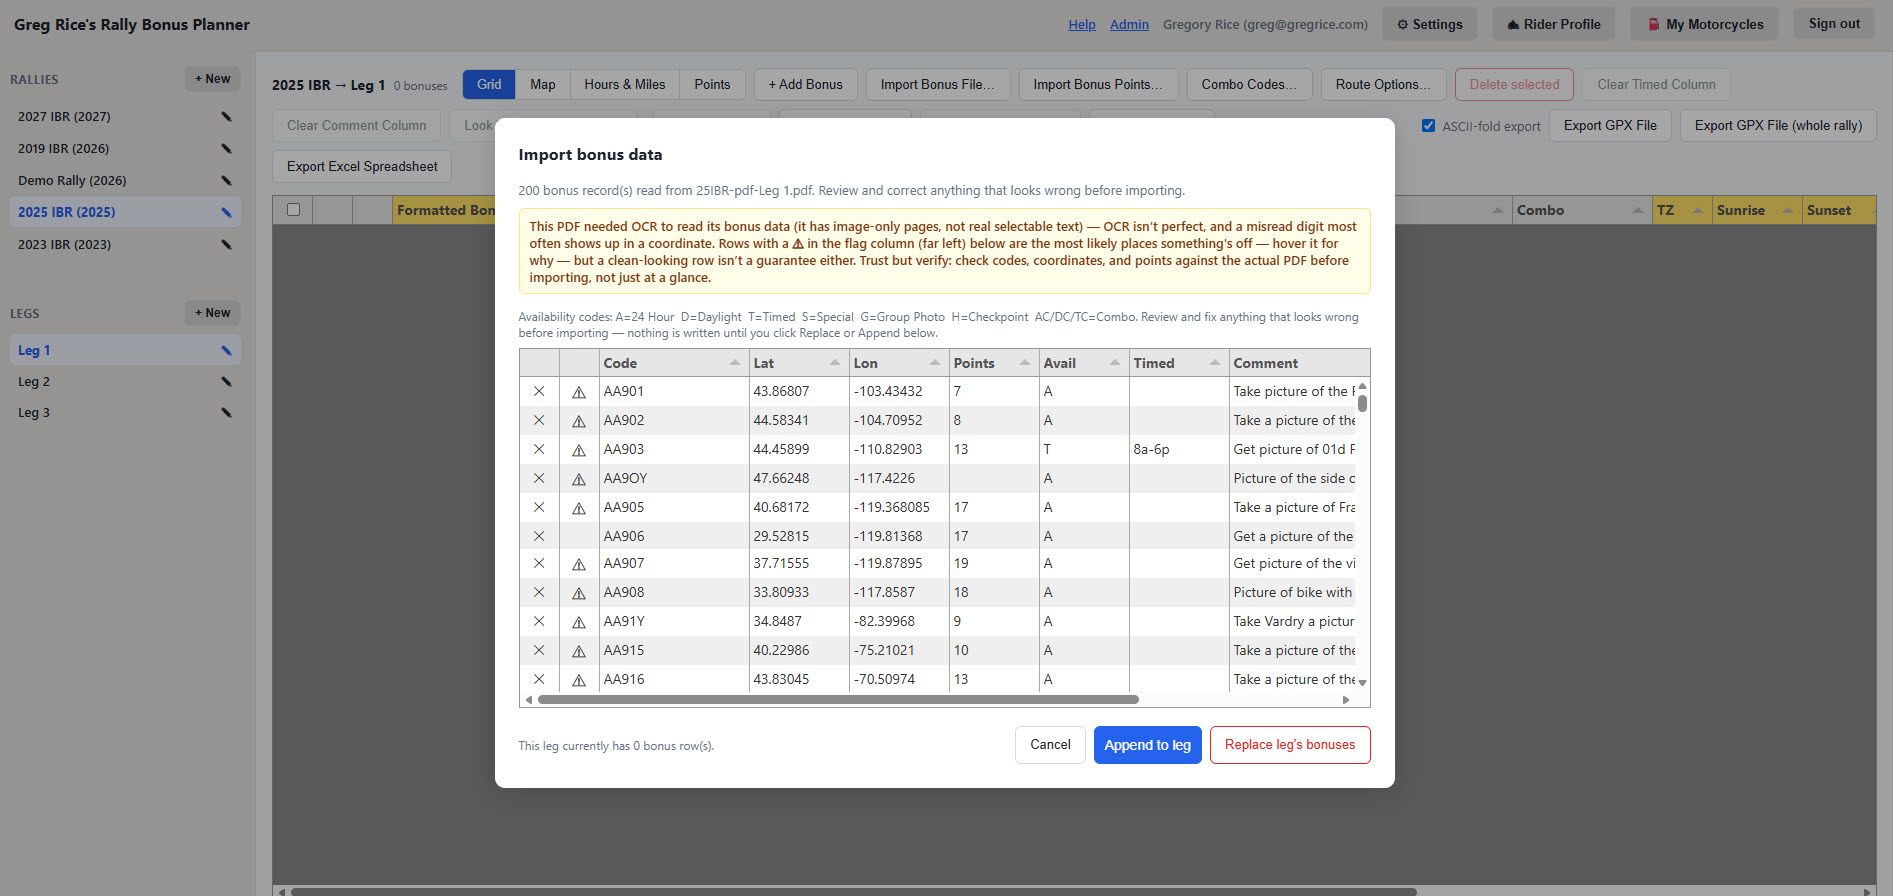
OCR is less reliable than reading real text, so give the preview grid a closer look afterward: a row OCR isn't confident about gets a ⚠ in its own Flag column (far left) with a specific reason — hover it to see why — most often a coordinate a misread digit could throw off. A clean-looking row isn't a guarantee either: trust but verify, and check codes, coordinates, and points against the actual PDF before importing, not just at a glance.
Importing a points file
Some rally masters publish the bonus locations and the bonus point values as two separate files — a codes/lat/lon file, and a second file (usually CSV, sometimes plain text) with just the bonus code and its point value, sometimes released later than the location file. Click Import points… and choose that file to merge it into the current leg.
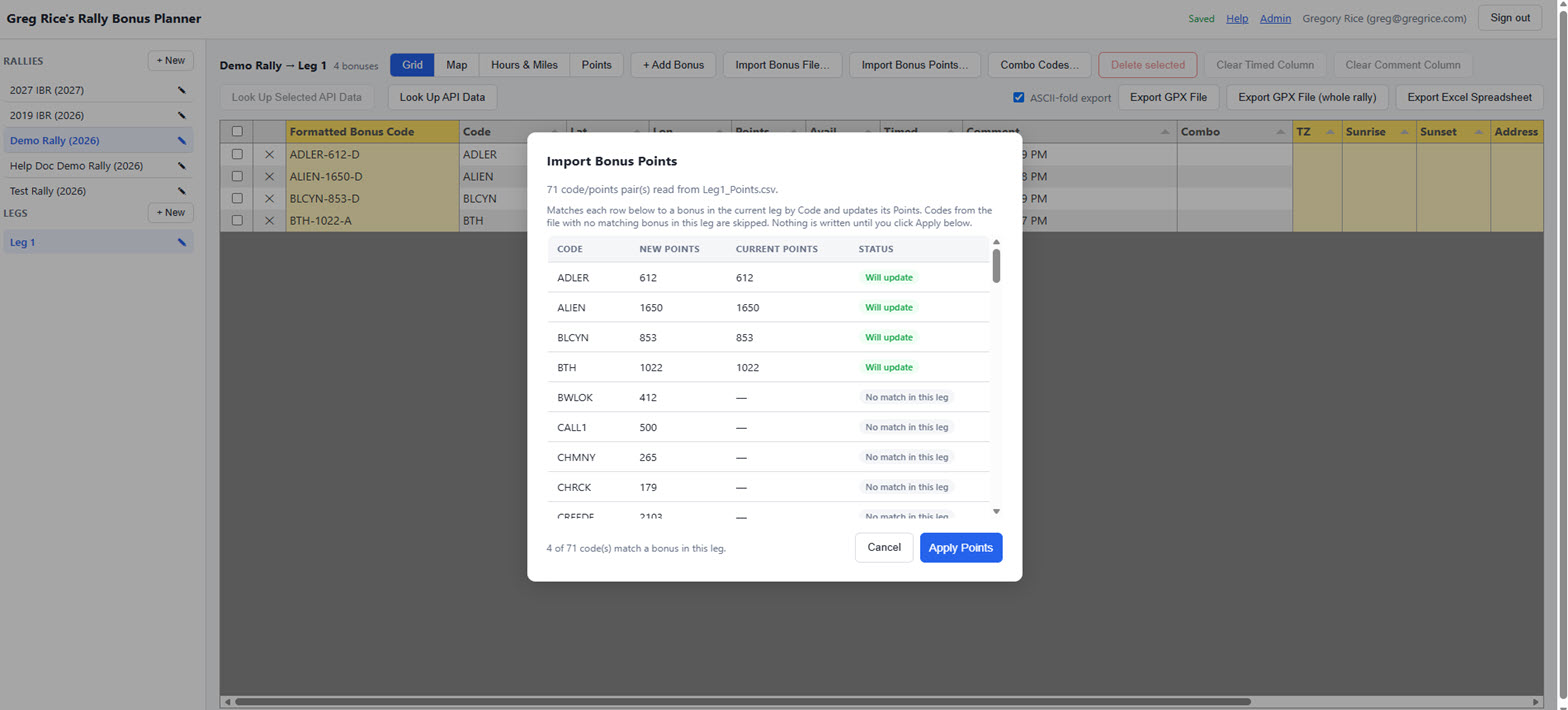
Unlike Import file…, this never adds or removes rows — it only matches each code in the file against a bonus already in the leg's grid and updates its Points column. A preview lists every code from the file, whether it found a match, and its current vs. new point value, so you can check for typos or mismatched codes before applying anything.
Matching ignores case and extra whitespace in the code, since the two files often come from different sources. Codes in the file with no matching bonus in the current leg are listed but skipped — nothing is created for them.
Rally-book route options
Many rally books define their own predefined route choices — ride every bonus on a list (e.g. "AAAA6," 3229 miles, 372 points) and claim that option's own lump-sum bonus on top. Click Route Options… in the grid toolbar to see this leg's own list, straight from the rally book PDF, with each option's code, mileage, points, and full bonus checklist right next to your grid — no need to keep re-reading the PDF to remember which bonuses a given option needs.
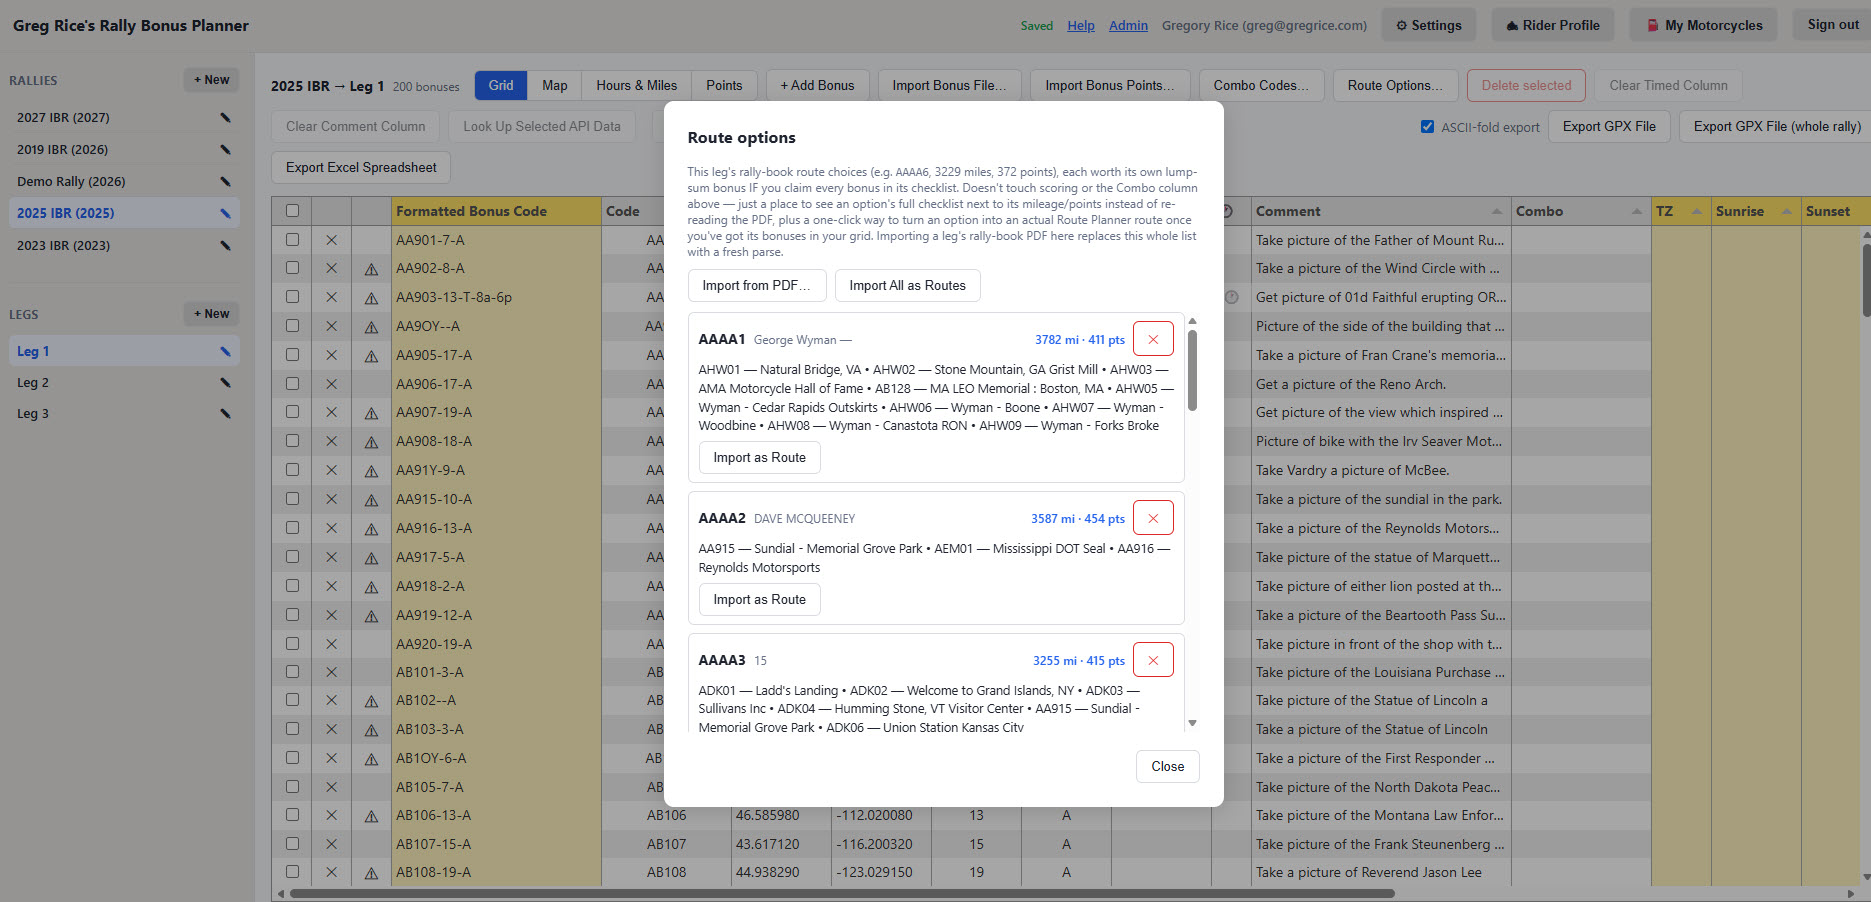
This list is purely a reference — importing it, removing a card, or clicking Import as Route never touches your grid's scoring or the Combo column above it. Import as Route only works once every bonus on that option's checklist is already in your grid (import or add them first if any are missing) — it then creates a new, independent Route Planner route with those bonuses as its stops, same as building one by hand. Import All as Routes does that for every option in the list at once. Re-clicking Import from PDF replaces this whole reference list with a fresh parse of the PDF — it doesn't touch any routes you've already created from it.
Exporting GPX & XLSX
The toolbar's right-hand buttons export the current leg (or the whole rally, for GPX):
- Export GPX — waypoints for the current leg, ready to load onto a GPS.
- Export GPX (whole rally) — every leg's bonuses in one file.
- Export XLSX — a spreadsheet copy of the current leg's grid.
Check ASCII-fold export (on by default) to strip accented characters from exported names — useful for older GPS units that don't handle non-ASCII text well.
Want a route line, not just a flat waypoint list? See Building a route below — it has its own GPX and KML export with the road-following line included.
Hours & Miles planning
Click Hours & Miles next to Grid and Map in the toolbar to open this rally's planning worksheet — how much riding time a leg actually has once rest, gas stops, bonus stops, and routing time are subtracted, and how many miles that riding time makes possible. It covers 1 to 3 legs, and use the Legs +/− control at the top to match however many legs your rally has. Everything here is saved per rally and shared across every leg, the same as combo codes.
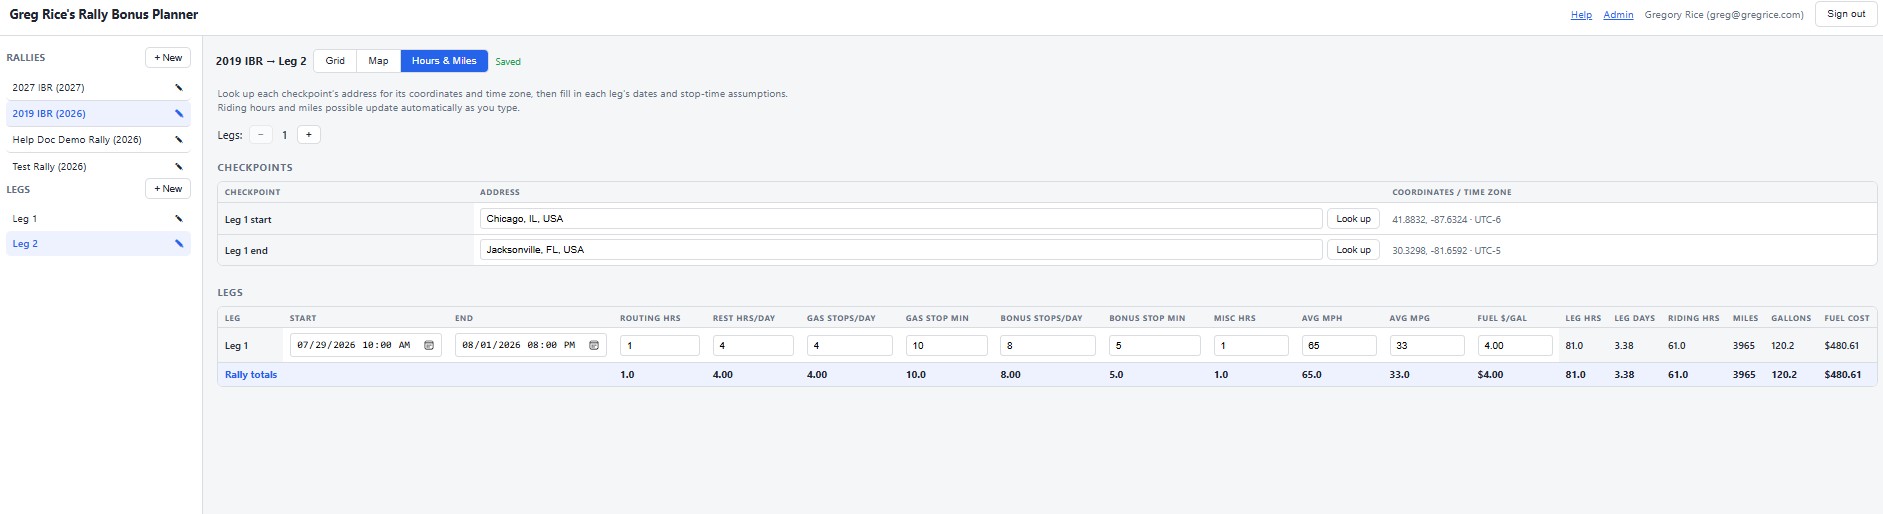
Rest hrs, # Gas stops, Gas stop hrs, # Bonus stops, and Bonus stop hrs show each leg's real total — not just the daily rate you typed into Rest hrs/day, Gas stops/day, etc. — correctly accounting for legs that span more than one day (a 61-hour leg at 4 gas stops/day works out to 10.17 gas stops for the leg, for example). The bold Rally totals row sums Rest hrs/day, Gas stops/day, Gas stop min, Bonus stops/day, and Bonus stop min across every leg in use — 4 rest hours on each of 3 legs shows 12, not 4 — while Avg MPH, Avg MPG, and Fuel $/gal still show an average, since adding those together wouldn't mean anything.
Each leg is bounded by two checkpoints — its start and its end. Type an address for each checkpoint (city and state is usually enough) and click Look up to resolve it to coordinates and a time zone; that's the one place this page calls out to Google. A 2-leg rally shares its middle checkpoint (leg 1's end is leg 2's start), so you'll only ever look up legs + 1 checkpoints total, not two per leg.
For each leg, fill in its start and end date/time and your planning assumptions — routing hours, planned rest hours per day, gas and bonus stops per day and how long each takes, any misc hours, and your Avg moving MPH, fuel economy, and fuel cost per gallon. Leg hours, riding hours available, and miles possible update automatically as you type, and the bold Rally totals row at the bottom of the Legs table adds them up across every leg in use — averaging the per-day assumptions over however many legs you actually have, rather than always dividing by three.
Avg moving MPH is your speed only while actually riding — never blended with rest, gas, bonus-stop, or misc time, which this table already subtracts out on its own into Riding hrs before multiplying by Avg moving MPH to get Miles. It's a separate number per leg (not pulled from your Rider Profile), since real moving speed tends to vary rally to rally more than a personal baseline does. See Rider profile for the fuller explanation of "moving" speed, which means the same thing everywhere the app asks for it.
Like the bonus grid, changes save automatically — watch the small save indicator in the toolbar. Only your inputs are stored; every hours/miles/fuel figure is recalculated from them each time you open this page.
Once a leg block here has both dates and both checkpoints looked up, its Miles possible number automatically feeds the bonus grid and map's Range flag for that same leg — matched by position (this worksheet's Leg 1 to your rally's first leg, Leg 2 to its second, and so on). See The bonus grid for what that flag means.
Bonus point planning
Click Points next to Hours & Miles in the toolbar to open this rally's bonus point plan — how many points each leg needs, and how your planned route and actual score compare to that target. Like Hours & Miles, it covers 1 to 3 legs (use the Legs +/− control at the top), and everything is saved per rally, shared across every leg.
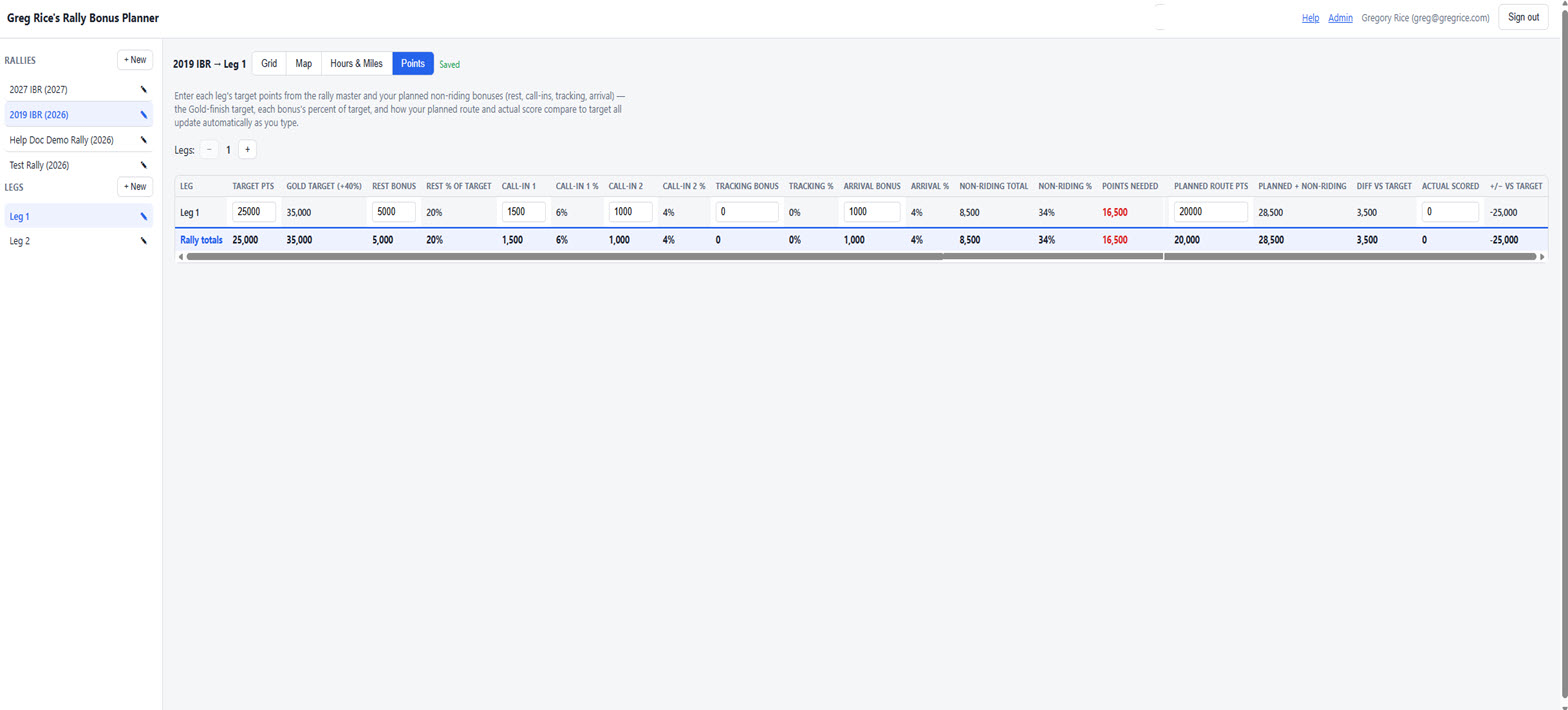
For each leg, enter the Target points the rally master published for that leg, then your planned non-riding bonuses — rest bonus, both call-in bonuses, tracking bonus, and arrival bonus. The Gold target (+40%) column, each bonus's percent of target, the Non-riding total, and the red Points needed column (how many bonus points your route still needs to hit target once non-riding bonuses are counted) all update automatically as you type.
Fill in Planned route pts with the bonus total from your planned route in Basecamp or your mapping program, and the Diff vs target column shows whether that's enough — it turns pink when you're short. After the rally, fill in Actual scored to see your final +/− vs target for each leg. The bold Rally totals row adds every column up across all legs in use.
Changes save automatically — watch the small save indicator in the toolbar. Only your inputs are stored; every gold target, percentage, and points-needed figure is recalculated from them each time you open this page.
Map view
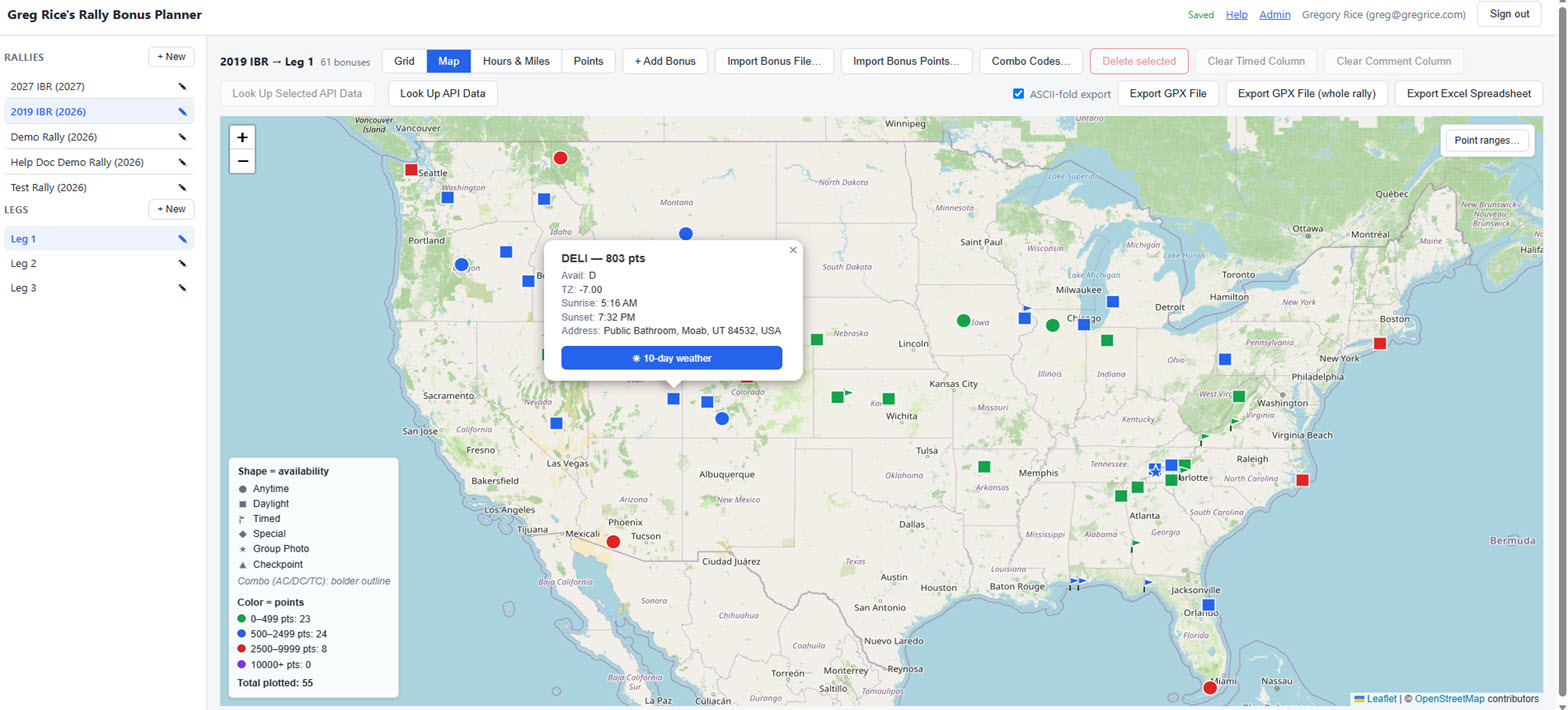
Click Map next to Grid in the toolbar to switch views. Each bonus is plotted as a marker whose shape encodes its availability (circle, square, flag, diamond, star, triangle — see the legend) and whose color encodes its point value. Combo bonuses (AC/DC/TC) get a bolder outline.
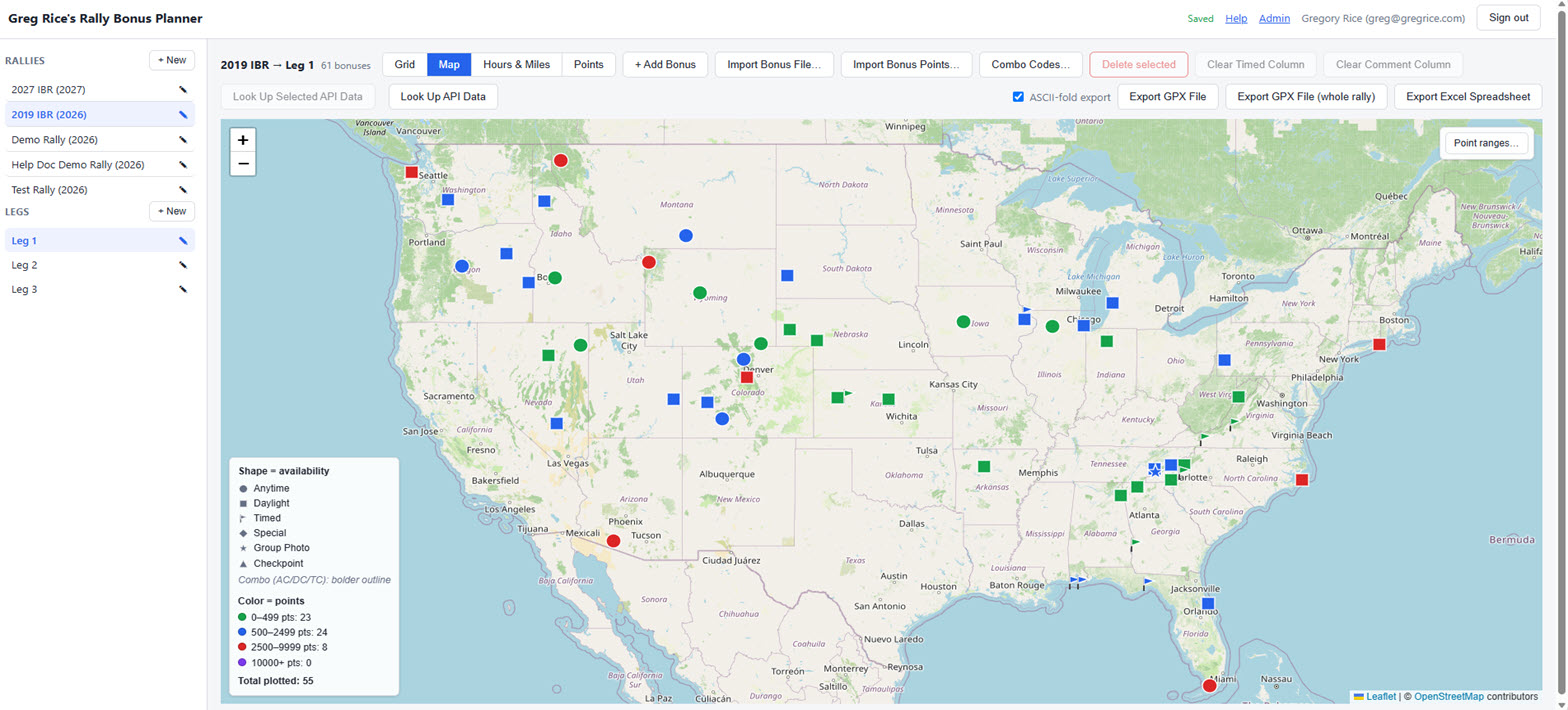
Click any marker to see its details in a popup, including a one-click link to its weather forecast.
A marker shown dimmed and grayed-out is the same Range flag as the bonus grid's Range column — a bonus a round trip from Start to it and back to End can't fit inside this leg's Hours & Miles budget (see the bonus grid for how that budget is matched to each leg). It's still fully clickable and still shows on the map either way — never hidden or removed, only dimmed — so the bonuses actually worth planning around stand out.
Building a route
Pick the bonuses you want to ride, in order, and the app draws a route line on the map with a stop count, distance, and estimated ride time — then export it as its own GPX or KML file, separate from the plain bonus-list exports above.
Two ways to add stops, and you can mix both on the same route:
- In Grid view, check the bonuses you want (same checkboxes used for delete/ lookup) and click Add Selected to Route.
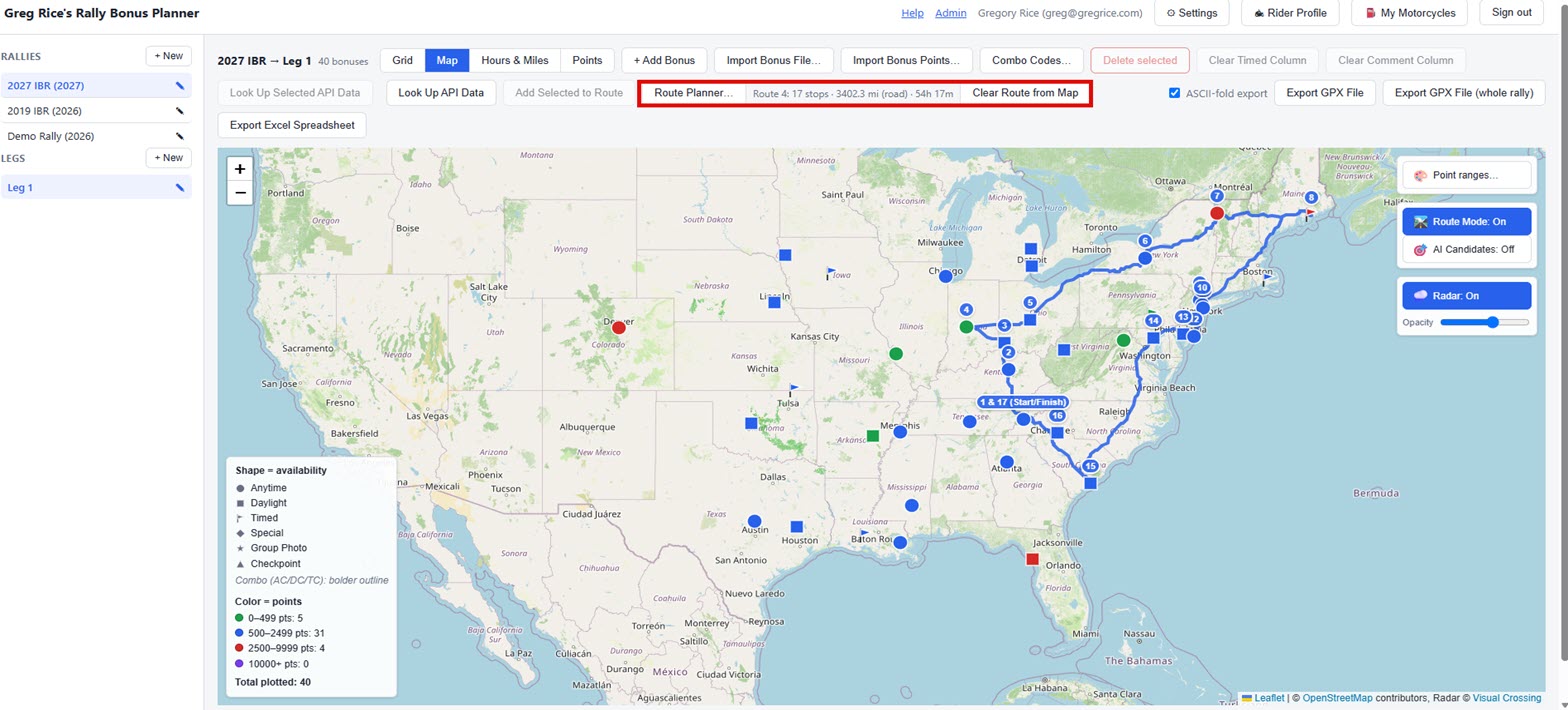
- In Map view, click Route Mode: Off (top-right) to turn it on, then click bonus markers in the order you'd ride them — a numbered badge appears on each one you've added. Click again to remove a stop. Turn Route Mode back off to go back to clicking markers for their normal popup.
Many rally legs start and end at the same bonus location. To close a loop like that, click the route's first stop again once you've added the rest of the stops — instead of removing it, that adds it a second time as the final stop, and its map marker shows both stop numbers (e.g. "1 & 6"). Click it once more to undo the loop and go back to a one-way route. To remove a specific occurrence of a repeated stop (say you want to drop the closing one but keep the bonus as the start), use the ✕ in the Route Planner panel's stop list instead of the map marker — it removes exactly the one you click, not every use of that bonus.
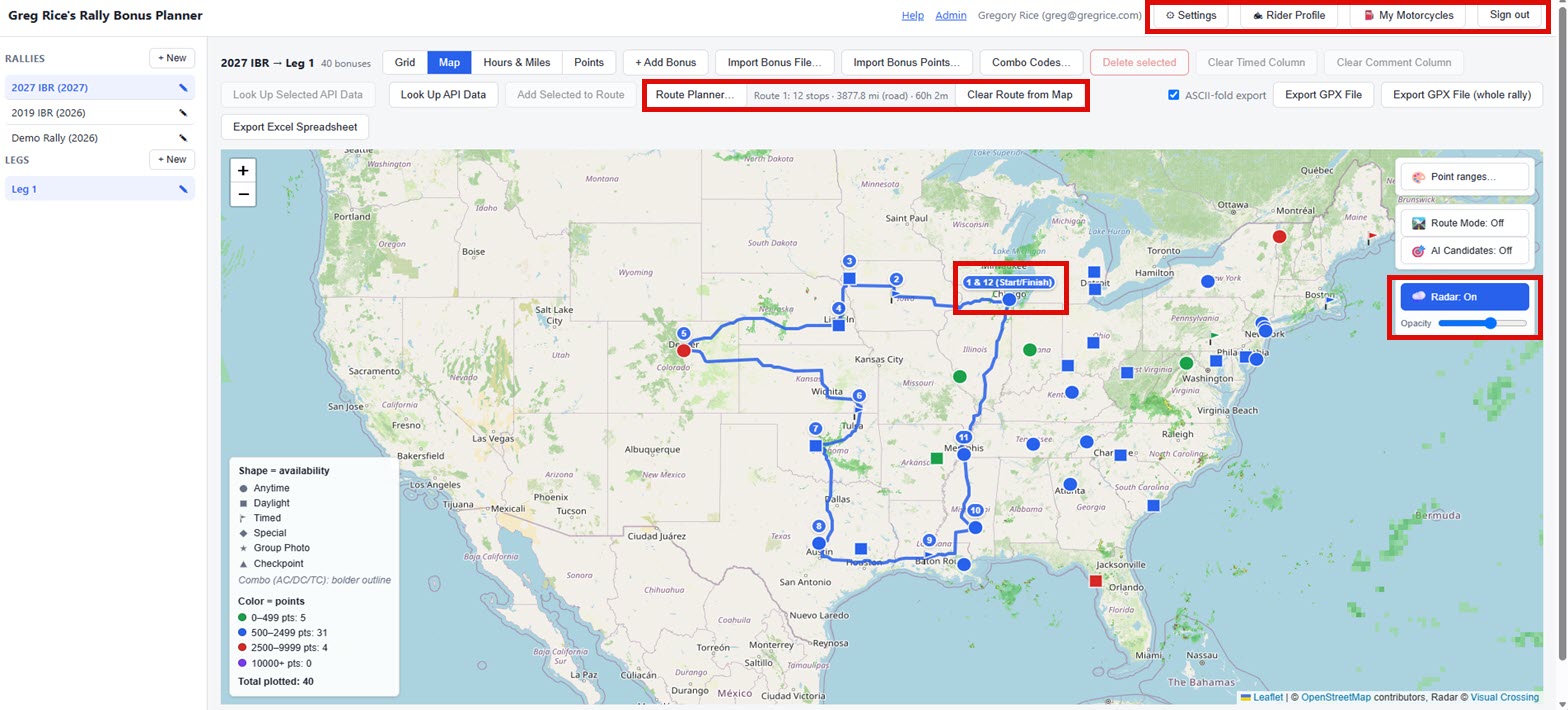
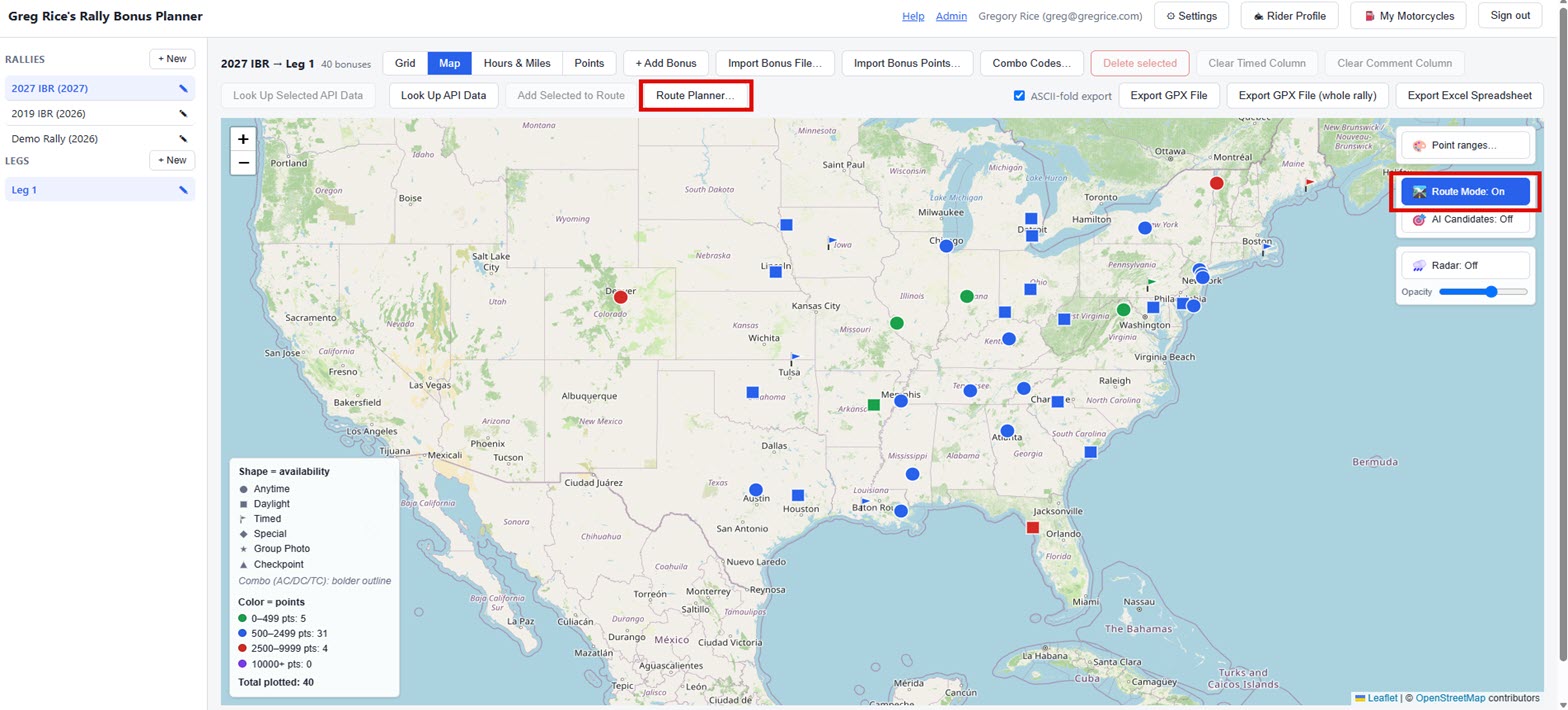
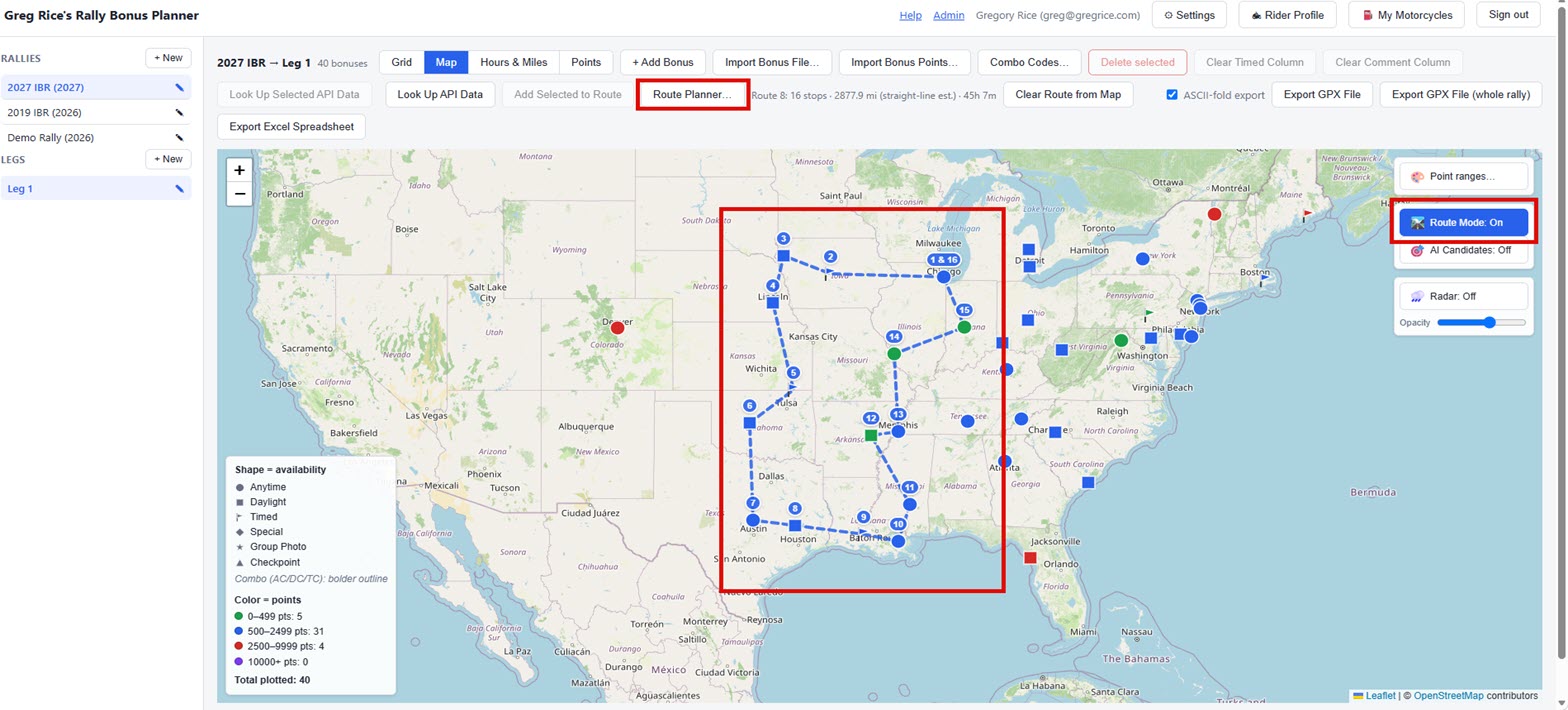
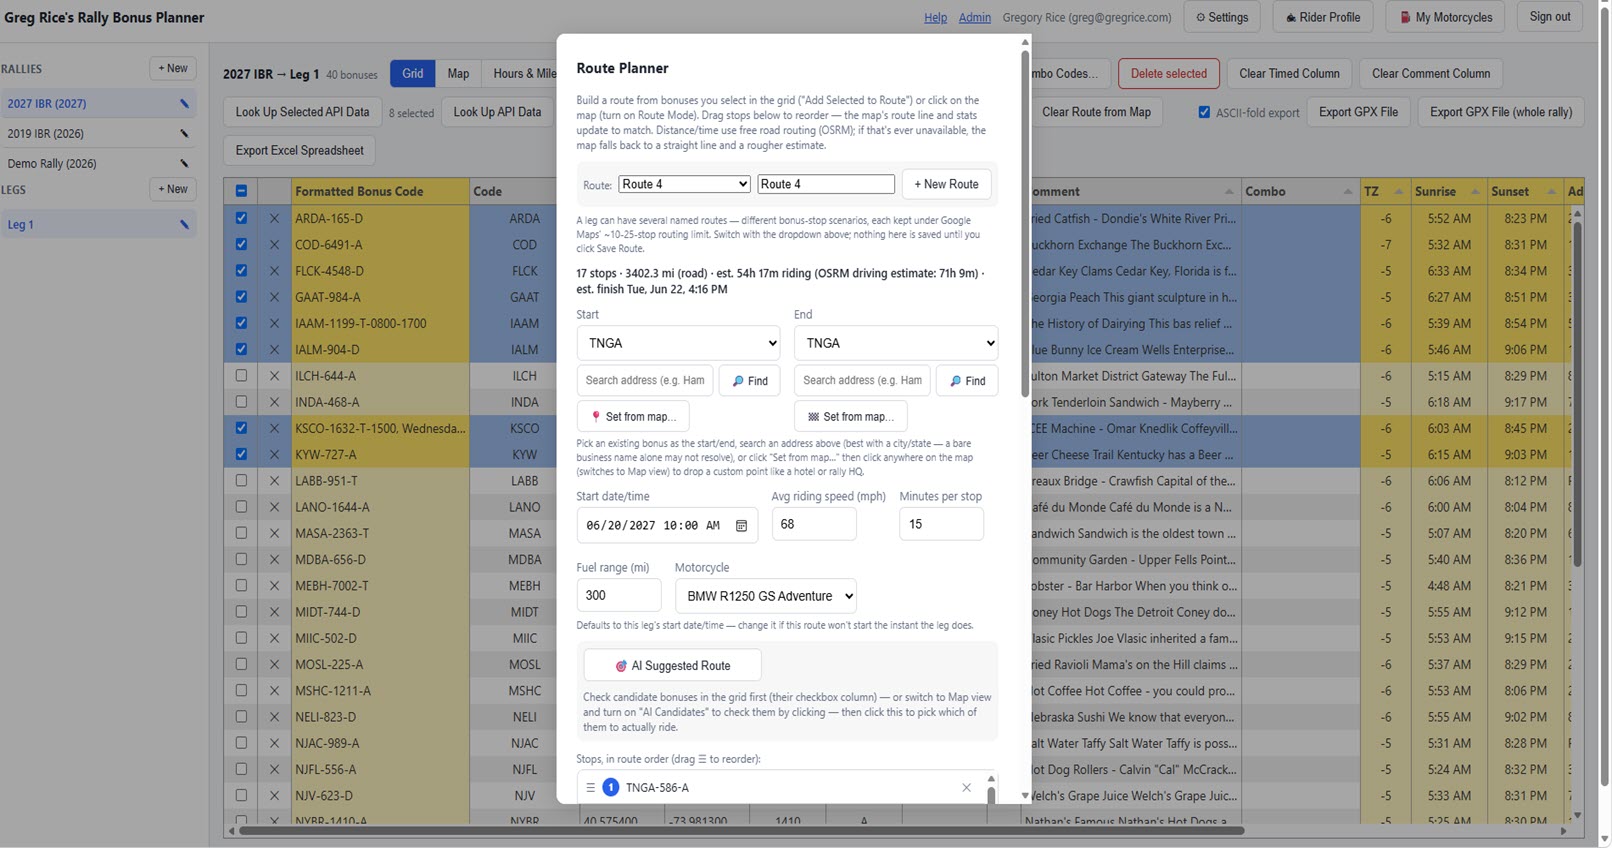
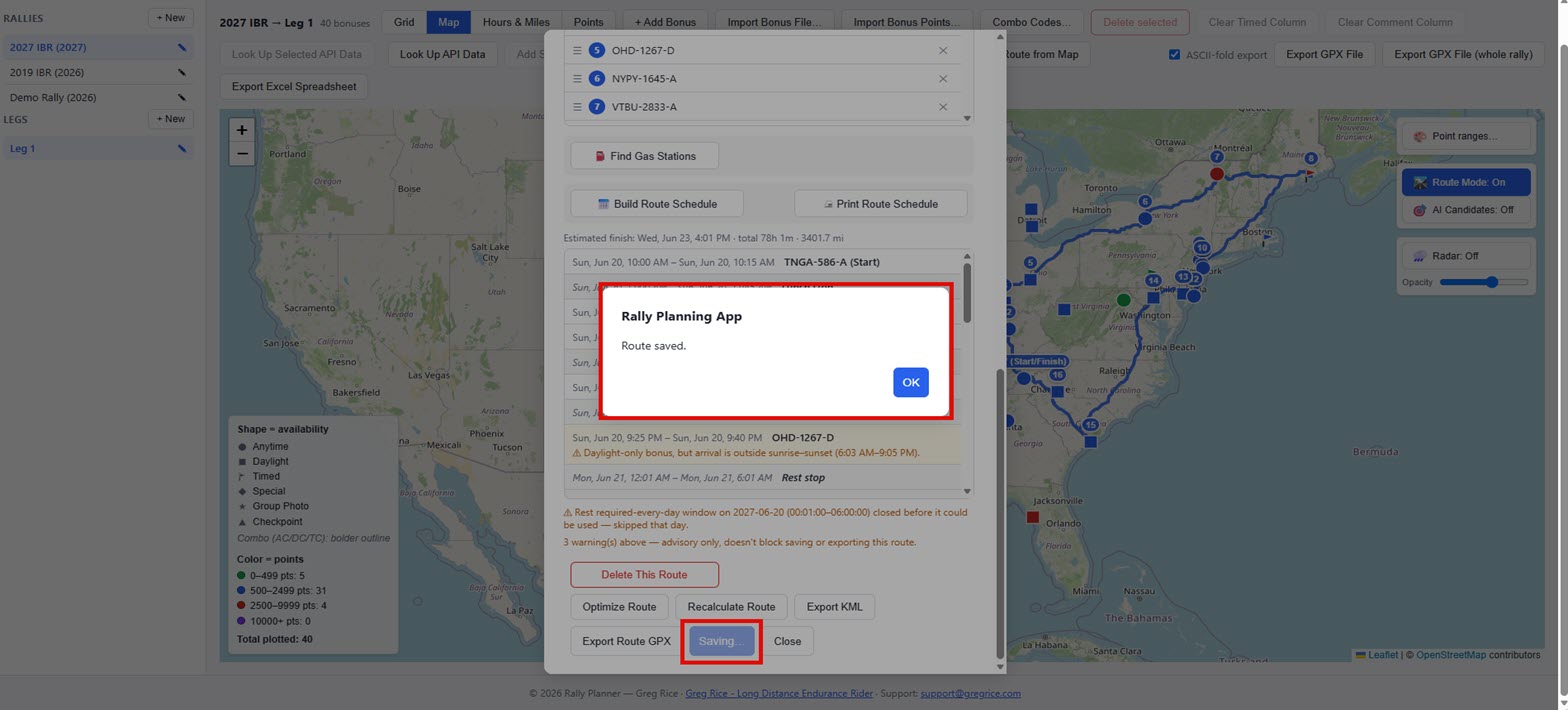
Click Route Planner… in the toolbar any time to open the route panel: drag stops (☰) to reorder, click ✕ to remove one, and set your Avg moving speed and minutes-per-stop — those two feed the estimated ride time. Start date/time defaults to the leg's own start date/time but is yours to change (say the route doesn't start the instant the leg does) — set it and the panel shows an estimated finish time too. Recalculate Route refreshes the road distance and the map's route line from free road-routing data; Save Route keeps the route for next time you open this leg; Delete This Route deletes it. Export Route GPX downloads the stops as a route for Basecamp/Garmin — the GPS recalculates the actual road path itself when you activate the route, so the file doesn't carry a separate road-line track. Export KML downloads the stops and the road-following line (Google My Maps/Earth have no route-recalculation feature of their own, so the line is the only way to see the road path there).
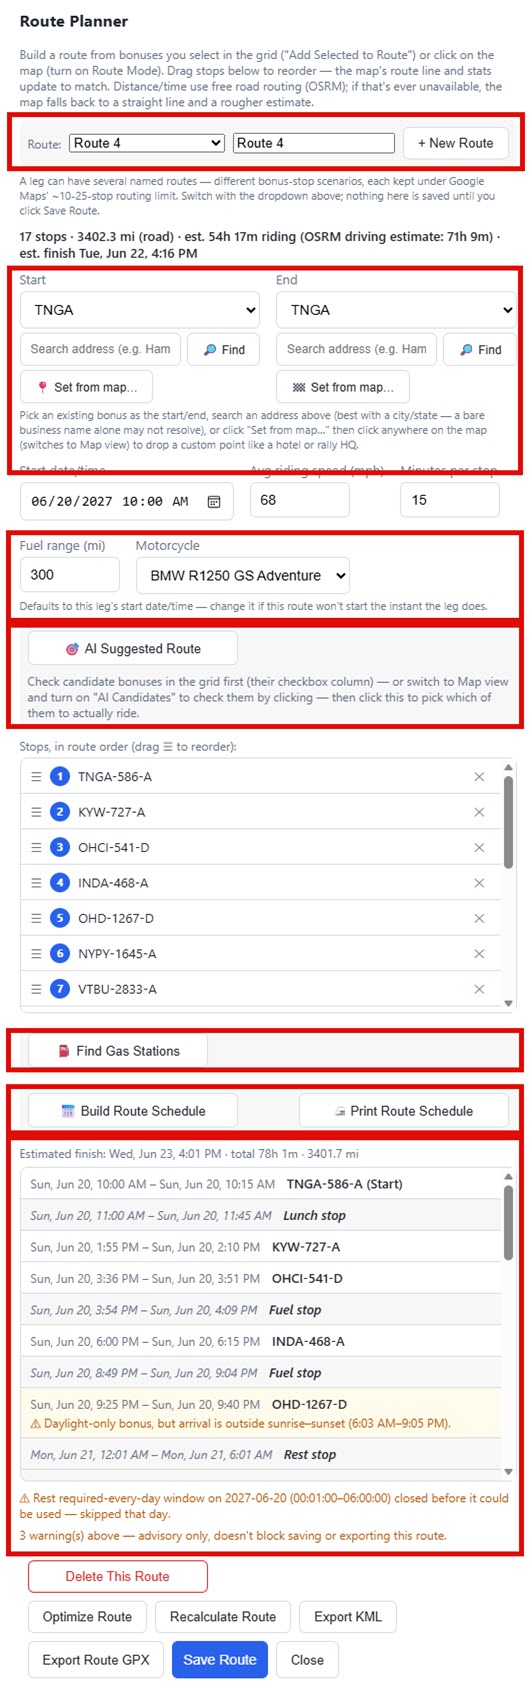
Click the ℹ️ Route Info button (next to the route-stats line near the top of the panel) any time for a clean, screenshot-friendly summary: every stop broken down by kind — Bonus, Gas, Rest, and Lunch stops, plus a Total — followed by Points, Distance, Riding time, and Points-per-mile efficiency. Gas/Rest/Lunch counts and the Total row only show up once you've clicked 📅 Build Route Schedule for this route (see below) — until then, the popup offers a Build Schedule Now button in their place instead of showing stale or missing numbers.
The road distance/line comes from a free routing service and can occasionally be unavailable — when that happens the map shows a dashed straight line instead and labels the distance as an estimate, so it's never mistaken for the real road distance. The estimated ride time is always calculated from your own speed/stop-time settings, not a car-driving estimate.
Start, End, and your motorcycle
The Start and End pickers each accept either an existing bonus (the dropdown, same list as the grid) or a custom point — a hotel, rally HQ, or any other spot that isn't itself a bonus. Two ways to set a custom point:
- Type an address into the search box above Set from map… and click 🔎 Find (or press Enter). Works best with a city/state included — "Hampton Inn, Springfield IL" rather than just "Hampton Inn" — since it's a street-address lookup, not a full place-name search. The label defaults to whatever you typed; the line underneath shows the address it actually found, so you can confirm it landed in the right spot before relying on it.
- Click Set from map…, then click anywhere on the map to drop a pin by hand and give it a label — the fallback for anywhere the search box can't resolve.
If this leg has a saved Start/End location — set in the leg's own edit popup, see Creating a leg — the Start and End pickers here default to that location automatically, the moment you open this leg or start a new route for it, so you're not re-typing or re-searching the same hotel address every time. You can still change or clear either one for this specific route same as before; it only sets the starting point.
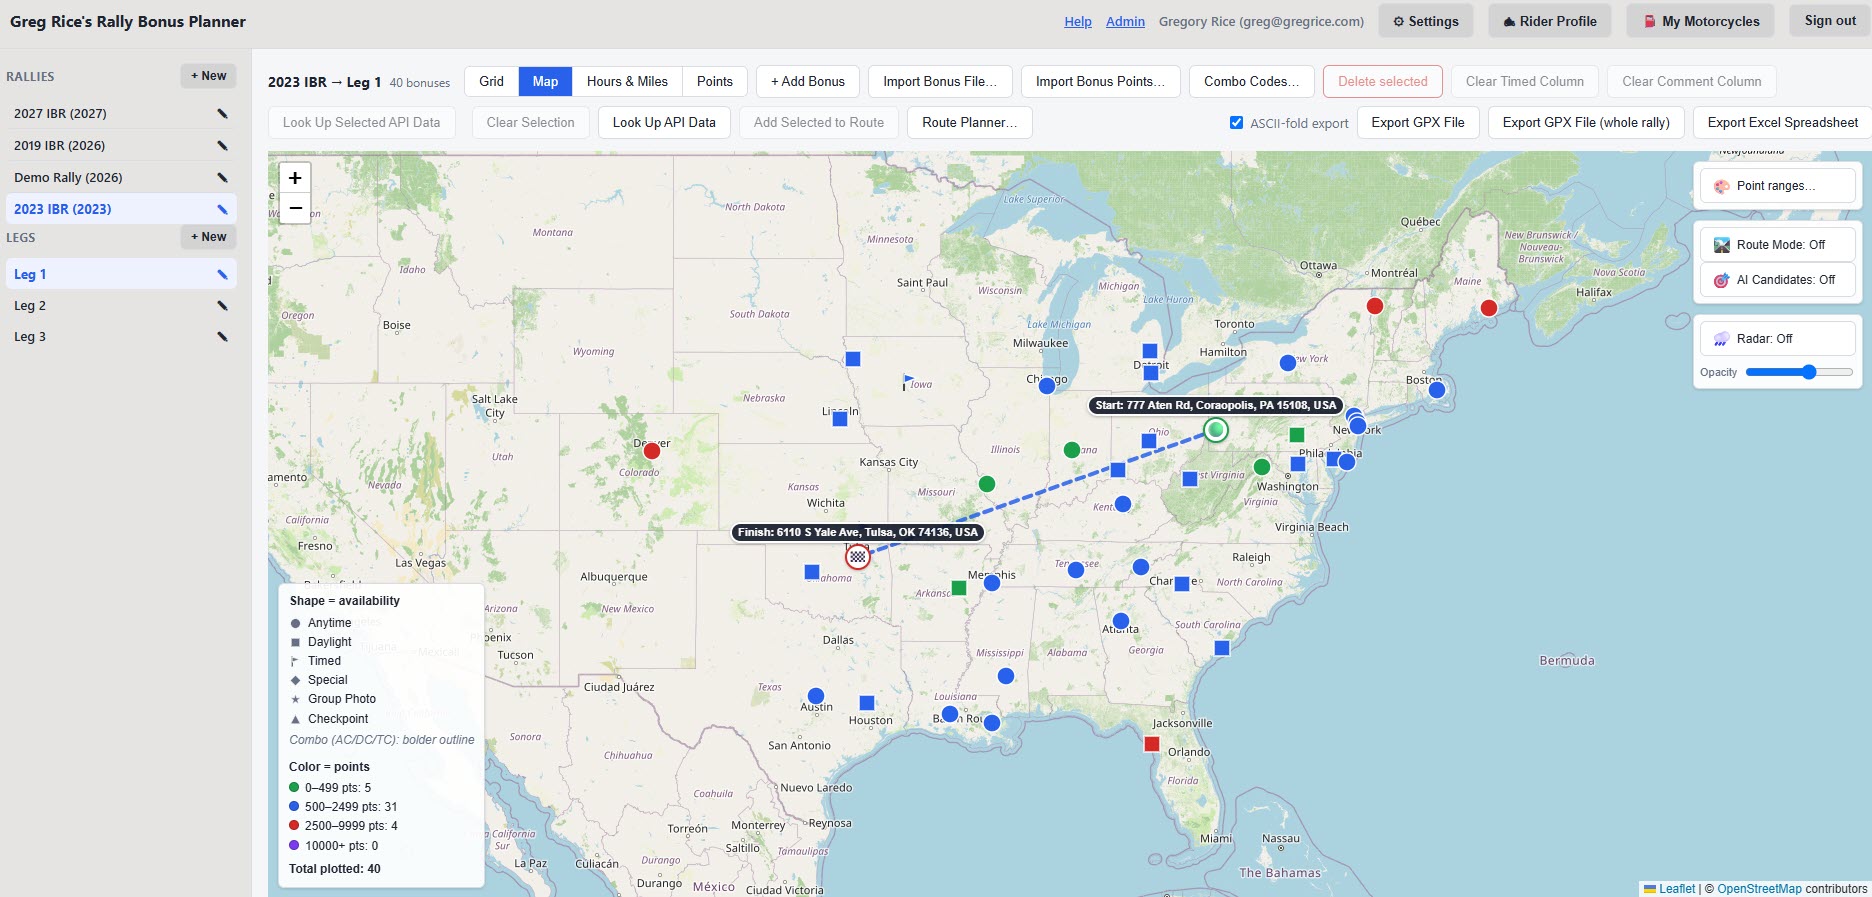
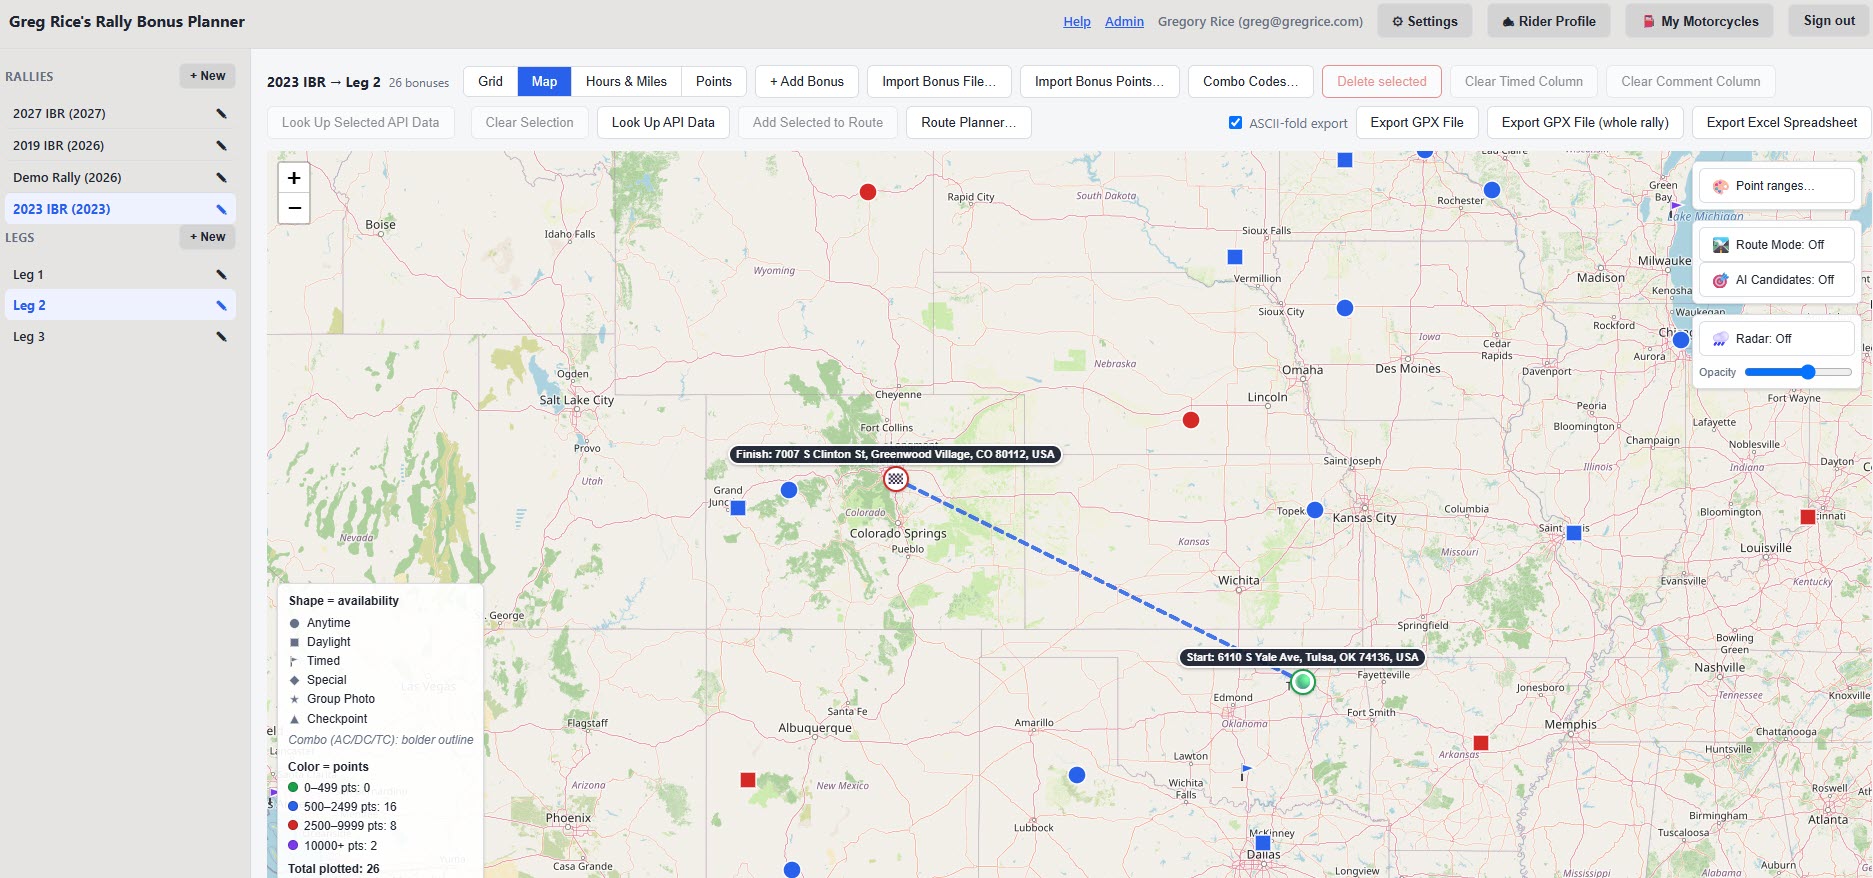
A bonus picked as Start/End gets "(Start)"/"(Finish)" added to its existing map marker; a custom point gets its own 🟢/🏁 marker instead. The Motorcycle dropdown lets you attach one of your saved motorcycle profiles to this route — it's saved with the route so you know which bike it was planned for, and it fills in Fuel range (mi) from that bike's own tank/consumption numbers (switching bikes updates it again); overwrite it with your own number any time if you'd rather. A fresh route also starts with Avg moving speed and Minutes per stop pre-filled from your rider profile, instead of a generic guess.
🎯 AI Suggested Route
Where Optimize Route (below) only reorders stops you've already picked, 🎯 AI Suggested Route picks which bonuses to ride in the first place — and in what order — out of a pool of candidate bonuses you check off, aiming to score the most total points while still getting you back to your End point by the leg's own end date/time.
Set these up first
Two of these are required — 🎯 AI Suggested Route simply won't run without them, and tells you which one's missing if you click it too soon. The rest are optional and fall back to sensible defaults, but are worth setting once so every route you plan uses your own numbers instead of a generic guess.
- Your Rider Profile (optional). Sets your average moving speed and preferred stop length — pre-fills Avg moving speed and Minutes per stop below on every route. Skip it and those default to 55 mph / 15 minutes instead.
- A motorcycle profile (optional). Pre-fills Fuel range (mi) from that bike's tank size and MPG. Skip it, or don't pick one from the Motorcycle dropdown, and the route defaults to a flat 200-mile fuel range instead.
- The leg's Start and End date/time (required). Set under Creating a leg when you create the leg, or any time after via its ✎ edit button — this is per-leg, not a rally-wide setting, so a multi-leg rally needs it set on each leg separately. 🎯 AI Suggested Route uses the leg's End date/time as its hard deadline for getting back to your End point, so it refuses to run without one.
- Rest stop and/or lunch break rules (optional — only if your rally requires them). Set on the rally itself (✎ next to the rally name) so every leg uses the same rule by default, or override a specific leg individually (✎ next to that leg) — the fields are Rest stop every (hours)/Rest stop duration (minutes) and the matching Lunch break every (hours)/Lunch break duration (minutes), both optional clock-time windows, and a Required every day checkbox for Iron Butt-style "once per calendar day" rules instead of an hours-since-last-stop interval. Leaving a leg's fields blank inherits whatever the rally has set; leaving both blank means that rule simply isn't required. One exception: if you leave the rest-stop interval/duration blank on both the rally and the leg, it quietly falls back to your Rider Profile's own "How often do you want a break?"/"How long is each break?" answers instead of skipping rest stops entirely — lunch has no such personal fallback, so a lunch break only ever happens if the rally or leg actually asks for one. See Rest, lunch & fuel schedule below for exactly how these get applied once a route's built.
Then, build your candidate pool
A pool of candidate bonuses — bonuses you'd be willing to ride if they make the cut, not a final list. Two ways to do this, and they both feed the exact same pool so you can mix and match:
- Check them off in the bonus grid's checkbox column, same checkboxes Add Selected to Route uses.
- Switch to Map view and turn on the 🎯 AI Candidates toggle (next to Route Mode) — then click bonus markers on the map to check/uncheck them. A checked bonus gets a small amber ring around its marker so you can see the pool build up as you click. AI Candidates and Route Mode are mutually exclusive — only one can be on at a time, so a click always means one clear thing (check a candidate bonus, vs. add/remove an actual stop).
Any bonus you've marked ⭐ Mandatory joins the candidate pool automatically, whether or not you've also checked it here or on the map — starring it is enough by itself, and it's treated as a hard requirement rather than an ordinary candidate bonus once the search runs (see "Click it" below).
A checked (or ⭐ mandatory) bonus only actually joins the candidate pool if it has coordinates on file — an ordinary candidate bonus that's never been looked up (see Looking up address & timezone) is silently skipped rather than breaking the run, but a mandatory one missing coordinates is called out up front instead — see below.
Then fill in the route fields
See Start, End, and your motorcycle above for the full explanation of each — quick reference:
- Start / End — an existing bonus from the dropdown, an address typed into the search box (works well for a hotel with its city/state, e.g. "Marriott, Chicago IL" — see above for why a bare business name alone can fail), or a pin dropped by hand with Set from map…. In some rallies the start/end hotel is itself one of the imported bonuses — check the dropdown first before searching or dropping a pin.
- Start date/time — pre-filled from the leg's own Start date/time (step 3 above); change it here any time the route itself won't start the instant the leg does.
- Avg moving speed (mph) — pre-filled from your Rider Profile (step 1); overwrite it for just this route any time, including to see how a slower or faster pace changes whether Daylight-only bonuses stay reachable.
- Minutes per stop — same source as above, and same "just this route" override. This is dwell time at each bonus stop only — fuel stops use their own fixed ~15-minute dwell regardless of this setting.
- Fuel range (mi) — pre-filled from the Motorcycle dropdown (step 2), or 200 mi flat if none is picked; overwrite it any time.
Click it
With everything above in place, click 🎯 AI Suggested Route. It replaces your current stop list with whichever subset and order of your checked candidate bonuses scores the most points, while respecting:
- ⭐ Mandatory bonuses — every bonus you've starred (see ⭐ Marking a bonus mandatory) is treated as a hard requirement and seeded into the route first, in its own pass, before the normal points-per-hour search runs — whether or not you also checked it. A low-value mandatory bonus can no longer lose its spot to a higher-value optional one the way it could before this existed; if the leg's time doesn't stretch to cover both, it's one of your checked, non-mandatory bonuses that gets dropped instead.
- The leg's own deadline — it never builds a route that gets back to End later than the leg's End date/time.
- Timed and day/time-specific bonuses — a bonus with a Timed window, or one only available on specific day(s), is only included at a position where it's actually reachable inside that window.
- Daylight-only bonuses — only included where the schedule has you arriving between that bonus's own sunrise and sunset, using the sunrise/sunset already looked up for that bonus (see Looking up address & timezone) — nothing new is fetched to make this decision.
- Rest, lunch & fuel stops — the rules from "Set these up first" above, applied exactly as described in Rest, lunch & fuel schedule below.
A candidate bonus with no structured Timed/Daylight window data on file isn't excluded just because it can't be checked — it's left in as a soft, visible warning on the built schedule instead (same as a manually-built route already shows), never silently dropped for being unverifiable. Specifically for Daylight-only bonuses, if the sunrise/sunset lookup was simply never run for one or more of your candidates (see Looking up address & timezone), 🎯 AI Suggested Route warns you about it before the search even starts, naming which ones — a chance to cancel, run Look up selected/missing, and try again, or continue anyway knowing the search will treat those bonuses as if they had no daylight restriction at all.
If a ⭐ mandatory bonus has no coordinates on file at all, 🎯 AI Suggested Route stops and tells you before it even runs the search — an ordinary candidate bonus missing coordinates is just quietly skipped (see above), but a mandatory one is important enough that you get a chance to fix it, or knowingly continue without it, rather than finding out only after the fact.
When it's done, a confirmation tells you the total points scored, how many candidate bonuses made the cut vs. were left out, and — for smaller candidate pools — the specific reason each excluded one didn't fit (missed its window, or couldn't be fit in without blowing the leg's deadline). If a ⭐ mandatory bonus genuinely couldn't be made to fit anywhere it was tried, that's called out on its own line — "⚠ N mandatory bonus(es) could NOT be included…" — ahead of and separate from the ordinary list of optional bonuses that simply didn't make the value cut, so it's never easy to miss. It also builds the full rest/lunch/fuel schedule for you automatically — the same one 📅 Build Route Schedule produces by hand — so any Daylight-only or Timed bonus your resulting arrival time would actually miss, or couldn't be verified at all, both shows up in the timeline below at the exact stop it applies to and gets a total count called out right there in the same completion popup ("⚠ The built schedule has N warning(s) — this route may not actually be valid"), so it's never something you'd only notice by scrolling down. Like everything else in the route planner, nothing is saved to the database until you click Save Route — so it's safe to try, look at the result and warnings, tweak the average speed or stop time to see if that fixes a close daylight call, and try again with a different candidate pool if it's still not quite what you wanted. The route it builds is a normal, fully editable route afterward — add, remove, or reorder stops by hand same as any other. There's also a hard cap of 50 total stops (start + chosen + end) to match the road-routing service's own limit.
What parameters are used for the AI Suggested Route functionality
Quick reference for everything the search actually reads, and how each one behaves — some can change which bonuses get picked, others only ever add a warning to the resulting schedule:
- ⭐ Mandatory status — read straight from each bonus's own ⭐ column in the grid at the moment you click 🎯 AI Suggested Route. Definitely changes which bonuses get picked: a starred bonus is a hard requirement, not just a higher-priority candidate bonus.
- Avg Moving Speed — is pulled from the Route Planner's "Avg moving speed" field. That field is pre-filled from your Rider Profile's average moving speed when you open Route Planner or switch motorcycles, but it's editable per-route, so whatever value is showing in that field at the moment you click 🎯 AI Suggested Route is what's used.
- Fuel Range — pre-filled from the selected motorcycle's tank + aux tank − reserve, times MPG, times (1 − safety buffer %), but editable, so it's whatever's currently in the "Fuel range (mi)" field.
- Rest/Lunch Rules — come from the resolved leg → rally → (rest only) your Rider Profile's break-interval/duration as a fallback, but only if neither the leg nor the rally has its own rest interval and duration set. Lunch has no rider-level fallback at all — leg → rally → none.
- Night Riding Preference — is read from your Rider Profile, but it's advisory only. It never changes which bonuses get picked or excludes a route; it only adds a warning to the resulting schedule if a stop would be reached after dark.
- "How Hard Do You Ride?" / Intensity — scales the pre-filled "Avg riding speed" default (relaxed −8%, moderate unchanged, aggressive +8% — still editable per-route), and gives 🎯 AI Suggested Route's search a safety buffer before the leg's real deadline (relaxed ≈8% of the leg's own window held back, moderate ≈3%, aggressive 0 — the full window, same as before this feature existed). Unlike night riding and bad weather, this one can change which bonuses get picked. When a buffer is applied, the results popup says so in plain language.
- "Riding In Bad Weather / Rain" — an advisory-only warning, same pattern as night riding: it never changes which bonuses get picked. It only fires when you've already looked up the 10-day forecast for a bonus (grid's ☁ column, or a popup's "10-day weather" button) during this browser session, and that cached forecast's condition looks rainy/stormy/snowy on the day the schedule would actually reach that stop. No new API calls are made on your behalf — if you haven't looked up a bonus's weather, no warning can appear for it, regardless of preference.
Route optimizer
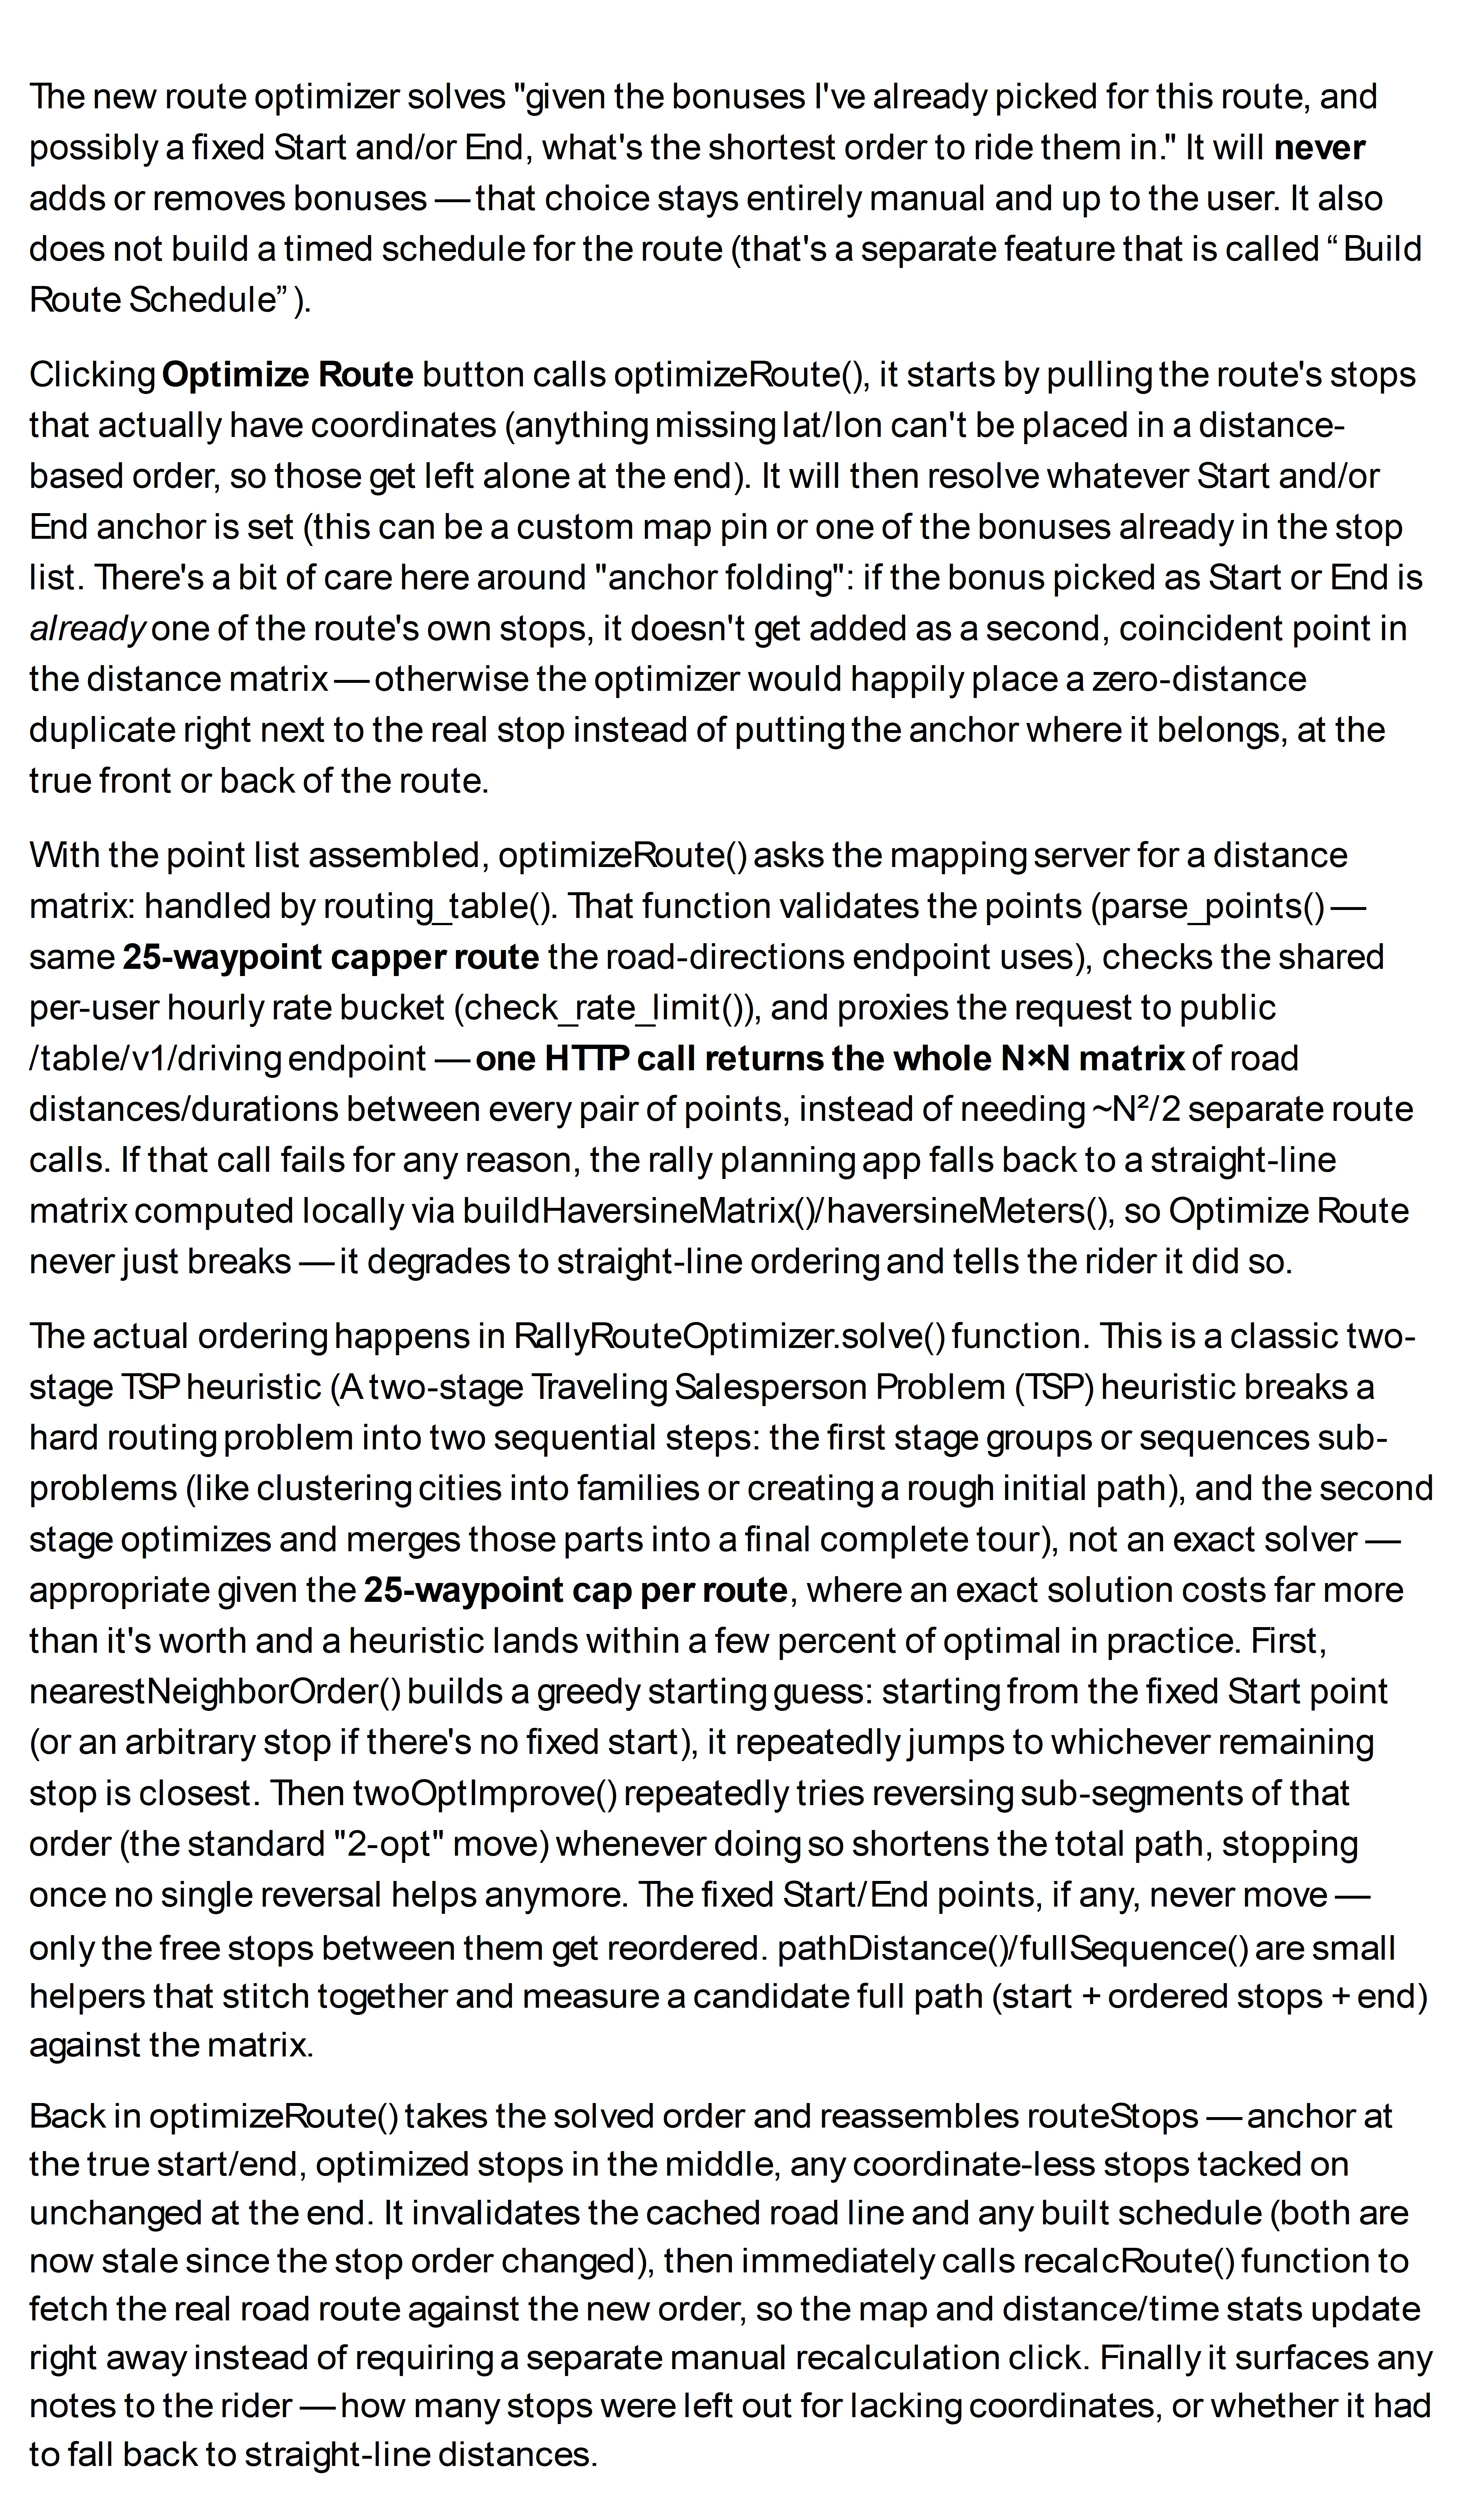
Optimize Route reorders your existing stops for the shortest overall ride, keeping any Start/End you've set fixed at the ends. It never adds or removes stops — bonus selection stays entirely your own manual pick — and it automatically recalculates the real road route afterward, so the map never shows a stale straight line after optimizing.
Under the hood, it asks for real road distances between every pair of your stops (one request covers the whole set, however many stops you have, up to the same 50-stop cap the road-routing itself uses) and uses those to work out a short overall order — good, not necessarily mathematically perfect, but close enough that hunting for a better one by hand isn't worth the effort. If road distances are briefly unavailable, it falls back to straight-line distances instead of failing outright, and tells you so.
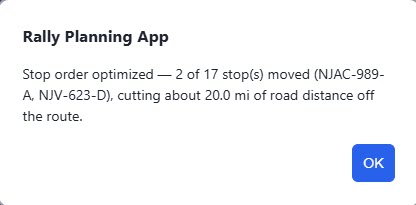
Once it's done, a message tells you exactly what changed — how many stops moved (and which ones, by name, for smaller routes), plus roughly how much distance the new order saves. If your stops were already in the shortest order, it tells you that too, rather than leaving you to wonder whether the click did anything.
Rest, lunch & fuel schedule
📅 Build Route Schedule goes a step further than distance/time stats: it builds a full timeline — arrival and departure at every stop — inserting rest, lunch, and fuel stops wherever they'd actually trigger (even mid-leg, if one stretch is long enough to need more than one). It uses your rider profile and the rally/leg's rest & lunch rules where set, falling back sensibly when either is missing, and flags — but never blocks — any Daylight-only or Timed bonus your arrival time would miss. Every warning is advisory only; re-running it after any change is one click away.
The rest/lunch rules themselves live on the rally (Edit under the rally in the sidebar) and can be overridden per leg (Edit next to the leg) — Rest stop every (hours)/Rest stop duration (minutes) and the matching Lunch fields, all optional. A leg left blank inherits the rally's value for that field; a rally left blank means "not required" for it.
Rest and lunch can each also require the mandatory stop to start within a specific clock-time window — Rest window start/Rest window end (e.g. an Iron Butt-style 11:00 PM–4:00 AM overnight window) and Lunch window start/Lunch window end (typically daytime, e.g. 11:00 AM–4:00 PM) — set independently of each other; both fields in a pair need a value for that window to apply. Once a stop is due, Build Route Schedule checks the clock: if it's already inside the window, the stop starts right then (and still runs its full required duration even if that extends past the window's close). If not, rather than showing the rider as parked and idle, the timeline simply keeps going as normal riding — any fuel or other due stops in between still appear exactly as they would anyway — right up until the window opens, at which point the rest/lunch stop starts there, with its required duration counted only from that moment. A rest stop and a lunch stop are never combined into a single stop even if both happen to be due around the same time — whichever one's window opens sooner takes its stop first, and the other follows immediately after.
Some rallies (Iron Butt-style ones especially) require the rest and/or lunch stop every single day of the rally — including day 1 — landing inside that rule's window, rather than every so many hours. Check Rest required every day (or Lunch required every day) on the rally to switch that rule to this daily mode; a rally uses either the hours-based interval or daily mode for a given rule, never both at once, and daily mode only takes effect when that rule's window is also set (a specific clock-time target is what "once a day" anchors to). A leg can override this independently via its own Rest required every day/Lunch required every day dropdown — Same as rally inherits the rally's checkbox, or pick Required every day/Not required to explicitly override it just for that leg. If a day's window already closed before it could ever be reached — the rally's own start time is already past day 1's window, or a long stop elsewhere ate into the clock — Build Route Schedule flags an advisory warning and skips straight to the next day rather than forcing something impossible.
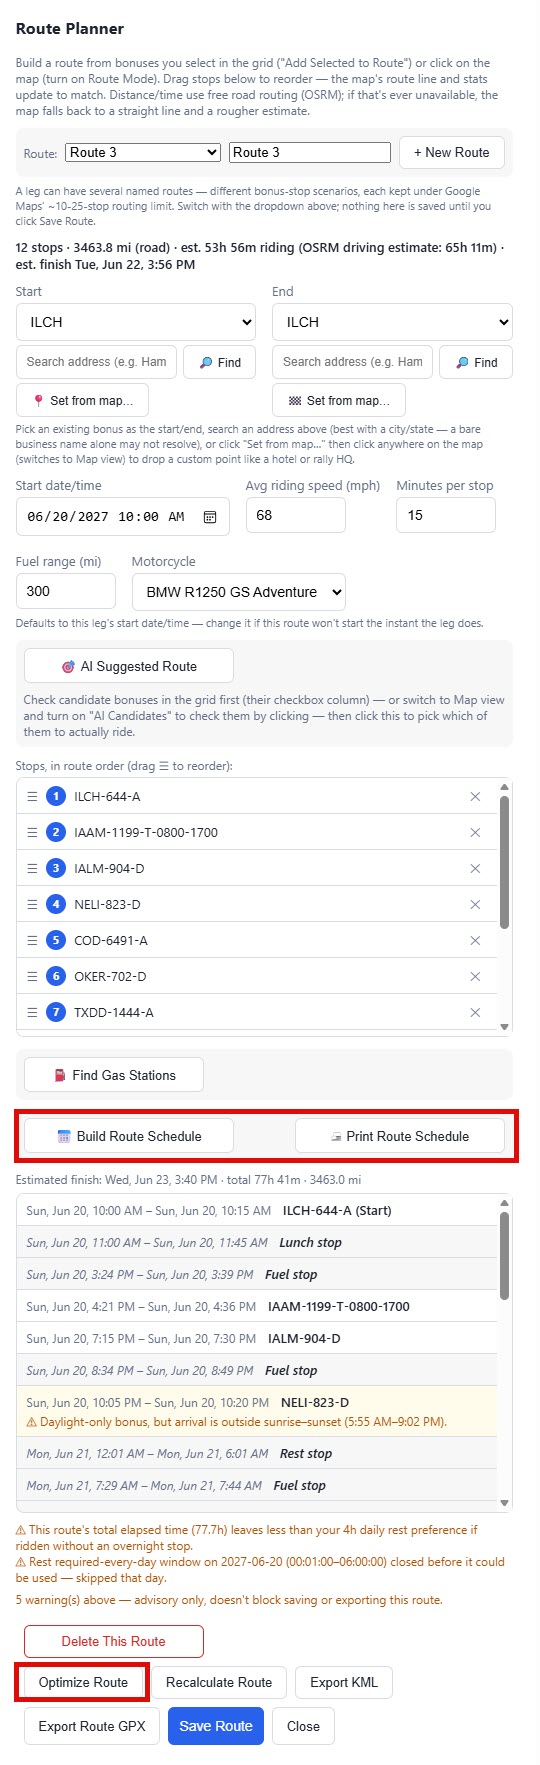
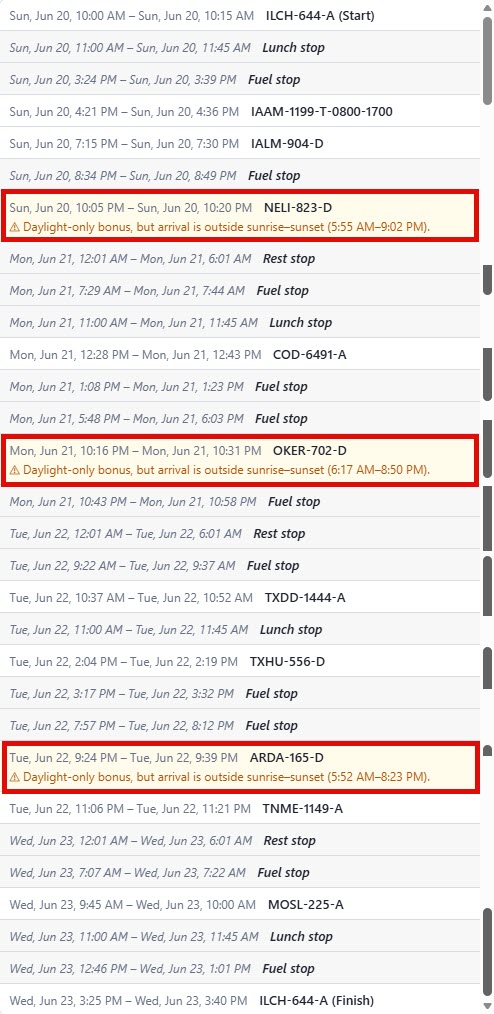
Build Route Schedule's Timed-bonus check uses the structured window set via the 🕐 icon next to the Timed column, not the plain Timed text itself — see the bonus grid above.
The schedule is saved along with the route the next time you click Save Route — reopening the route later shows it immediately, no need to click Build Route Schedule again unless you've changed the stops, Start time, average speed, stop time, or fuel range since (any of those clears the saved schedule, since it's no longer accurate). Use 🖨 Print Route Schedule to open a clean, print-friendly copy of the timeline in a new tab; your browser's Print dialog (Save as PDF) covers keeping a copy as well as printing one.
Multiple routes per leg
A leg isn't limited to one route — the Route: dropdown at the top of the Route Planner panel lets you build and save several named route scenarios for the same leg, and switch between them at any time. This matters because Google Maps-based tools (including my separate Route Planner & Cannonball AI app, which this app's GPX route export is designed to feed into) can only handle around 10–25 stops in one route before Google's own routing API rejects the request outright. A leg with more bonuses than that doesn't fit in a single route — so instead of forcing every bonus into one oversized route, you can split it into a few smaller ones, each kept comfortably under that limit.
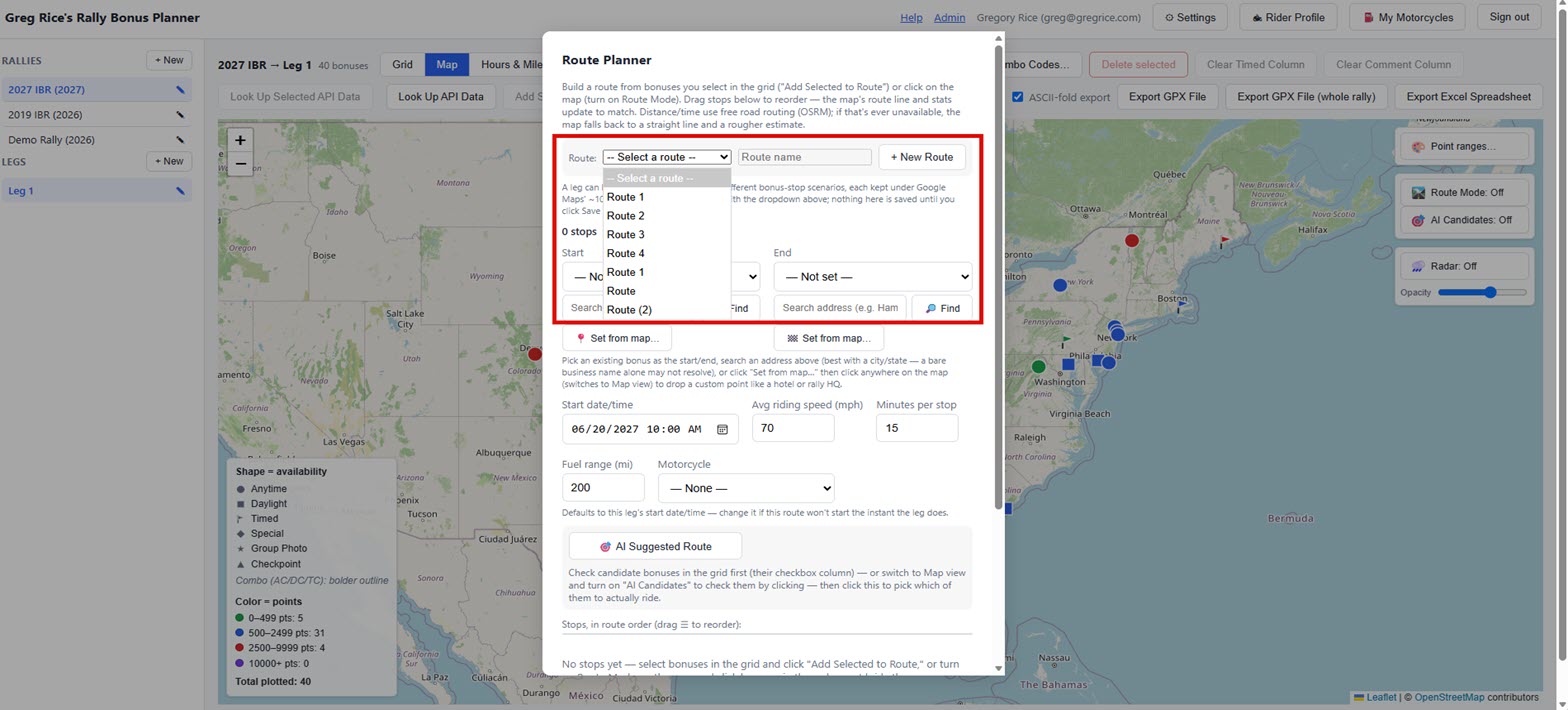
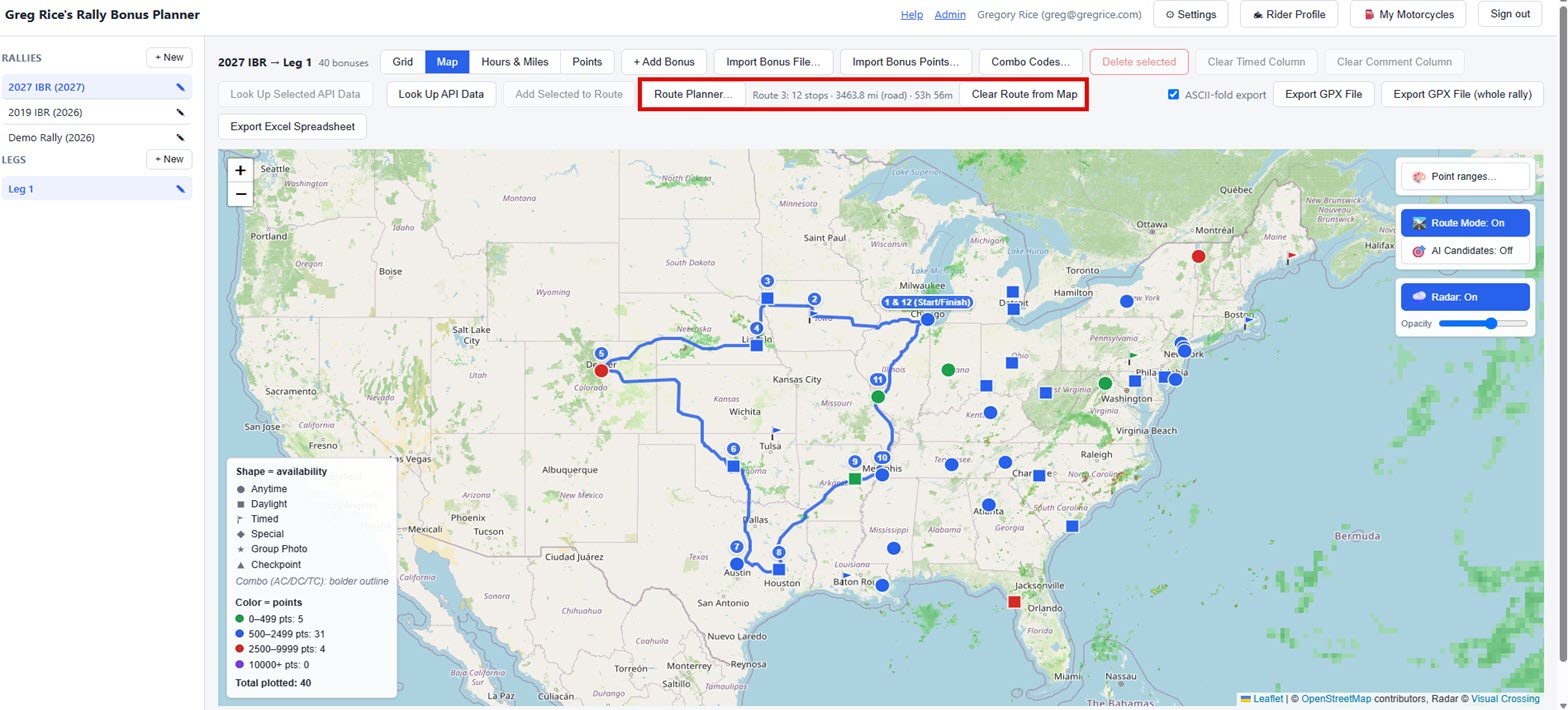
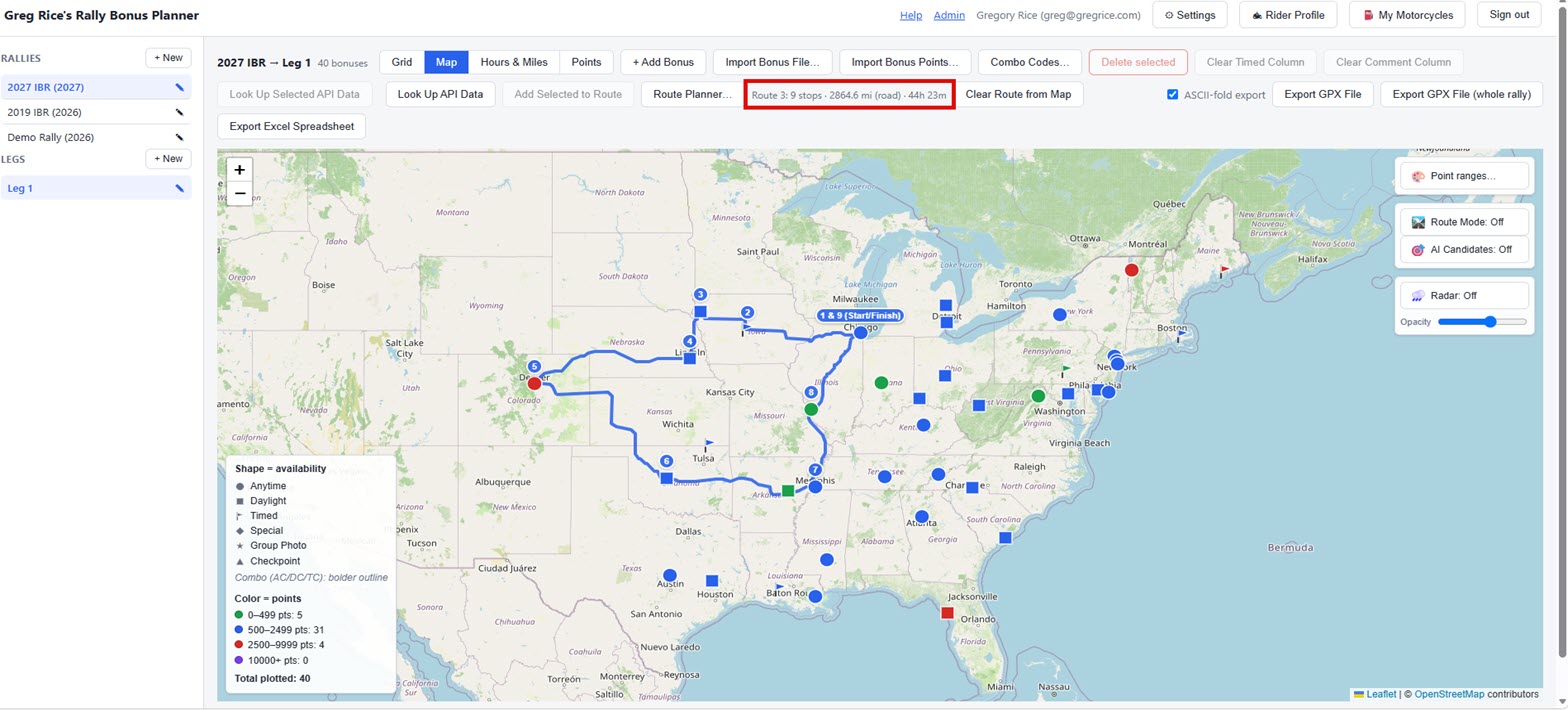
Exporting GPX/KML from the route panel now names the file after the specific route ("<Rally> - <Leg> - <Route name>"), so exporting two different scenarios from the same leg gives you two distinct files instead of one overwriting the other.
Opening a leg with saved routes doesn't automatically draw one on the map — you'll see just the bonus markers until you pick a route from the Route: dropdown (or start a new one). Clear Route from Map, next to the route summary in the toolbar once a route is showing, hides the current route and its gas stops from the map without deleting anything — pick it again from the dropdown any time to bring it back.

Gas station search
Once a route has at least two stops, the Route Planner panel's ⛽ Find Gas Stations button searches a local gas station dataset for stops near the route line and suggests where to fuel up along the way. Set Fuel range (mi) to your bike's real tank range first — the search places a suggested stop roughly every 90% of that range (a built-in reserve buffer). At each stop, a 24h-reliable station (a truck stop or a known 24-hour brand) is preferred over a regular one when there's a nearby choice — if none is nearby, it falls back to the nearest regular station rather than skipping the stop. Click ⛽ Find Gas Stations to run it; if the route fits inside a single tank, no stops are suggested.
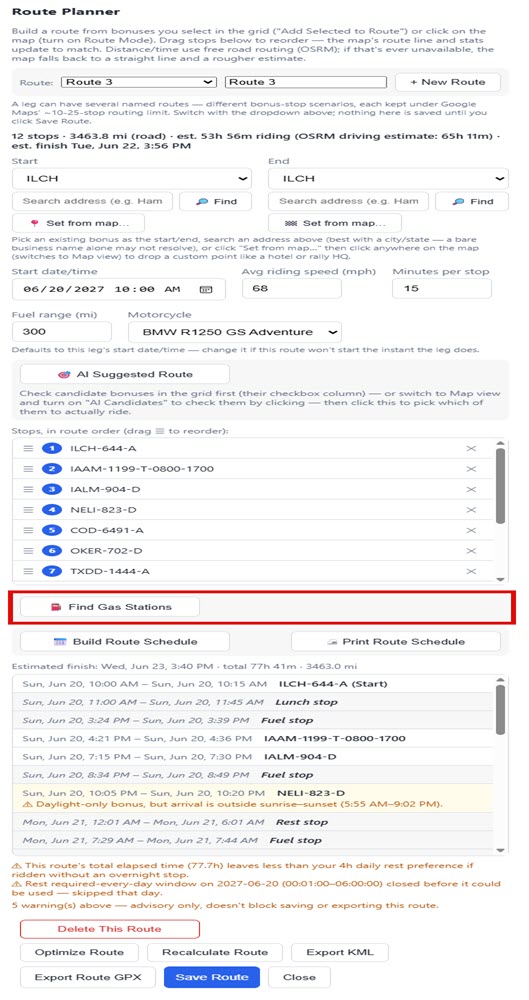


Clear Gas Stops removes the suggested stops from the map. This is a planning aid only — nothing here is saved with the route or included in GPX/KML exports, and it resets automatically whenever the route's stops change.
Point color ranges
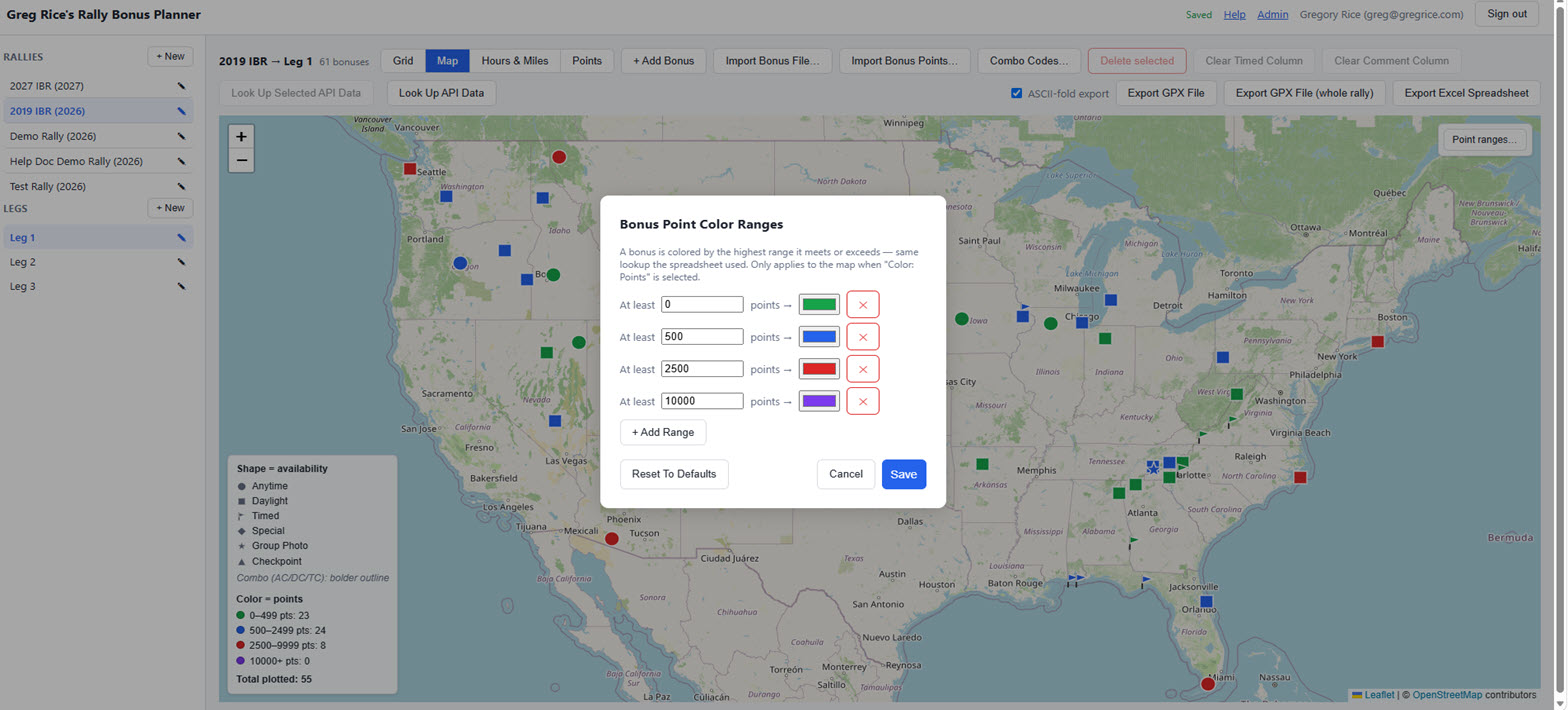
Click Point ranges… (top-right of the map) to customize the point thresholds and colors used on the map. A bonus is colored by the highest range it meets or exceeds. Add, remove, or reset ranges to defaults at any time — this only affects the map's coloring, not scoring.
Weather forecasts
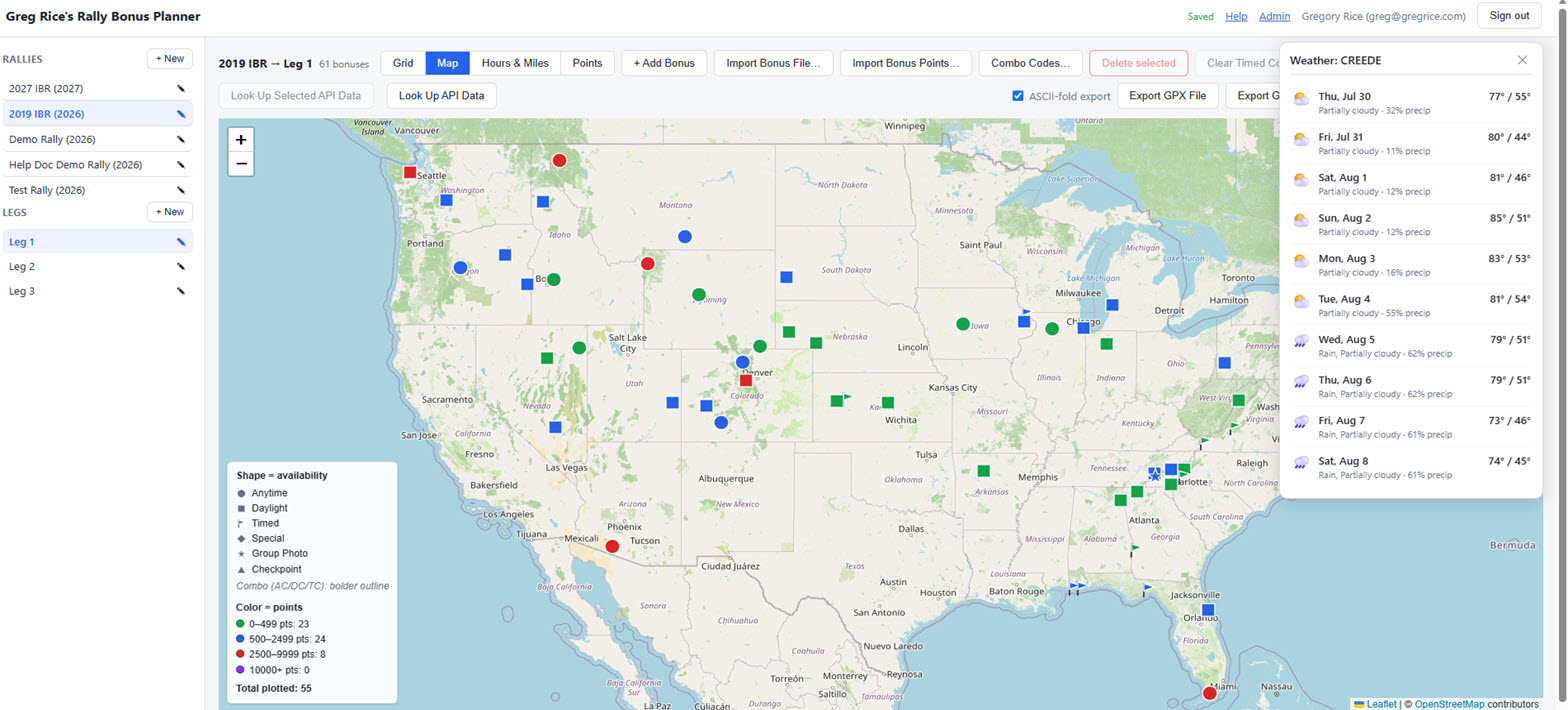
From a marker's popup, click 10-day weather to open a forecast panel for that bonus's location — daily highs/lows, conditions, and precipitation chance.
Weather radar overlay
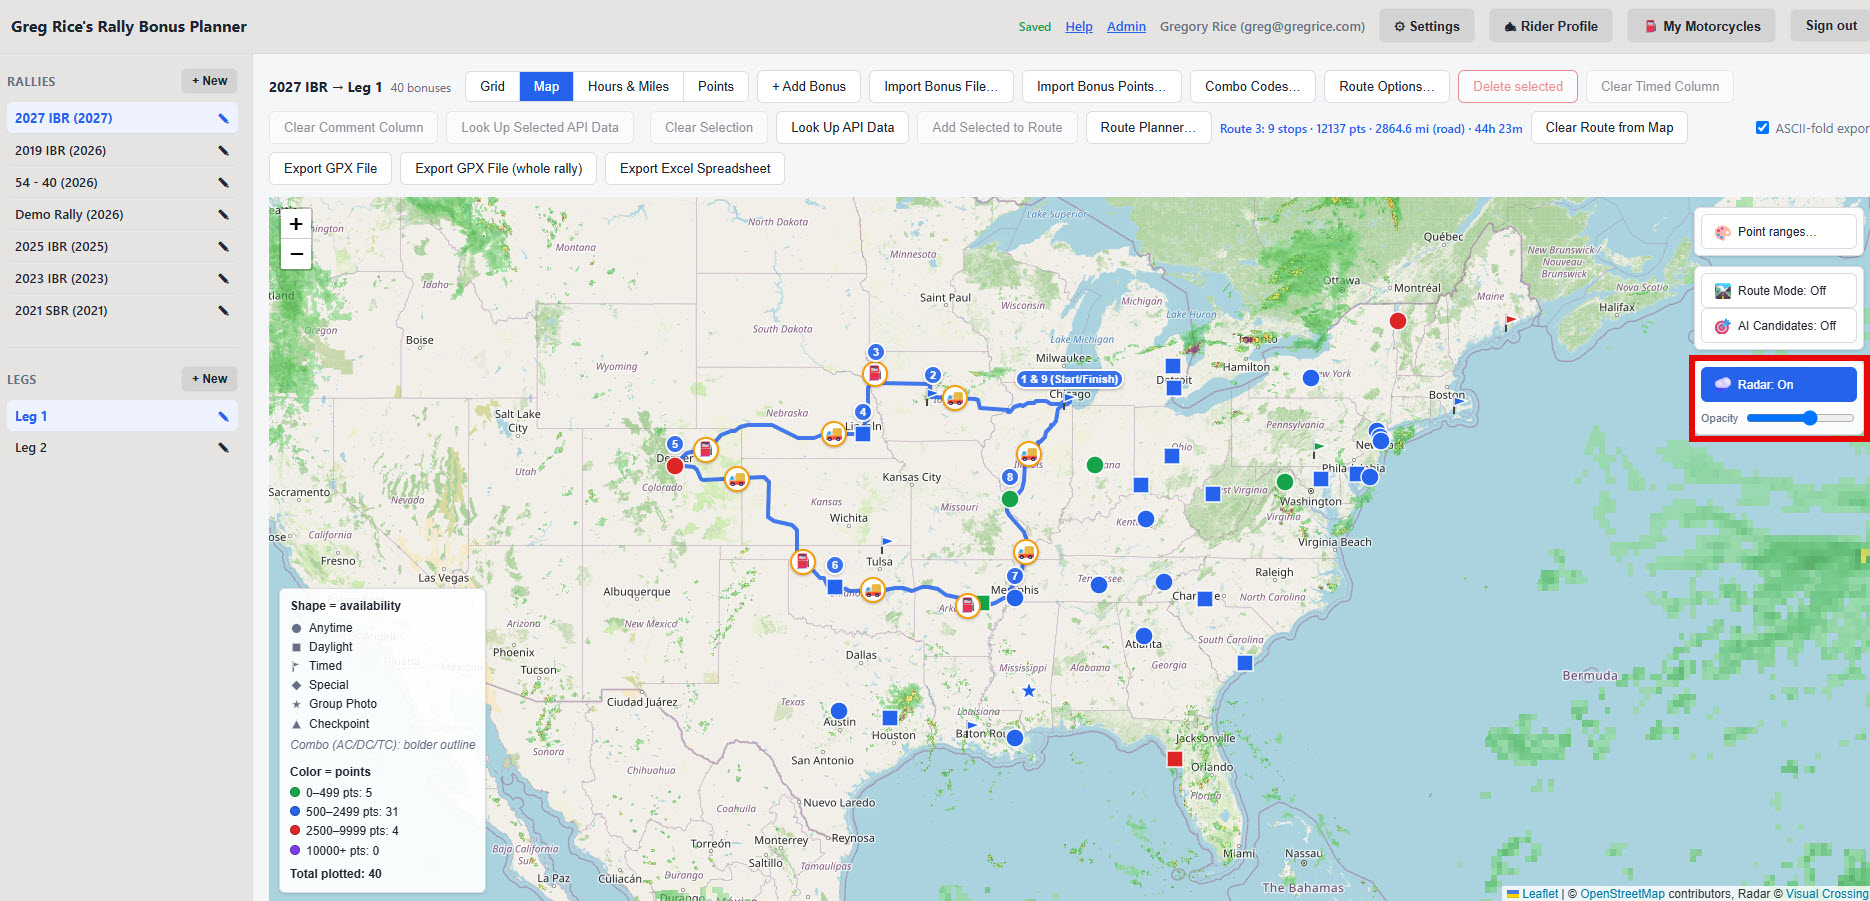
Click Radar: Off (top-right of the map) to switch on a live precipitation radar overlay across the whole map — useful for spotting weather along a route at a glance instead of checking each bonus's forecast individually. Click it again (now labeled Radar: On) to turn it off. The slider next to the button controls the overlay's opacity, so you can fade it back enough to still see bonus markers and the route line underneath instead of letting it cover them completely.
Admin portal
Admin accounts see an Admin link in the header. The admin portal lists every rider with their status, role, when they were created, when they were last active, and how many live lookups they've used (broken out by timezone/geocode/weather, hits vs. misses — misses are what actually cost against the API quota).
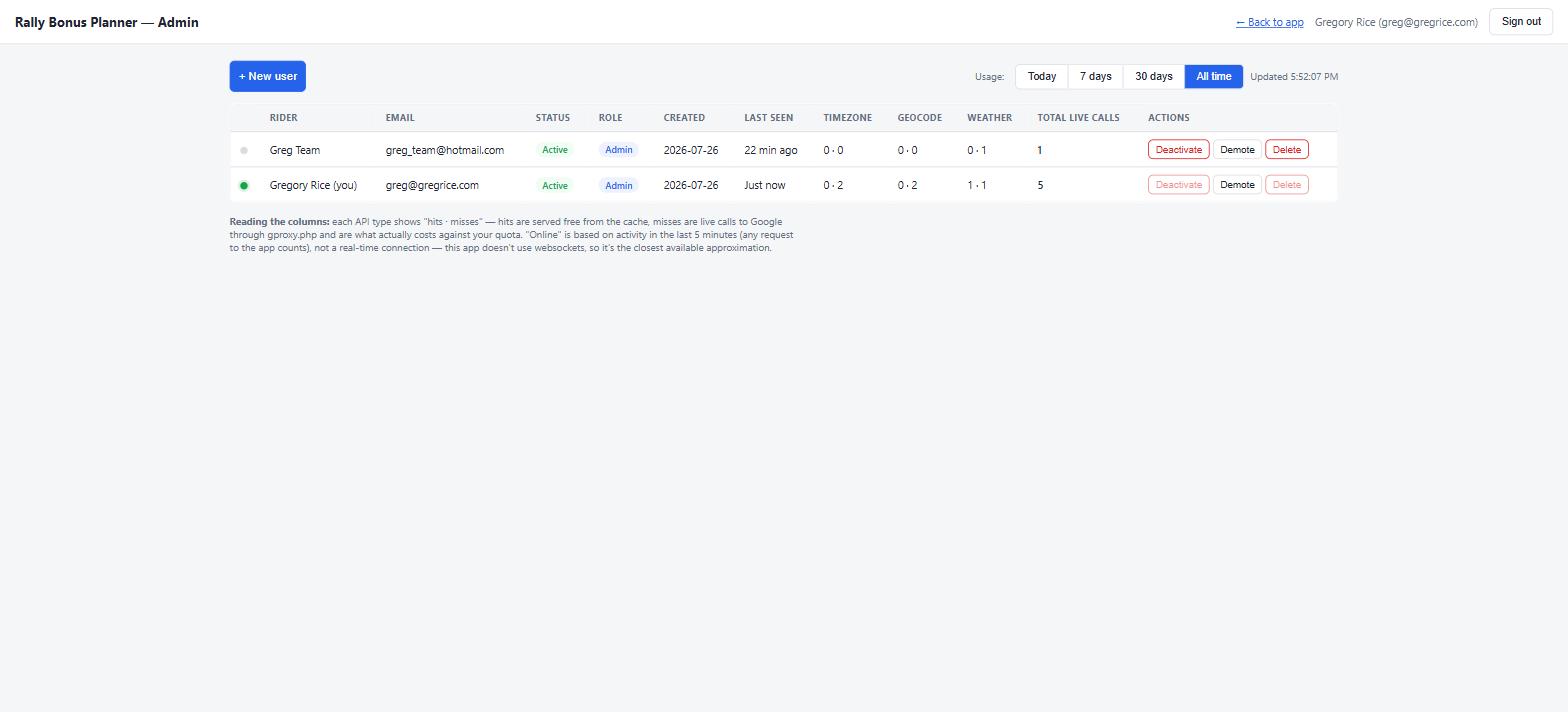
Adding a user
Click + New user, fill in their email, display name, and a temporary password (minimum 8 characters), then Create user. Share the temporary password with them directly — there's no email invite flow, so they should sign in and can change it via Forgot password? if you'd rather not hand off your own choice.
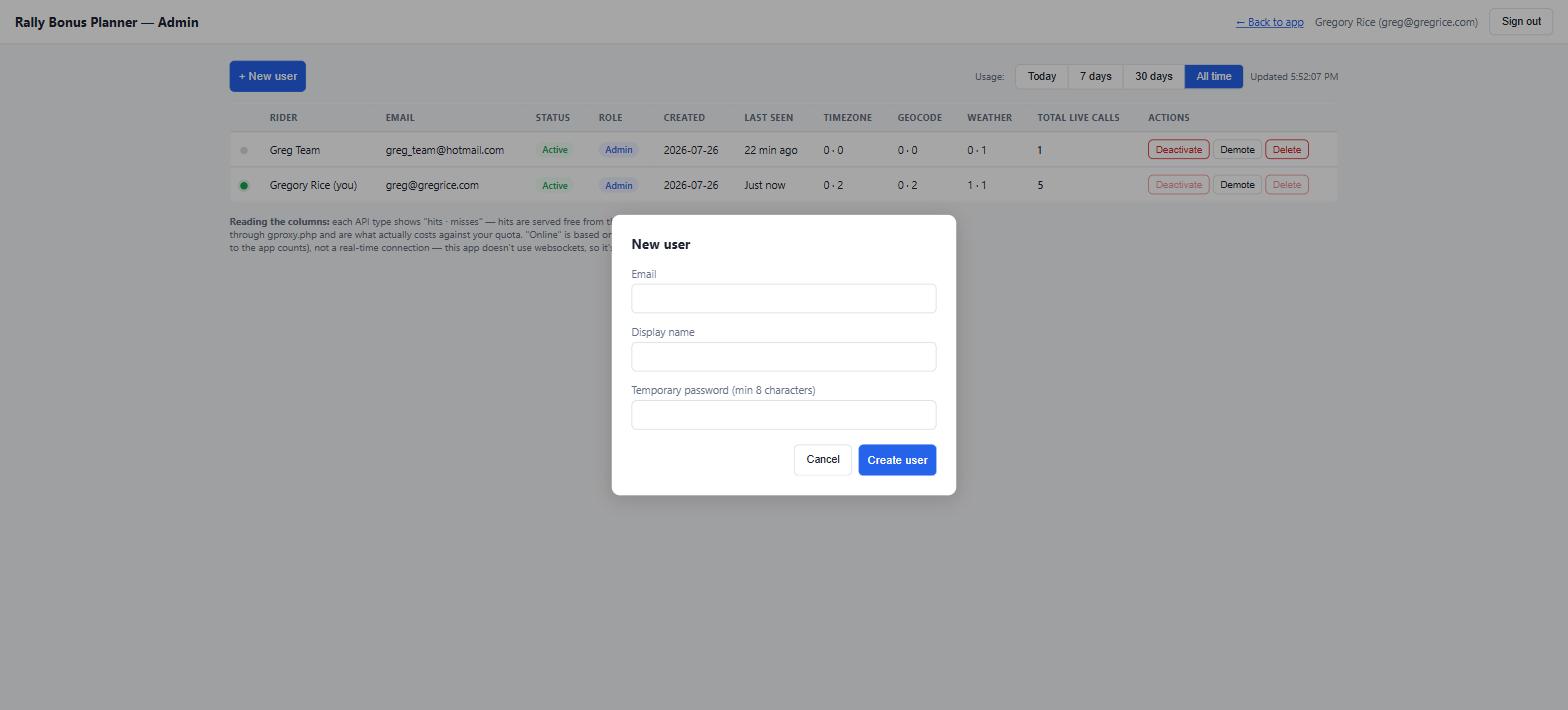
Each row's Actions column lets you deactivate, promote/demote, or delete a rider. Deactivating blocks sign-in without deleting their data.
Lookup access
The Lookup access column controls whether a rider can use the lookup buttons at all — separately for address/timezone lookups and for weather forecasts. New riders start with both switched on; click Disable next to either one if you want to withhold it from a specific rider, or Enable to turn it back on. Admin accounts always have full access and show an "Admin: full access" badge here instead of the toggle buttons.